Einleitung
Wir zerlegen die Maus, um das Kabel durch ein brandneues zu ersetzen.
Was du brauchst
-
-
Es ist sehr typisch für dieses Kabel, dass es nach lang dauerndem Gebrauch ausfranst. Öffnen wir nun die Maus, um das Kabel zu ersetzen.
-
-
-
Heble die drei Füße ab, um an die Schrauben zu gelangen.
-
-
-
Finde das versteckte Schraubenloch hinter dem Logitech Aufkleber.
-
Stich durch den Aufkleber, um an die Schraube zu gelangen.
-
Entferne alle fünf Kreuzschlitzschrauben.
-
-
-
Wenn alle Schrauben entfernt sind, nimm den Oberteil der Maus vorsichtig vom restlichen Gehäuse ab.
-
-
-
-
Hebe den ZIF Kabelschutz mit einem Spudger ab.
-
Entferne das Kabel vom oberen Gehäuse. Das obere Gehäuse kann nun beiseite gelegt werden.
-
-
-
Entferne die drei Kreuzschlitzschrauben, um den Gewichtselementhalter zu lösen.
-
Hebe den Gewichtselementhalter von der Maus ab.
-
-
-
Drücke den Stift, der das Mausrad und Gehäuse sichert nach links.
-
Entferne das Mausrad und Gehäuse.
The springs go in the very front, on top of the transparent piece. It was hard for me to figure out the latest time around :)
-
-
-
Entferne die beide parallelen Schrauben, mit denen ein Stück schwarzes Plastik an der Maus befestigt ist.
-
-
-
Entferne die beiden Schrauben, die die Leiterplatte am Boden der Maus festhalten.
This screw is a bit tricky during reassembly. A magnetized screwdriver tip did the trick.
-
-
-
Entferne die letzten beiden Kreuzschlitzschrauben nahe bei der Oberseite, mit denen die Leiterplatte an der Platte befestigt ist.
Yes, the transparent piece goes between the boards and needs to be reinserted before the boards are secured to the black bottom case.
-
-
-
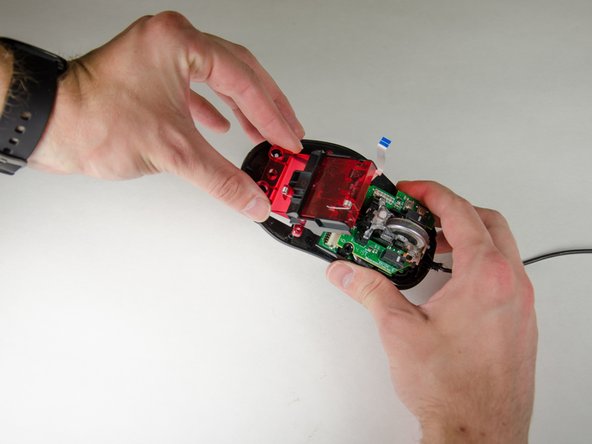
Ziehe die Leiterplatten von der Bodenplatte ab.
-
Es kann sein, dass du ein Spudger brauchst, um die Leiterplatte frei zu bekommen.
-
-
-
Hebel vorsichtig auf beiden Seiten des Maus-Steckers bis das Kabel gelöst ist.
-


Um dein Gerät zusammenzubauen, folge dieser Anleitung in umgekehrter Reihenfolge.
Um dein Gerät zusammenzubauen, folge dieser Anleitung in umgekehrter Reihenfolge.
Rückgängig: Ich habe diese Anleitung nicht absolviert.
30 weitere Personen haben diese Anleitung absolviert.
Besonderer Dank geht an diese Übersetzer:innen:
100%


Diese Übersetzer:innen helfen uns, die Welt zu reparieren! Wie kann ich mithelfen?
Hier starten ›

15 Kommentare
Thanks for the guide! Despite being super careful with the springs they managed to flick out when I was screwing the circuit board back in, one was never to be seen again. Thankfully the middle mouse button seems to work fine with just one!
Hi, Phillips #00 Screwdriver didn’t work for me after step8. P00 doesn’t loose those screws, Only its tip is touching to screws, the hole on the screw head is too shallow. Any suggestions?
Alternative tools:
Philips screwdriver, knife and flat screwdriver, magnetic screwdriver tip
You are awsome!
Inside my G500 there's an additional wire soldered between the main PCB and the one that holds the side buttons. It has enough length to allow for disassembly but I did have to take care not to pull on it.
What are the switch model used for the scroll wheel side click buttons (labeled SW7 and SW8) on the board? I want to get them replaced.
Is there a way to fix the cable instead of replacing it?
I used this guide to re-solder the clicker components. My mouse is back to life. Thank you so much!
I will leave a couple notes for who may have other problems like myself.
1. if you rip the zif cable, it’s a standard 10 pin ZIF (sometimes referred to as FLEX) cable, contacts on same side, width 0.5cm, length anything above 6cm will do, I got 10.
2. Clicker components are available on ebay or aliexpress with the model number D2FC-F-7N. Didn’t try dissecting other mouses, the feel just wouldn’t be the same.
Awsome tutorial! Thanks man.
merci beaucoup !!! very usefull !
It is a poor design. They should have put a rubber booth on the cable.
pbartkovjak - Antwort