Diese Version enthält möglicherweise inkorrekte Änderungen. Wechsle zur letzten geprüften Version.
Was du brauchst
-
KaufenIn diesem Schritt verwendetes Werkzeug:P5 Pentalobe Screwdriver Retina MacBook Pro and Air$5.99
-
Benutze einen P5 Pentalobe-Schraubendreher, um folgende zehn Schrauben zu entfernen, mit denen das untere Gehäuse befestigt ist:
-
Zwei 9 mm Schrauben
-
Acht 2,6 mm Schrauben
-
-
-
Löse das hintere Gehäuse vom Air, indem du mit den Fingerspitzen zwischen Display und Gehäuse gehst und es nach oben ziehst.
-
Entferne das hintere Gehäuse und lege es beiseite.
-
-
-
Ziehe die Plastiklasche, die am Stecker des Akkus hängt, in Richtung der vorderen Kante des MacBooks, um den Akku vom Logic Board zu trennen.
-
-
-
Entferne die folgenden fünf Schrauben, die den Akku am Gehäuse befestigen:
-
Drei 6,3 mm Torx T5 Schrauben
-
Zwei 2,4 mm Torx T5 Schrauben
-
-
-
Hebe den Akku von der Seite des Logic Boards aus an und entferne ihn vorsichtig aus dem Gehäuse.
-
Lade den Akku vollständig und lasse das MacBook danach für mindestens 2 Stunden weiter eingesteckt. Verwende jetzt das MacBook, bis es wegen geringem Akkustand von selbst in den Standby-Modus geht. Warte jetzt noch mindestens 5 Stunden, bevor du das MacBook wieder auf 100% auflädst.
-
Wenn nach dem Einbau des neuen Akkus Probleme auftreten, kann es helfen, den SMC zurückzusetzen.
-
-
-
Klappe den Sicherungsbügel am ZIF Anschluss des Flachbandkabels zum Trackpad mit der Spudgerspitze oder deinem Fingernagel hoch.
-
Ziehe das Flachbandkabel zum Trackpad gerade aus seinem Anschluss in Richtung der hinteren Kante des Air.
-
-
-
-
Hebe das Flachbandkabel zur Tastatur mit einer Hand an und klappe gleichzeitig den Sicherungsbügel am ZIF Anschluss des Tastaturkabels mit der Spudgerspitze oder deinem Fingernagel hoch.
-
Ziehe das Flachbandkabel zur Tastatur gerade aus seinem Anschluss heraus in Richtung der Vorderkante des Air.
-
-
-
Entferne folgende zwölf Kreuzschlitzschrauben:
-
Sechs 1,6 mm Schrauben, welche das Trackpad am oberen Gehäuse befestigen.
-
Sechs 1,6 mm Schrauben, welche die Halterungen des Trackpads am Trackpad befestigen.
-
Ein PH000 Kreuzschlitzschraubendreher sollte gehen, aber ein JIS000 funktioniert genauso gut.
-
-
-
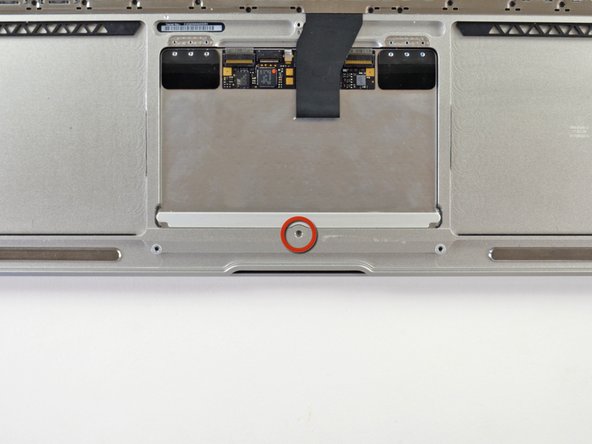
Entferne die 1,4 mm Torx T5 Stellschraube aus der vertieften Öffnung nahe der Vorderkante des oberen Gehäuses.
-
-
-
Hebe die Kante des Trackpads nahe der Tastatur vorsichtig mit dem flachen Ende des Spudgers aus ihrer Vertiefung im oberen Gehäuse, indem du sie aus den Halterungen, die am oberen Gehäuse angebracht sind, weghebst.
-
Entferne das Trackpad vom oberen Gehäuse.
-
-
Dieser Schritt ist noch nicht übersetzt. Hilf mit, ihn zu übersetzen!
-
This is the seat of the buffer.
-
You will find the rest of the rotten buffer here, which made your trackpad rattle
-
Peel it off and clean with some alcohol or similar untill you see the raw aluminium surface
-
-
Dieser Schritt ist noch nicht übersetzt. Hilf mit, ihn zu übersetzen!
-
Cut two tiny (approx. 1,5 x 4 mm) pieces of double sided adhesive tape and place them on the seat
-
the red colour comes form the protective film of Tesa 4965, which works perfectly for this job. But principally any double sided tape, which is not too thick should do
-
On the second photo you see the empty seat on the left and the prepared one on the right
-
-
Dieser Schritt ist noch nicht übersetzt. Hilf mit, ihn zu übersetzen!
-
Now cut a piece of foam material of the same size. My foam material is black, and therefore a bit hard to see
-
In this case an EPDM foam was used, which can be compressed with little force but has a high longevity
-
The material must be below one milimeter thick! depending on your source material you will have to cut all tree dimensions
-
This took me many tries…
-
-
Dieser Schritt ist noch nicht übersetzt. Hilf mit, ihn zu übersetzen!
-
Peel off the protective film of the double sided tape and position the foam parts on both sides.
-
It should look more or less like on the photos
-
-
Dieser Schritt ist noch nicht übersetzt. Hilf mit, ihn zu übersetzen!
-
Reinstall trackpad by following step 8 in reverse order but only tighten the 6 screws at the trackpad (orange) firmly and leave the 6 screws of the case (red) slightly loose
-
Open the MacBook to nearly 90° so that it stands stable on its display case.
-
Check the feel of the click. Does it go back gently into rest position? Has it enough stroke?
-
If not, you might have chosen to rigid or to thick material (or both)
-
You may also try to readjust the central screw which is marked in step 10 and which you hopefully did not unscrew!
-
-
Dieser Schritt ist noch nicht übersetzt. Hilf mit, ihn zu übersetzen!
-
Finally center the trackpad in the case. This can easily be done by positioning a lamp behind the vertically standing lower case.
-
Move the trackpad in order to have an equal gap all around it. Then tighten the remaining 6 screws firmly to fix your adjustment.
-
Reassemble the rest going back from Step 8 and you're done!
-


Rückgängig: Ich habe diese Anleitung nicht absolviert.
4 weitere Nutzer:innen haben diese Anleitung absolviert.
5 Kommentare
Hello, good tutorial. Today on my Macbook Air disarm the trackpad, since it was loose and it sounded when using it. The only solution and that was good for me, was to tighten the central screw, to the point that it remained firm and allowed the clicks.
Another thing, the brackets I found on ebay, the pair at $ 5.
Very good guide. I did this yesterday on my Macbook Air Early 2014 and it solved the problem but as @ifixitkit mentioned in Step 8, “Removing the bracket is completely unnecessary”.
Thank you for the guide. I do advise against removing the 6 Philips screws attaching the trackpad to its hinges as described in Step 8. They simply don’t have to be removed, unless you’re replacing the trackpad.
My 2013 11” Air’s trackpad had started rattling after a battery swap and the noise drove me positively nuts. The trackpad does feel as good as new now. I used a ~1mm thick double sided foam tape instead of EPDM, hoping that it’s robust enough to last.
Nice guide, my 5 year old machine had a loose trackpad that was making it difficult to register clicks and drags. All I had to do was step 10, not even remove the battery and the trackpad is as flush as new now 😊
Thank you so much! The trackpad of my MacBook Air 11'' early 2015 was ratteling because I changed the battery. I really couldn´t find out the problem. Than I found this guide and as mentioned I just had to adjust the screw in step 10 a little bit and now it is working perfectly again.