Einleitung
Rüste den Speicher deines MacBook auf!
Was du brauchst
-
-
Entferne die zehn Schrauben, die das obere und das untere Gehäuse zusammenhalten.
-
Drei 13,5 mm (14,1 mm) Kreuzschlitzschrauben.
-
Sieben 3 mm Kreuzschlitzschrauben.
-
-
-
Hebe das Gehäuseunterteil nahe beim Lüfter mit beiden Händen an und löse es so von den beiden Clips, die es mit dem Gehäuseoberteil verbinden.
-
Entferne das Gehäuseunterteil und lege es zur Seite.
-
-
-
Benutze die Kante eines Spudgers, um den Akkustecker nach oben aus seinem Anschluss zu hebeln.
-
-
-
-
Biege das Akkukabel leicht von seinem Anschluss auf dem Logic Board weg, damit es sich nicht versehentlich wieder selbst verbindet, während du arbeitest.
-
-
-
Die Halterung der Festplatte ist mit zwei Kreuzschlitzschrauben am oberen Gehäuse befestigt. Drehe sie heraus.
-
-
-
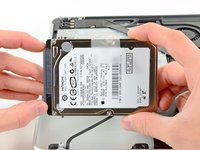
Hebe die Festplatte mit der Zuglasche an und entferne sie aus ihrem Sitz. Achte dabei auf das Kabel, mit dem sie noch mit dem Computer verbunden ist.
-
-
-
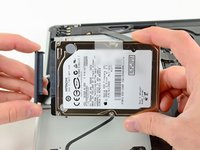
Entferne das Festplattenkabel, indem du seinen Verbinder direkt von der Festplatte abziehst.
-
-
-
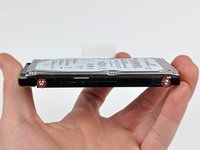
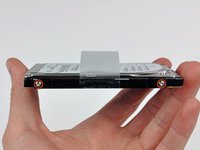
Entferne beide T6 Torx Schrauben an jeder Seite der Festplatte (insgesamt 4 Schrauben).
-
Optional kann die Zuglasche an der neuen Festplatte befestigt werden.
-


Um dein Gerät wieder zusammenzusetzen, folge den Schritten in umgekehrter Reihenfolge.
Um dein Gerät wieder zusammenzusetzen, folge den Schritten in umgekehrter Reihenfolge.
Rückgängig: Ich habe diese Anleitung nicht absolviert.
293 weitere Personen haben diese Anleitung absolviert.
Besonderer Dank geht an diese Übersetzer:innen:
100%


Diese Übersetzer:innen helfen uns, die Welt zu reparieren! Wie kann ich mithelfen?
Hier starten ›

18 Kommentare
Thanks yet again, iFixit! I am not an expert by any stretch of the imagination, but your clear, explicit directions always make me feel like one.
The repair proved even easier than the "moderate" difficulty rating would suggest. The entire process took me about ten minutes—far less time than it would take to even drive to a repair depot or Genius Bar.
Also: I was unable to locally source a spudger or T6 Torx screwdriver, and couldn't afford to wait. No problemo! I was able to easily disconnect the MacBook battery using my fingernails. Also, because the Torx screws protrude slightly, I was able to unscrew them (and screw them into the new drive) using needle-nose pliers.
My new drive is now formatted and being restored using a Time Machine backup.
Very easy if you have a basic understanding of how a computer is put together. Took me about five minutes, honestly. The hardest part was getting a screwdriver that was small enough. The key is to go slow and BE CAREFUL. If you're going to disconnect the battery connector, DON'T PRY IT WITH ANYTHING METAL. That should be common sense, but it probably isn't. Also, take note that the ribbon cable that is attached to the SATA connector is very delicate. Again, be careful and you should be good.
Great guide. Everything was exactly as stated. However, not my HD sits loose in the case. It shifts and clunks every time I pick it up. Did I miss something or should I just open it up and use duct tape.
I had the same issue. You probably forgot to take the torx screws off the old drive and put them on the new drive. See Step 9 for details. I glossed over this, it was easy to miss, but it's definitely in the steps above and probably the cause of your issue.
REALLY straightforward :)
Have a plate or other clean, plain surface - as you unscrew them just lay out the scerws in their physical order and positions on the plate.
I DIDN'T disconnect the battery, but was VERY careful not to touch ANYTHING other than the disk - I guess that's feasibly where an accident might happen.
Go slow, keep touching a metal radiator or similar to ensure there is no static build up, and... DONE! Thanks iFixit :)