Zum Hauptinhalt wechseln

Master and Dynamic MW50 Charging Port Replacement

Was du brauchst

  1. Master and Dynamic MW50 Charging Port Replacement, Master and Dynamic MW50 Disassembly: Schritt 1, Bild 1 von 3 Master and Dynamic MW50 Charging Port Replacement, Master and Dynamic MW50 Disassembly: Schritt 1, Bild 2 von 3 Master and Dynamic MW50 Charging Port Replacement, Master and Dynamic MW50 Disassembly: Schritt 1, Bild 3 von 3
    • Pull the cushion off of the desired side by gripping the top of the headphones and pulling the cushion off.

  2. Master and Dynamic MW50 Charging Port Replacement: Schritt 2, Bild 1 von 1
    • Remove the four 5mm screws from the earpiece with a Y1 Triwing screwdriver.

  3. Master and Dynamic MW50 Charging Port Replacement: Schritt 3, Bild 1 von 1
    • Use the Jimmy to lift up the black cover to get inside the device.

  4. Master and Dynamic MW50 Charging Port Replacement, Charging Port: Schritt 4, Bild 1 von 2 Master and Dynamic MW50 Charging Port Replacement, Charging Port: Schritt 4, Bild 2 von 2
    • Remove the two 2mm screws pictured with a JIS #00 screwdriver.

    • Gently pull the silver cover off of the ear piece.

  5. Master and Dynamic MW50 Charging Port Replacement: Schritt 5, Bild 1 von 1
    • Remove the two 2mm screws shown with a JIS #00 screwdriver.

  6. Master and Dynamic MW50 Charging Port Replacement: Schritt 6, Bild 1 von 1
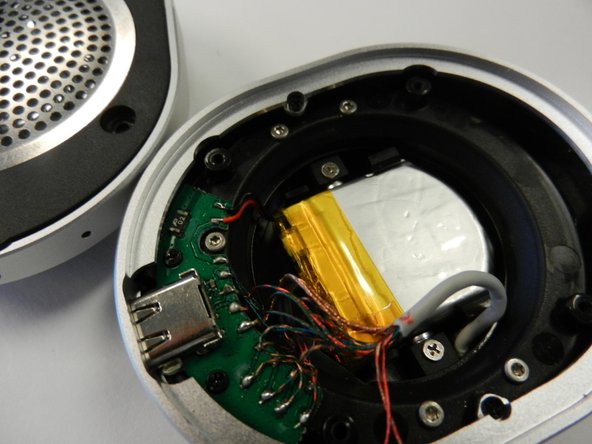
    • Lift up the mother board with the attached charging port to see the soldering points. You must desolder these points in order to detach (and re-attach) the charging port.

Abschluss

To reassemble your device, follow these instructions in reverse order.

Tyler Guffey

Mitglied seit: 01/24/19

208 Reputation

2 Anleitungen geschrieben

Team

Cal Poly, Team S1-G4, White Winter 2019 Mitglied von Cal Poly, Team S1-G4, White Winter 2019

CPSU-WHITE-W19S1G4

4 Mitglieder

12 Anleitungen geschrieben

0 Kommentare

Kommentar hinzufügen

Seitenaufrufe:

Letzte 24 Stunden: 0

Letzte 7 Tage: 4

Letzte 30 Tage: 13

Insgesamt: 310