Einleitung
If your Nest Hello is not delivering clear audio, then the microphone may need to be replaced. Before following these step make sure that the microphone is not blocked by debris and doublecheck your settings in the Nest App. To reach the microphone on this device, you will need the iFixit, opening picks, Phillips #000 screwdriver, and tweezers. The Microphone on this device is integrated into the plastic housing beneath the face plate, so replacement of that complete piece is required. During disassembly it is also easy to damage the waterproofing O-Ring, so plan on replacing that as well.
Was du brauchst
-
-
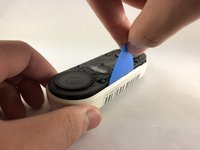
Insert the pick between the black faceplate and white casing of the Nest Hello.
-
Pry the faceplate away from the device with the opening pick.
-
Completely remove the faceplate from the device, do not be afraid to pull hard.
-
-
-
Peel back the cover stickers and use the Phillips #000 screwdriver to remove the four screws.
-
-
-
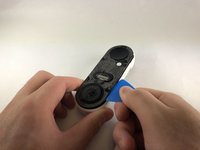
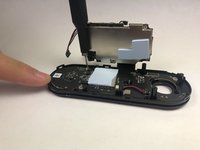
Insert opening pick between the white casing and the black internal circuitry and pry it out.
I ended up doing the headlight lens restoration method - I scraped away any plastic that was flaking off and then I used progressively finer sandpaper (start with 400-600 grit and go up from there). I finished it with rubbing compound and polish. Looks decent.
Also - be careful not to cut or displace the rubber gasket that runs around the outside of the main body that has the circuitry - you'll risk losing the waterproofing
What is the replacement battery type please?
BUSFUIVA Replacement Battery for Nest 1ICP7/17/26, Hello, NC5100US, C1241290, Vido Doorbell Wired. 3.7V 280MAH https://a.co/d/38BD8qY
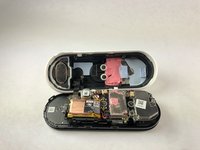
The top end has some kind of mild adhesive (the blue stuff). The bottom end came out more easily for me, and then I ended up bending my board slightly by trying to pry out the top end. May be better to start on the top end if you can get something under the edge of the board to get leverage.
The black ribbon cable was instantly sheared in half the moment I got the two halves apart, which took more force than I was hoping to need. Turns out the ribbon cable is attached to a sharp metal piece and it will easily tear through it. No longer worth it to replace the battery for me, sadly.
What a stupid design by Nest. If they know that battery will fail they should at least make it user accessible when removed from mount. Replaced mine. It’s a pain getting to the battery and it’s easy to crack the faceplate when prying it off. Also the plastic tools included with kit will fail before you’re into the device.
If you can manage to get to the battery without destroying the Nest Doorbell it’s worth it to get a few more years of use.
-
-
-
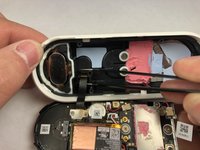
Use the Phillips #000 to remove the two screws holding the ribbon cable to the white casing.
-
-
-
In diesem Schritt verwendetes Werkzeug:Tweezers$4.99
-
Grip the connector with the tweezers as shown and pull it away from the casing.
-
-
-
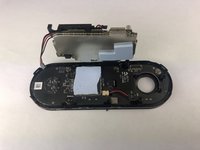
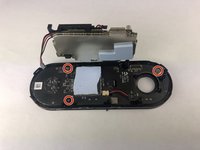
Remove the six smaller screws shown with the Phillips #000 screwdriver.
-
Remove the three larger screws shown with the Phillips #000 screwdriver.
-
-
-
Holding the device as shown push the circuit board away from you and up to free it from the clips.
-
-
-
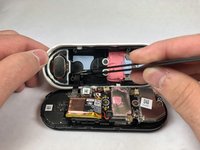
Use the Phillips #000 screwdriver to remove the three screws holding the last circuit board to the black plastic housing.
-
-
-
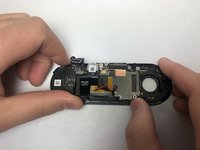
Insert the pick underneath the black connectors and pry them upward to disconnect them from the circuit board.
-
Work your way around the device, prying the circuit board away from the housing.
-


To reassemble your device, follow these instructions in reverse order.
To reassemble your device, follow these instructions in reverse order.
Rückgängig: Ich habe diese Anleitung nicht absolviert.
Eine weitere Person hat diese Anleitung absolviert.

Team

Embry-Riddle Aeronautical University, Team S1-G7, Cromer Twal Spring 2020 Mitglied von Embry-Riddle Aeronautical University, Team S1-G7, Cromer Twal Spring 2020
ERAU-CROMER TWAL-S20S1G7
4 Mitglieder
27 Anleitungen geschrieben
I had to use a metal spudger tool to start and then used guitar picks.
Joel Lundi - Antwort
Be afraid to pull hard. The faceplate will break in two.
B Bremer - Antwort
I did the JerryRigEverything method and slipped a razor under the faceplate to separate it carefully from the body. Worked perfectly and nothing was damaged
There I Fixed It - Antwort
Be careful with the wiring and the heater element. I must have shorted something together when it put it back together and now it will no longer power up. It is probably best to cut the wires to the heater and deal with the consequences in the cold temperatures.
Joe I. Fabritz - Antwort
The secret I think is slicing through the adhesive. I shoved multiple picks in and worked my way around. You want to cut the adhesive. Prying is likely to break the faceplate. The big hint is the next picture in the step, seeing where the adhesive is.
Arnold de Leon - Antwort