Diese Version enthält möglicherweise inkorrekte Änderungen. Wechsle zur letzten geprüften Version.
Was du brauchst
-
-
Der Akkufachdeckel ist mit zwei Kreuzschlitzschrauben am Game Boy befestigt. Drehe sie heraus.
-
Hebe den Akkufachdeckel ab.
-
-
Dieser Schritt ist noch nicht übersetzt. Hilf mit, ihn zu übersetzen!
-
Use a push pin to remove the four plastic screw covers on the front bezel.
-
-
Dieser Schritt ist noch nicht übersetzt. Hilf mit, ihn zu übersetzen!
-
Remove four Phillips screws securing the front bezel to the rear bezel.
-
-
Dieser Schritt ist noch nicht übersetzt. Hilf mit, ihn zu übersetzen!
-
Using two hands, gently slide the rear bezel upwards.
-
-
-
Dieser Schritt ist noch nicht übersetzt. Hilf mit, ihn zu übersetzen!
-
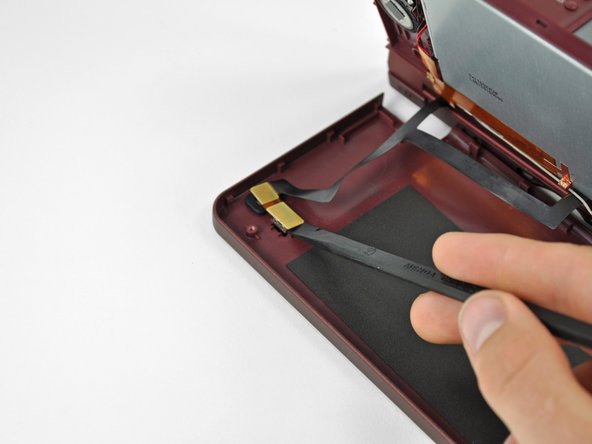
Insert a spudger into the gap between the front and rear bezel
-
Rotate the spudger away from the DSi XL, prying the two bezels apart.
-
-
Dieser Schritt ist noch nicht übersetzt. Hilf mit, ihn zu übersetzen!
-
In the same manner as described above, continue prying along the top edge of the front and rear bezels.
-
-
Dieser Schritt ist noch nicht übersetzt. Hilf mit, ihn zu übersetzen!
-
Separate the rear bezel from the front bezel.
-
-
Dieser Schritt ist noch nicht übersetzt. Hilf mit, ihn zu übersetzen!
-
Use the flat end of a spudger to pry the rear camera off the rear bezel.
-
Remove the rear bezel.
-
-
Dieser Schritt ist noch nicht übersetzt. Hilf mit, ihn zu übersetzen!
-
Use a spudger to lift the antenna from the front bezel to make room for lifting the speaker cables up.
-
-
Dieser Schritt ist noch nicht übersetzt. Hilf mit, ihn zu übersetzen!
-
Use a spudger to lift the right speaker from its housing in the front bezel.
-
-
Dieser Schritt ist noch nicht übersetzt. Hilf mit, ihn zu übersetzen!
-
Use a spudger to lift the left speaker from its housing in the front bezel.
-
-
Dieser Schritt ist noch nicht übersetzt. Hilf mit, ihn zu übersetzen!
-
De-route the left speaker cable along the top edge of the upper LCD.
-
-
Dieser Schritt ist noch nicht übersetzt. Hilf mit, ihn zu übersetzen!
-
Open the display slightly, and lift the LCD out of the front bezel.
-
Lay the LCD down next to the DSi XL.
-
-
Dieser Schritt ist noch nicht übersetzt. Hilf mit, ihn zu übersetzen!
-
Desolder the two solder joints to separate the speakers from the LCD.
-
Right Speaker
-
Left Speaker
-


Rückgängig: Ich habe diese Anleitung nicht absolviert.
3 weitere Nutzer:innen haben diese Anleitung absolviert.

3 Kommentare
In my case, it turned out there was nothing wrong with my speaker… one of the wires that feeds around the screen was bad.
is there anyway of adding two more speaker?