Diese Version enthält möglicherweise inkorrekte Änderungen. Wechsle zur letzten geprüften Version.
Was du brauchst
-
Dieser Schritt ist noch nicht übersetzt. Hilf mit, ihn zu übersetzen!
-
Remove the two 7 mm screws on the top of the device using a J00 Phillips screwdriver, turning them counterclockwise.
-
-
Dieser Schritt ist noch nicht übersetzt. Hilf mit, ihn zu übersetzen!
-
Pry the seam between the screen and the case on all four sides with a large plastic opening tool until the plastic case comes off.
-
Lift the device off of the case and flip over the device so that it sits screen side down.
-
The device is now free from the plastic casing.
-
-
-
Dieser Schritt ist noch nicht übersetzt. Hilf mit, ihn zu übersetzen!
-
Wedge a plastic card beneath the battery unit.
-
Wiggle the card side to side and up and down gently until the glue sealing the battery to the device is broken.
-
-
Dieser Schritt ist noch nicht übersetzt. Hilf mit, ihn zu übersetzen!
-
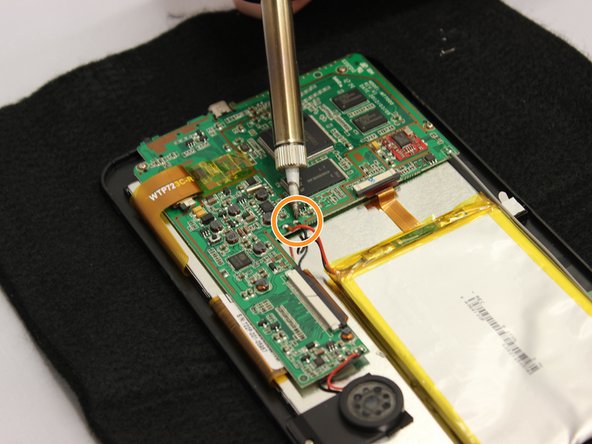
Set the device on a heat safe surface.
-
Desolder from the motherboard the red wire that connects to the battery unit.
-
Desolder from the motherboard the black wire that connects to the battery unit.
-
Lift the battery out of the device using your hands.
-
The battery is now free from the device.
-


Rückgängig: Ich habe diese Anleitung nicht absolviert.
4 weitere Nutzer:innen haben diese Anleitung absolviert.
Team

Eastern Washington University, Team 2-2, Plummer Fall 2015 Mitglied von Eastern Washington University, Team 2-2, Plummer Fall 2015
EWU-PLUMMER-F15S2G2
4 Mitglieder
6 Anleitungen geschrieben
Ein Kommentar
This tablet has the exact same setup as the 2011-2012 nextbook part might be interchangeable with this tablet .