Diese Version enthält möglicherweise inkorrekte Änderungen. Wechsle zur letzten geprüften Version.
Was du brauchst
-
Dieser Schritt ist noch nicht übersetzt. Hilf mit, ihn zu übersetzen!
-
Turn the keyboard locking screw so that it is parallel to the space bar.
-
Pull the keyboard release tabs toward you and lift up on the keyboard until it pops free.
-
Lift the keyboard out by pulling it up and away from you. Rest the keyboard, face down, on top of the track pad.
-
-
Dieser Schritt ist noch nicht übersetzt. Hilf mit, ihn zu übersetzen!
-
Pull the keyboard ribbon straight up from the logic board. Place the keyboard aside.
-
-
Dieser Schritt ist noch nicht übersetzt. Hilf mit, ihn zu übersetzen!
-
Your laptop should look approximately like this.
-
-
Dieser Schritt ist noch nicht übersetzt. Hilf mit, ihn zu übersetzen!
-
Remove the two silver Phillips #1 screws that attach the heat shield to the internal metal framework.
-
Lift the heat shield up and pull it toward you.
-
-
Dieser Schritt ist noch nicht übersetzt. Hilf mit, ihn zu übersetzen!
-
Your laptop should look approximately like this.
-
-
-
Dieser Schritt ist noch nicht übersetzt. Hilf mit, ihn zu übersetzen!
-
Firmly grasp the plastic tab attached to the Airport card and pull up and then to the right.
-
-
Dieser Schritt ist noch nicht übersetzt. Hilf mit, ihn zu übersetzen!
-
Disconnect the antenna cable from the Airport card.
-
-
Dieser Schritt ist noch nicht übersetzt. Hilf mit, ihn zu übersetzen!
-
Remove the long silver Phillips #1 screw from the heat sink.
-
Remove the two T8 Torx screws that attach the heat sink to the processor.
-
-
Dieser Schritt ist noch nicht übersetzt. Hilf mit, ihn zu übersetzen!
-
Lift the heat sink up from the left side and pull it out.
-
-
Dieser Schritt ist noch nicht übersetzt. Hilf mit, ihn zu übersetzen!
-
Grasp the plastic tab on the processor's right side and pull it directly up.
-
-
Dieser Schritt ist noch nicht übersetzt. Hilf mit, ihn zu übersetzen!
-
Your laptop should look approximately like this.
-
-
Dieser Schritt ist noch nicht übersetzt. Hilf mit, ihn zu übersetzen!
-
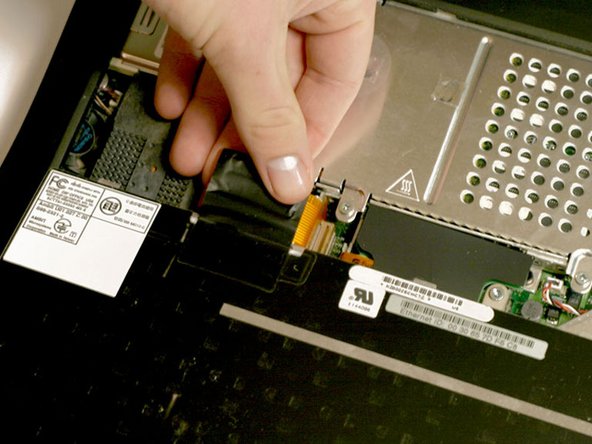
Grasp the orange cable at the left end of the hard drive and disconnect it from the logic board.
-
-
Dieser Schritt ist noch nicht übersetzt. Hilf mit, ihn zu übersetzen!
-
Grasp the plastic tab and pull the hard drive up and to the left, making sure that the metal bracket doesn't catch on the black plastic casing.
-
-
Dieser Schritt ist noch nicht übersetzt. Hilf mit, ihn zu übersetzen!
-
Your laptop should look approximately like this.
-


Rückgängig: Ich habe diese Anleitung nicht absolviert.
4 weitere Nutzer:innen haben diese Anleitung absolviert.
