Einleitung
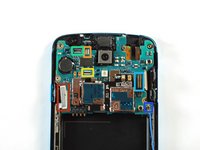
Use this guide to replace a defective motherboard in your Samsung Galaxy S4 Active.
Was du brauchst
-
-
Pry with a plastic opening tool, or your fingernail, in the divot to the left of the rear-facing camera, near the power button.
-
Lift the rear case by the corner nearest the divot and remove it from the phone.
-
-
-
Use a plastic opening tool, or your fingernail, to press the microSD card slightly deeper into its slot until you hear a click.
-
After the click, release the card and it will pop out of its slot.
-
Remove the microSD card.
-
-
-
Insert a plastic opening tool, or your finger, into the notch of the battery compartment and lift the battery upward to remove it.
-
-
-
-
Use a plastic opening tool, or your fingernail, to press the SIM card slightly deeper into its slot until you hear a click.
-
After the click, release the card and it will pop out of its slot.
-
Remove the SIM card.
-
-
-
Use the tip of a spudger to remove the four metallic pads located in each corner of the device.
-
Using a Phillips #00 screwdriver, remove the 12 screws connecting the midframe to the device.
-
-
-
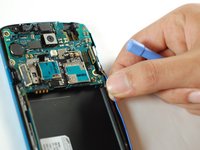
Use the plastic opening tool to pry around the entire edge of the midframe now to release it from the front case.
-
-
-
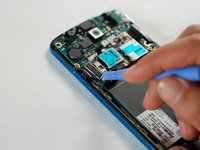
Use the flat end of a plastic opening tool to disconnect the USB board connector.
-
Disconnect the front-facing camera cable connector.
-
Disconnect the earpiece speaker assembly cable connector.
-
Disconnect the headphone jack assembly cable connector.
-
Disconnect the display/digitizer cable connector.
-
Disconnect the antenna cable connector.
-


To reassemble your device, follow these instructions in reverse order.
To reassemble your device, follow these instructions in reverse order.
Rückgängig: Ich habe diese Anleitung nicht absolviert.
22 weitere Personen haben diese Anleitung absolviert.

4 Kommentare
Kiitos paljon
I need a diagnosis. My device seems to be in a boot loop....any thought and suggestions would be helpful.
Nota1000 fera + parabéns
After the replacement of the motherboard, is there a procedure to Programm the old IMEI or will it imply a new IMEI?