Zum Hauptinhalt wechseln

Diese Version enthält möglicherweise inkorrekte Änderungen. Wechsle zur letzten geprüften Version.

Was du brauchst

  1. , Hinteres Gehäuse: Schritt 1, Bild 1 von 2 , Hinteres Gehäuse: Schritt 1, Bild 2 von 2
    • Heble mit einem Plastic Opening Tool, oder deinem Fingernagel, in die Kerbe links von den Rückkamera, bei dem Power Button.

  2. : Schritt 2, Bild 1 von 3 : Schritt 2, Bild 2 von 3 : Schritt 2, Bild 3 von 3
    • Hebe das hintere Gehäuse an der Ecke, die der Kerbe am nächsten ist, an und entferne es von dem Gerät.

  3. , MicroSD Karte: Schritt 3, Bild 1 von 3 , MicroSD Karte: Schritt 3, Bild 2 von 3 , MicroSD Karte: Schritt 3, Bild 3 von 3
    • Drücke die microSD Karte mit dem Fingernagel etwas tiefer in ihren Slot, bis du ein Klick hörst.

    • Lasse die Karte nach dem Klicken los. Daraufhin ploppt sie aus dem Slot.

    • Entferne die microSD Karte.

    • Beim Wiederzusammenbau drücke die microSD Karte in den Slot, bis sie wieder einrastet.

  4. , Akku: Schritt 4, Bild 1 von 3 , Akku: Schritt 4, Bild 2 von 3 , Akku: Schritt 4, Bild 3 von 3
    • Führe ein Plastic Opening Tool, oder deine Finger, in die Kerbe am Akkufach und hebe den Akku nach oben.

    • Entferne den Akku von deinem Samsung Phone.

  5. , SIM Karte: Schritt 5, Bild 1 von 3 , SIM Karte: Schritt 5, Bild 2 von 3 , SIM Karte: Schritt 5, Bild 3 von 3
    • Drücke die SIM Karte mit einem Plastic Opening Tool oder dem Fingernagel etwas tiefer in ihren Slot, bis du ein Klick hörst.

    • Lasse die Karte nach dem Klicken los. Daraufhin ploppt sie aus dem Slot.

    • Entferne die SIM Karte.

    • Beim Wiederzusammenbau drücke die SIM Karte in den Slot, bis sie wieder einrastet.

  6. , Mittelrahmen: Schritt 6, Bild 1 von 1
    • Entferne die neun 4,0 Kreuzschlitzschrauben, mit denen der Mittelrahmen an der Display Einheit befestigt ist.

  7. : Schritt 7, Bild 1 von 2 : Schritt 7, Bild 2 von 2
    • Der Mittelrahmen ist mit mehreren Kunststoff-Clips hinter der Chromeinfassung des Mittelrahmens an der Display Einheit befestigt.

    • Starte auf der Seite, wo sich der Lautsprecherregler befindet. Führe dein Plastic Opening Tool zwischen die Chromeinfassung um das Displayglas und das größere Chromrandteil.

    • Fahre mit dem Opening Tool an der Spalte entlang und trenne dabei die Kunststoff-Clips.

    • Sei sei vorsichtig beim Hebeln und heble gerade stark genug, um die Kunststoff-Clips zu trennen—in der Einfassung des Mittelrahmens gibt es einige dünne Punkte, die brechen können, wenn du sie zu stark biegst.

  8. : Schritt 8, Bild 1 von 2 : Schritt 8, Bild 2 von 2
    • Heble weiter um die Ecke des Mobiltelefons herum.

    • Fahre mit deinem Opening Tool an der Spalte zwischen dem Mittelrahmen und dem Display entlang des unteren Teil des Gerätes und löse dabei die dortigen Kunststoff-Clips.

  9. : Schritt 9, Bild 1 von 2 : Schritt 9, Bild 2 von 2
    • Heble weiter um die Ecke herum in Richtung der Power Button Seite.

    • Fahre mit dem Opening Tool an der Spalte entlang.

  10. : Schritt 10, Bild 1 von 2 : Schritt 10, Bild 2 von 2
    • Fahre mit dem Plastic Opening Tool entlang der Oberseite des Mobiltelefons und löse die letzten Clips. So lässt sich der Mittelrahmen von der Display Einheit lösen.

    • Nun kannst du mit deinem Plastic Opening Tool noch einmal um das Gerät herumfahren, um sicherzugehen, dass alle Kunststoff-Clips gelöst sind.

  11. : Schritt 11, Bild 1 von 3 : Schritt 11, Bild 2 von 3 : Schritt 11, Bild 3 von 3
    • Entferne den Mittelrahmen von der Display Einheit.

  12. , Motherboard Eineheit: Schritt 12, Bild 1 von 3 , Motherboard Eineheit: Schritt 12, Bild 2 von 3 , Motherboard Eineheit: Schritt 12, Bild 3 von 3
    • Trenne den Stecker der USB Platine mit dem flachen Ende eines Spudgers.

    • Trenne den Kabelstecker der Frontkamera.

    • Trenne den Kabelstecker der Ohrhörer-/ Lautsprecher Einheit.

  13. : Schritt 13, Bild 1 von 3 : Schritt 13, Bild 2 von 3 : Schritt 13, Bild 3 von 3
    • Trenne den Kabelstecker der Kopfhörerbuchse.

    • Trenne den Kabelstecker des Displays/Digitizers.

    • Trenne den Kabelstecker der Antenne.

  14. : Schritt 14, Bild 1 von 1
    • Entferne die einzelne 2,4 mm Kreuzschlitzschraube von der Motherboard Einheit.

  15. : Schritt 15, Bild 1 von 2 : Schritt 15, Bild 2 von 2
    • Entferne vorsichtig das Motherboard.

    • Halte das Motherboard an seinen Kanten, um Schäden durch elektrostatische Entladung zu vermeiden. Achte darauf, dass es nicht an Kabeln hängenbleibt, wenn du es aus der Display Einheit entfernst.

  16. Dieser Schritt ist noch nicht übersetzt. Hilf mit, ihn zu übersetzen!

    : Schritt 16, Bild 1 von 2 : Schritt 16, Bild 2 von 2
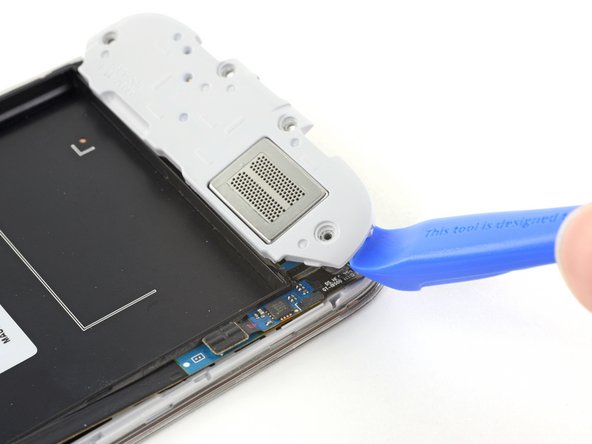
    • Use an opening tool to unclip the speaker assembly on the bottom of the phone.

    • Remove the speaker assembly.

  17. Dieser Schritt ist noch nicht übersetzt. Hilf mit, ihn zu übersetzen!

    : Schritt 17, Bild 1 von 2 : Schritt 17, Bild 2 von 2
    In diesem Schritt verwendetes Werkzeug:
    Tweezers
    $4.99
    Kaufen
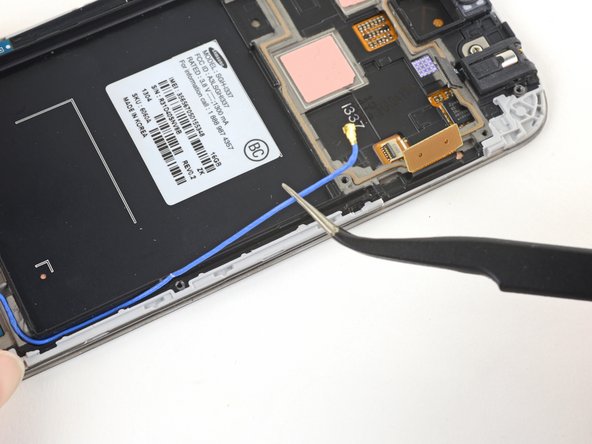
    • Use tweezers to lift and de-route the antenna cable from the edge of the case.

  18. Dieser Schritt ist noch nicht übersetzt. Hilf mit, ihn zu übersetzen!

    : Schritt 18, Bild 1 von 2 : Schritt 18, Bild 2 von 2
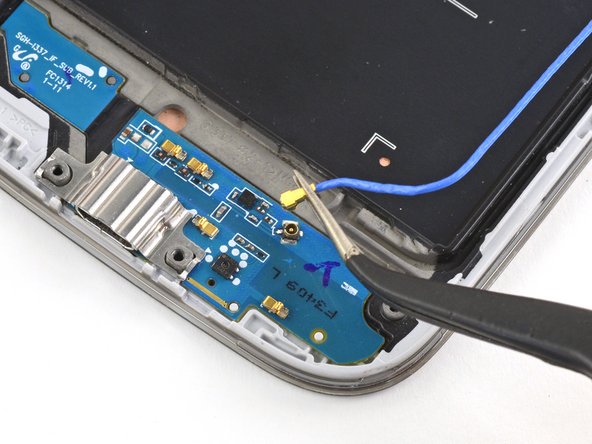
    • Lift directly up on the antenna connection to remove it from the speaker daughter board.

    • Completely remove the antenna cable.

  19. Dieser Schritt ist noch nicht übersetzt. Hilf mit, ihn zu übersetzen!

    : Schritt 19, Bild 1 von 1
    • Prepare an iOpener (or use a hair dryer or heat gun) and heat the screen side of the phone to loosen the display adhesive.

    • Leave the iOpener on the phone for at least two minutes to fully heat the screen and soften the adhesive holding it to the case.

    • You may need to reheat the iOpener and repeat this procedure several times until the display adhesive gets loose enough.

  20. Dieser Schritt ist noch nicht übersetzt. Hilf mit, ihn zu übersetzen!

    : Schritt 20, Bild 1 von 2 : Schritt 20, Bild 2 von 2
    In diesem Schritt verwendetes Werkzeug:
    Jimmy
    $7.95
    Kaufen
    • Because the gap between the screen and phone frame is so thin, a Jimmy is needed to separate the two. Read the following warnings carefully before proceeding.

    • Even though the metal blade is mostly dull, be careful not to apply too much pressure, as this might cause the Jimmy to slip and cut you or damage the phone.

    • Wear eye protection. The glass may break, sending pieces flying.

  21. Dieser Schritt ist noch nicht übersetzt. Hilf mit, ihn zu übersetzen!

    : Schritt 21, Bild 1 von 3 : Schritt 21, Bild 2 von 3 : Schritt 21, Bild 3 von 3
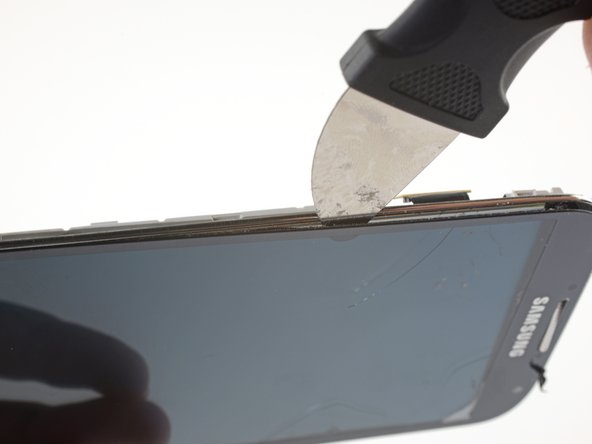
    • With the adhesive lose, insert the blade into the small gap between the frame and the screen, near the volume rocker.

    • Slowly slide the blade down the length of the phone towards the charge port to release the screen glass from the LCD.

    • The glass will most likely develop hairline fractures as you bend it during this step. Make sure you have proper eye protection.

  22. Dieser Schritt ist noch nicht übersetzt. Hilf mit, ihn zu übersetzen!

    : Schritt 22, Bild 1 von 2 : Schritt 22, Bild 2 von 2
    • The next three steps involve removing extremely fragile components. Consider working on a surface that will be easy to clean up afterwards.

    • With the screen glass completely loosened around the edges, remove it from the phone.

    • The fragile LCD display underneath the glass has a tendency to shatter into small pieces. If in doubt, protect your hands with gloves.

    • Cover the LCD with tape to prevent the broken glass from spreading or falling out during removal.

  23. Dieser Schritt ist noch nicht übersetzt. Hilf mit, ihn zu übersetzen!

    : Schritt 23, Bild 1 von 2 : Schritt 23, Bild 2 von 2
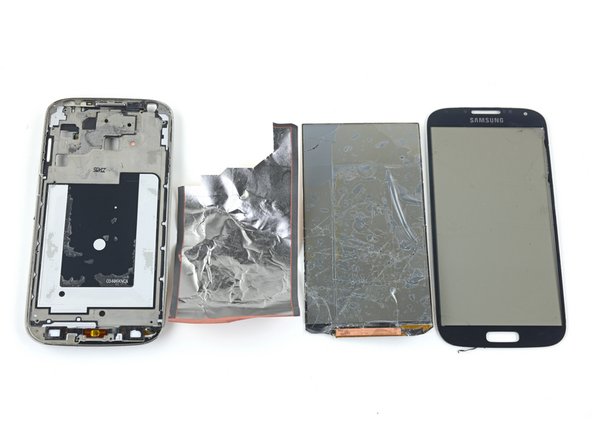
    • Carefully peel the cracked LCD away from the frame.

    • If necessary, push the Jimmy between the LCD and the frame to loosen it from the adhesive.

    • Remove the LCD.

  24. Dieser Schritt ist noch nicht übersetzt. Hilf mit, ihn zu übersetzen!

    : Schritt 24, Bild 1 von 2 : Schritt 24, Bild 2 von 2
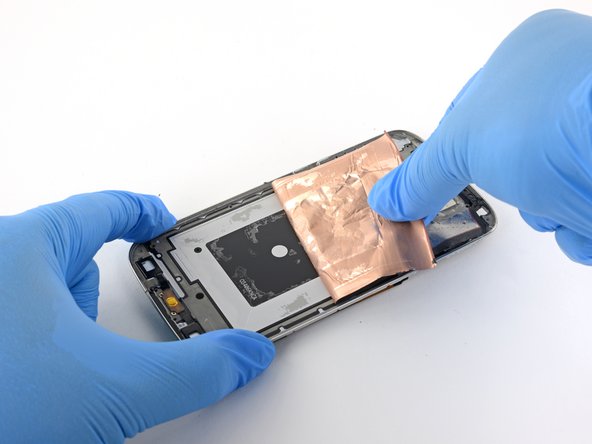
    • Grab the foil liner underneath the LCD and peel it away from the case.

    • You may need to reheat and reapply the iOpener to help loosen the adhesive.

  25. Dieser Schritt ist noch nicht übersetzt. Hilf mit, ihn zu übersetzen!

    : Schritt 25, Bild 1 von 3 : Schritt 25, Bild 2 von 3 : Schritt 25, Bild 3 von 3
    • Use tweezers to remove all old adhesive from the phone case before installing the new display.

    • When you install the replacement display, feed the display cable through the hole on the rear of the case.

Ziellinie

27 weitere Nutzer:innen haben diese Anleitung absolviert.

Carsten Frauenheim

Mitglied seit: 03/10/20

114.422 Reputation

338 Anleitungen geschrieben

Team

iFixit Mitglied von iFixit

Staff

135 Mitglieder

17.277 Anleitungen geschrieben

0 Kommentare

Kommentar hinzufügen

Seitenaufrufe:

Letzte 24 Stunden: 0

Letzte 7 Tage: 10

Letzte 30 Tage: 51

Insgesamt: 30,782