Zum Hauptinhalt wechseln

Sony CDX-GT540UI Motherboard Replacement

Was du brauchst

  1. Sony CDX-GT540UI Motherboard Replacement, Front Panel: Schritt 1, Bild 1 von 1
    • Locate face-plate eject button.

  2. Sony CDX-GT540UI Motherboard Replacement: Schritt 2, Bild 1 von 2 Sony CDX-GT540UI Motherboard Replacement: Schritt 2, Bild 2 von 2
    • Press the eject button.

    • Remove the face-plate.

  3. Sony CDX-GT540UI Motherboard Replacement: Schritt 3, Bild 1 von 3 Sony CDX-GT540UI Motherboard Replacement: Schritt 3, Bild 2 von 3 Sony CDX-GT540UI Motherboard Replacement: Schritt 3, Bild 3 von 3
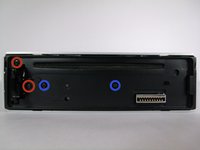
    • Remove two 4.9mm Phillips #00screws on the front of the device.

    • Remove two 7.5mm Phillips #00screws on the front of the device.

    • When the screws are removed, the eject lever may fall into the device. Make sure the device is held horizontal and level.

    The screws in red do not seem to need to be removed unless you are trying to replace the eject lever. If you're not trying to replace the lever, it adds an unnecessary complication to putting it back together.

    Dale Pearson - Antwort

  4. Sony CDX-GT540UI Motherboard Replacement: Schritt 4, Bild 1 von 2 Sony CDX-GT540UI Motherboard Replacement: Schritt 4, Bild 2 von 2
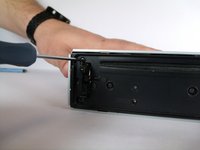
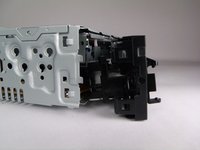
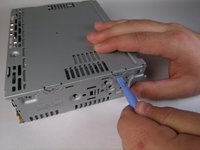
    • Rotate device 90 degrees to either side.

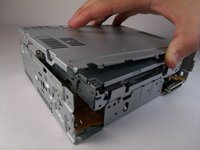
    • Use the plastic opening tool to pry open the top and bottom tab respectively.

    • Repeat on opposite side.

  5. Sony CDX-GT540UI Motherboard Replacement: Schritt 5, Bild 1 von 1
    • Remove front panel.

  6. Sony CDX-GT540UI Motherboard Replacement, Wiring Harness: Schritt 6, Bild 1 von 1
    • Locate the clip on the wiring harness.

  7. Sony CDX-GT540UI Motherboard Replacement: Schritt 7, Bild 1 von 2 Sony CDX-GT540UI Motherboard Replacement: Schritt 7, Bild 2 von 2
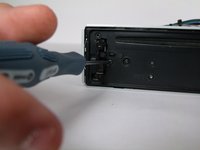
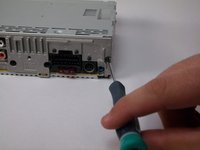
    • Press down on the clip like you would an Ethernet cable.

    • Rock harness side to side, pulling gently towards you until harness detaches.

  8. Sony CDX-GT540UI Motherboard Replacement, Back Panel: Schritt 8, Bild 1 von 1
    • Locate back panel.

  9. Sony CDX-GT540UI Motherboard Replacement: Schritt 9, Bild 1 von 3 Sony CDX-GT540UI Motherboard Replacement: Schritt 9, Bild 2 von 3 Sony CDX-GT540UI Motherboard Replacement: Schritt 9, Bild 3 von 3
    • Remove four 11.5mm Phillips #00 (silver) screws from back panel.

  10. Sony CDX-GT540UI Motherboard Replacement: Schritt 10, Bild 1 von 1
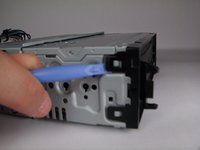
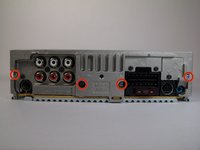
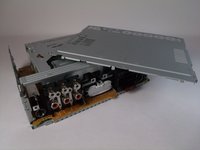
    • Remove four 9.5mm Phillips #00 (black) screws from back panel.

    • Remove two 7.5mm Phillips #00 (black) screws from back panel.

  11. Sony CDX-GT540UI Motherboard Replacement: Schritt 11, Bild 1 von 1
    • Remove back panel.

    • On the back panel there will be thermal (white) paste. Do not touch.

  12. Sony CDX-GT540UI Motherboard Replacement, CD Drive: Schritt 12, Bild 1 von 1
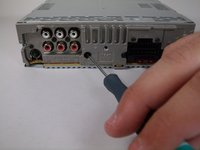
    • Remove one 9.5mm Phillips #00 screw.

    • Rotate device 180 degrees and repeat step.

  13. Sony CDX-GT540UI Motherboard Replacement: Schritt 13, Bild 1 von 2 Sony CDX-GT540UI Motherboard Replacement: Schritt 13, Bild 2 von 2
    • Using plastic opening tool, detach the tabs. There are two on either side.

    • You will need to apply a decent amount of force to detach.

  14. Sony CDX-GT540UI Motherboard Replacement: Schritt 14, Bild 1 von 2 Sony CDX-GT540UI Motherboard Replacement: Schritt 14, Bild 2 von 2
    • Remove top panel.

  15. Sony CDX-GT540UI Motherboard Replacement: Schritt 15, Bild 1 von 1
    • Pull up CD drive slightly.

  16. Sony CDX-GT540UI Motherboard Replacement: Schritt 16, Bild 1 von 1
    • Disconnect motherboard connection.

  17. Sony CDX-GT540UI Motherboard Replacement: Schritt 17, Bild 1 von 1
    • Remove CD drive.

  18. Sony CDX-GT540UI Motherboard Replacement, Motherboard: Schritt 18, Bild 1 von 1
    • Remove three 6.7mm Phillips 300 screws.

  19. Sony CDX-GT540UI Motherboard Replacement: Schritt 19, Bild 1 von 1
    • Pull motherboard up.

Abschluss

To reassemble your device, follow these instructions in reverse order.

4 weitere Personen haben diese Anleitung absolviert.

Odelkys Marquez

Mitglied seit: 09/22/14

1.115 Reputation

7 Anleitungen geschrieben

Team

USF Tampa, Team 10-2, Brown Fall 2014 Mitglied von USF Tampa, Team 10-2, Brown Fall 2014

USFT-BROWN-F14S10G2

3 Mitglieder

7 Anleitungen geschrieben

Ein Kommentar

Card reader light bling but not on my car audio

Deepak Kumar - Antwort

Kommentar hinzufügen

Seitenaufrufe:

Letzte 24 Stunden: 0

Letzte 7 Tage: 6

Letzte 30 Tage: 12

Insgesamt: 2,298