Zum Hauptinhalt wechseln

Titan High Pressure Airless Sprayer Elite 3000 Inlet Valve Replacement

Was du brauchst

  1. Titan High Pressure Airless Sprayer Elite 3000 Inlet Valve Replacement, Safety precautions: Schritt 1, Bild 1 von 3 Titan High Pressure Airless Sprayer Elite 3000 Inlet Valve Replacement, Safety precautions: Schritt 1, Bild 2 von 3 Titan High Pressure Airless Sprayer Elite 3000 Inlet Valve Replacement, Safety precautions: Schritt 1, Bild 3 von 3
    • Before you begin, make sure to follow the pressure relief procedure documented in the user manual before powering down the paint sprayer and disconnecting the pump.

    • Turn off and unplug the sprayer.

    • Lay the sprayer down horizontally before continuing.

  2. Titan High Pressure Airless Sprayer Elite 3000 Inlet Valve Replacement, Remove the inlet valve housing: Schritt 2, Bild 1 von 3 Titan High Pressure Airless Sprayer Elite 3000 Inlet Valve Replacement, Remove the inlet valve housing: Schritt 2, Bild 2 von 3 Titan High Pressure Airless Sprayer Elite 3000 Inlet Valve Replacement, Remove the inlet valve housing: Schritt 2, Bild 3 von 3
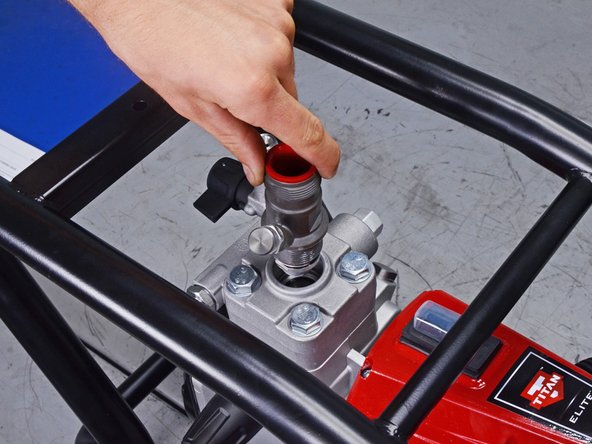
    • Use the included 30 mm wrench, or any 30 mm wrench, to loosen the inlet valve housing.

    • If you're having trouble loosening the housing, use a mallet to tap the end of the wrench.

  3. Titan High Pressure Airless Sprayer Elite 3000 Inlet Valve Replacement: Schritt 3, Bild 1 von 3 Titan High Pressure Airless Sprayer Elite 3000 Inlet Valve Replacement: Schritt 3, Bild 2 von 3 Titan High Pressure Airless Sprayer Elite 3000 Inlet Valve Replacement: Schritt 3, Bild 3 von 3
    • Remove the inlet valve housing.

  4. Titan High Pressure Airless Sprayer Elite 3000 Inlet Valve Replacement, Remove the clip: Schritt 4, Bild 1 von 3 Titan High Pressure Airless Sprayer Elite 3000 Inlet Valve Replacement, Remove the clip: Schritt 4, Bild 2 von 3 Titan High Pressure Airless Sprayer Elite 3000 Inlet Valve Replacement, Remove the clip: Schritt 4, Bild 3 von 3
    • Use a flathead screwdriver to pry and remove the clip securing the inlet valve.

  5. Titan High Pressure Airless Sprayer Elite 3000 Inlet Valve Replacement, Remove the inlet valve: Schritt 5, Bild 1 von 3 Titan High Pressure Airless Sprayer Elite 3000 Inlet Valve Replacement, Remove the inlet valve: Schritt 5, Bild 2 von 3 Titan High Pressure Airless Sprayer Elite 3000 Inlet Valve Replacement, Remove the inlet valve: Schritt 5, Bild 3 von 3
    • Use your fingers to pull up and remove the inlet valve from the bottom of its housing.

  6. Titan High Pressure Airless Sprayer Elite 3000 Inlet Valve Replacement, Remove the O-ring: Schritt 6, Bild 1 von 3 Titan High Pressure Airless Sprayer Elite 3000 Inlet Valve Replacement, Remove the O-ring: Schritt 6, Bild 2 von 3 Titan High Pressure Airless Sprayer Elite 3000 Inlet Valve Replacement, Remove the O-ring: Schritt 6, Bild 3 von 3
    • Use a pick tool to remove the O-ring from the inlet valve housing.

Abschluss

To reassemble your device, follow these instructions in reverse order.

2 weitere Nutzer:innen haben diese Anleitung absolviert.

Alex Diaz-Kokaisl

Mitglied seit: 01/16/22

124.540 Reputation

581 Anleitungen geschrieben

Team

iFixit Mitglied von iFixit

Staff

136 Mitglieder

17.289 Anleitungen geschrieben

0 Kommentare

Kommentar hinzufügen

Seitenaufrufe:

Letzte 24 Stunden: 1

Letzte 7 Tage: 5

Letzte 30 Tage: 43

Insgesamt: 607