Diese Version enthält möglicherweise inkorrekte Änderungen. Wechsle zur letzten geprüften Version.
Was du brauchst
-
Dieser Schritt ist noch nicht übersetzt. Hilf mit, ihn zu übersetzen!
-
Remove the SIM card, that is located on top of the Jetpack.
-
-
Dieser Schritt ist noch nicht übersetzt. Hilf mit, ihn zu übersetzen!
-
With the device on its back and the label facing you, remove the rubber screw cover on the top left corner of the device.
-
Under the rubber circle, remove the 1.25 mm screw using a Phillips #00 Screwdriver.
-
-
Dieser Schritt ist noch nicht übersetzt. Hilf mit, ihn zu übersetzen!
-
Use a plastic pick at the seams and pry open the case.
-
-
-
Dieser Schritt ist noch nicht übersetzt. Hilf mit, ihn zu übersetzen!
-
Once the cover is off, this is what your device will look like.
-
-
Dieser Schritt ist noch nicht übersetzt. Hilf mit, ihn zu übersetzen!
-
Once you have the case off of your device gently pull your battery away from the device.
-
-
Dieser Schritt ist noch nicht übersetzt. Hilf mit, ihn zu übersetzen!
-
With a pair of Tweezers remove the yellow tape covering the battery wires.
-
-
Dieser Schritt ist noch nicht übersetzt. Hilf mit, ihn zu übersetzen!
-
After removing the tape you may use the Tweezers to remove the wiring harness from the circuit board.
-
-
Dieser Schritt ist noch nicht übersetzt. Hilf mit, ihn zu übersetzen!
-
You may now replace the battery in your Verizon Ellipsis Jetpack MHS800L.
-
-
Dieser Schritt ist noch nicht übersetzt. Hilf mit, ihn zu übersetzen!
-
Locate the LCD screen cable and unlatch the harness connection form the circuit board.
-
-
Dieser Schritt ist noch nicht übersetzt. Hilf mit, ihn zu übersetzen!
-
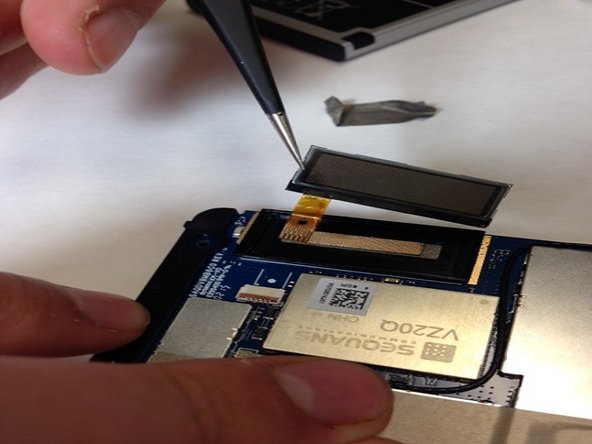
Using the Tweezers gently coax the display data cable out of circuit board connector.
-
-
Dieser Schritt ist noch nicht übersetzt. Hilf mit, ihn zu übersetzen!
-
Gently insert the Tweezers underneath the LCD screen and lift the LCD screen off of the circuit board.
-


Rückgängig: Ich habe diese Anleitung nicht absolviert.
Ein:e weitere:r Nutzer:in hat diese Anleitung absolviert.
Team

IUPUI, Team 3-3, Baechle Spring 2016 Mitglied von IUPUI, Team 3-3, Baechle Spring 2016
IUPUI-BAECHLE-S16S3G3
4 Mitglieder
6 Anleitungen geschrieben