Einleitung
Diese Anleitung zeigt, wie du das optische Laufwerk einer Xbox One ne S entfernen und austauschen kannst, wenn die Konsole die CDs nicht mehr richtig liest. Du benötigst Schraubendreher (z.B. Torx), ein dünnes Hebelwerkzeug. Bringe etwas Zeit und eine ruhige Hand mit.
Eventuell musst du ein wenig löten, unsere Anleitung hilft dir dabei.
Was du brauchst
-
-
Fange auf der Rückseite des Gehäuses an, wo das Garantiesiegel klebt. Setze ein Plastiköffnungswerkzeug in den Spalt zwischen Boden und der Oberseite. Suche die Rasten, welche die Teile zusammenhalten.
-
Löse die Rasten mit dem Werkzeug. Am einfachsten geht es, wenn du das schwarze Gehäuse weg vom Boden hebelst.
Important!!
You've to start from the back corner where is the information label, because there is a main clip behind a warranty sticker
They should add this to the guide! I didnt know that, and did some minor damage to the bottom piece where that main clip is.
I dont mind because it's my own Xbox, but what if it belonged to a customer?
They should add this to the guide! I didnt know that, and did some minor damage to the bottom piece where that main clip is.
I dont mind because it's my own Xbox, but what if it belonged to a customer?
💯% same opinion!
I legitimately cannot open the case where the warranty sticker is, ive tried everything, im resorting to a fork to try and open this
-
-
-
Drehe die sechs grünen 50 mm langen Torx T10 Schrauben vom Metallgehäuse heraus. Sie sind mit F1 bis F6 markiert.
My F3 isn't coming out. The screwdriver isn't sitting tight like it is for the other ones. Any idea on how to fix that?
-
-
-
Trenne vorsichtig mit der geeigneten Methode das innere Gehäuse vom weißen Außengehäuse.
-
Drücke die weißen Seitenteile hinten nach außen, so dass sie sich vom I/O-Panel ablösen.
“appropriate method is not descriptive like Mr. Ross’s comment. The original poster should edit the description to ensure people do in fact remove the box from the case appropriately. I would also add arrows to the picture.
____________⬆️
↖️Yes! I see it the same way!↗️
⬅️Arrows are always a good thing!➡️
↙️Can't do anything wrong with them! ↘️
____________⬇️
😅😅
I didn't realize that metal ribbon was connecting the case to the console and I yanked it w out realizing it was there. How o I get a replacement?
-
-
-
-
Um an die inneren Bauteile heranzukommen, musst du die obere Abdeckungdes Gehäuses anheben. Sie sollte sich leicht abnehmen lassen.
-
-
-
Drehe die Konsole herum . Entferne die beiden mit C3 und C4 markierten 10 mm langen Torx T10 Schrauben auf der Rückseite der XBox One S.
-
Bei manchen Geräten können das auch die mit C4 und C5 markierten Schrauben sein.
Some of my silver were gold screws, so just letting people know to look out for that!
The Torx screw circled on the left is actually C5
I found the same. On my Xbox One S, it's C3 and C5 that hold in the hard drive caddy. C4 holds in the optical disk caddy.
jamesr -
Funny thing on my console rev t t3 built feb 2018 it’s C4 and C5
-
-
-
Löse vorsichtig die beiden Plastikstecker der Festplattenkabel auf der Hauptplatine.
Do not remove the cable!!!! You can change while the cables are plugged. It took 2 hours trying to put mm precisely all the little pins because of the removal of the cables.
Please update the post, I could easily end up as the Aaron, breaking the XBOX completly.
Yes, this has also happened to me the connectors had broken and the pins bent and snapped off.
-
-
-
Entferne die mit "C4" markierte silberfarbene 10 mm Torx T10 Schraube.
-
-
-
Ziehe das Laufwerk ein wenig von der Hauptplatine weg. Löse dann die Stecker von der Hauptplatine ab.
-
-
-
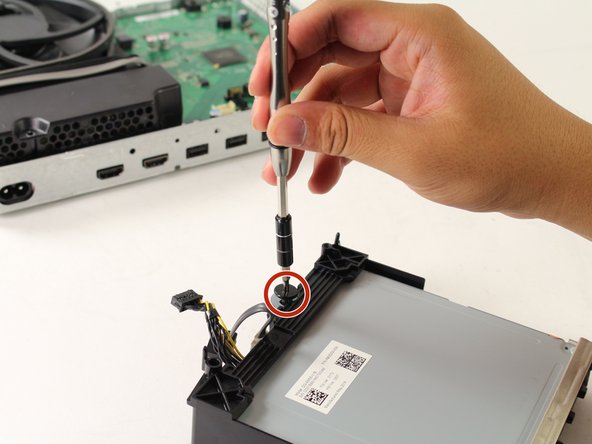
Entferne die schwarze, flache Torx Schraube von der Unterseite des optischen Laufwerks.
-
-
-
Entferne die Kabel vom Laufwerk und ziehe das Laufwerk heraus.
Wie heißt das graue Kabel das ihr zum Schluss herauszieht? bei mir sind die Kontakte abgebrochen und ich brauche ein neues!!!
Hey.. nach dem Austausch sagt mir “XBOX” dass das Laufwerk nicht verfügbar ist, aber die XBOX trotzdem verwendbar ist???
-


Um dein Gerät wieder zusammenzusetzen, befolge diese Anleitung in umgekehrter Reihenfolge.
Um dein Gerät wieder zusammenzusetzen, befolge diese Anleitung in umgekehrter Reihenfolge.
Rückgängig: Ich habe diese Anleitung nicht absolviert.
27 weitere Nutzer:innen haben diese Anleitung absolviert.
Besonderer Dank geht an diese Übersetzer:innen:
100%

Diese Übersetzer:innen helfen uns, die Welt zu reparieren! Wie kann ich mithelfen?
Hier starten ›
Team

Cal Poly, Team S22-G3, Livingston Spring 2017 Mitglied von Cal Poly, Team S22-G3, Livingston Spring 2017
CPSU-LIVINGSTON-S17S22G3
4 Mitglieder
56 Anleitungen geschrieben
8 Kommentare
Why do you have to replace the motherboard when replacing the optical disc drive?
because Microsoft puts a security code on the motherboard to pair the drive with the motherboard. so if they don’t match, all it will do is read DVDs and not play any games. Depending on the drive, sometimes you have to Unsolder and resolder the wires going to the motherboard. Other times, it can just be a series of clips for 2 cables and a plug.
If you learned basic soldering in High School, it isn’t too hard to solder.
Lawrence -
Helped me get to the optical drive in order to disassemble it and remove a coin that was blocking the motor (gotta love toddlers). Thanks!
Is this what is to be done if the laser unit seems to be faulty?
I have a friend who couldn’t wait for me to replace his optical drive so he did it himself without proper instructions and forgot to replace the cd drive motherboard on the new drive. He ended up throwing away the old drive and now his Xbox gets stuck on an update error. Is there anyway to just bypass the drive and just use it as a digital version?
On the Xbox 360 you had to swap the PCB from the drive onto the new one. It's that what you mean when you mention the “paired motherboard" or do you actually mean the motherboard from the XBOX ONE?