Einleitung
Nach und nach können die Kappen auf den Joysticks des Xbox Kontrollers locker oder klebrig werden. Diese Anleitung zeigt, wie sie ausgebaute und gereinigt oder getauscht werden können.
Was du brauchst
-
-
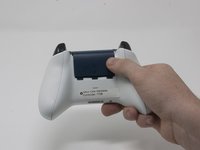
Schiebe die Abdeckung des Akkufachs nach oben und entferne sie.
-
Hebe die Akkus aus dem Akkufachs heraus.
-
-
-
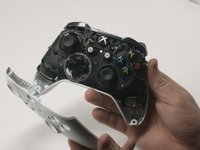
Setze ein Öffnungswerkzeuge aus Kunststoff in die obere Naht ein und arbeite dich dann behutsam nach unten.
-
Heble solange weiter, bis sich die seitliche Abdeckung vom Kontroller löst.
-
Wiederhole für die zweite seitliche Abdeckung.
-
-
-
Ziehe den Aufkleber im Akkufachs vorsichtig ab oder öffne das Loch in der Mitte, um an die verborgene Schraube darunter heranzukommen.
-
Entferne die fünf 9 mm Torx Sicherheitsschrauben auf der Rückseite.
-
-
-
-
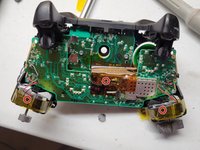
Drehe den Kontroller so, dass die Abdeckplatte nach oben zeigt.
-
Hebe die obere Abdeckung ab.
-
-
-
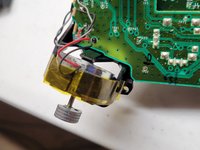
Befestige die Rüttelmotoren mit einem Klebeband.
-
So können die Motoren nicht herausfallen.
-


Um dein Gerät wieder zusammenbauen, folge den Schritten in umgekehrter Reihenfolge.
Um dein Gerät wieder zusammenbauen, folge den Schritten in umgekehrter Reihenfolge.
Rückgängig: Ich habe diese Anleitung nicht absolviert.
143 weitere Personen haben diese Anleitung absolviert.
Besonderer Dank geht an diese Übersetzer:innen:
100%
VauWeh hilft uns, die Welt in Ordnung zu bringen! Wie kann ich mithelfen?
Hier starten ›
Team

Cal Poly, Team S18-G3, Forte Fall 2017 Mitglied von Cal Poly, Team S18-G3, Forte Fall 2017
CPSU-FORTE-F17S18G3
4 Mitglieder
34 Anleitungen geschrieben
9 Kommentare
How about the square thing with the stick and hinges that the joystick is attached to? I think it’s called the Module. I have a joystick drift / drifting problem and that may help me out. Thanks.
Agreed. That’s actually the part I need to replace too. The module.
followed this guide to take the controller apart because I had a joystick that was sticking, my solution was to put some 3in1 oil on the module that was sticking and it seems to be working a lot better now.
@corytc and @tomchak I did replace the module, in general, you buy (Amazon or eBay) you will receive a module of 6 modules you need a multimeter and test each module interface, measure both resistances and subtract them, the one nearest zero is the module you will use since is the one with least drift from the factory.
Just disassemble it, turn upside down uses a solder remover and unsolder the old one, place the new one solder back, boom you are done.
Like you will need an iron solder with medium and thin tips, I used lead-free solder, so is a patience test, be careful with the wires from the rumbles, try not to unsolder them since is a thin wire and is difficult, like I have big hands so took me a while to solder back.
Just want to say the hardest part is carefully prying off the plastic covers on the handles. It’s also not necessary to remove the back cover for simply replacing the joysticks. Other than that, it’s very easy. I would guess this is rated at moderate difficulty simply due to the plastic covers.