Zum Hauptinhalt wechseln

iNet M1001 Motherboard Replacement

Was du brauchst

  1. iNet M1001 Motherboard Replacement, Back Cover: Schritt 1, Bild 1 von 2 iNet M1001 Motherboard Replacement, Back Cover: Schritt 1, Bild 2 von 2
    • Remove the two 4.1 mm PH1 screws with a Philips screwdriver.

  2. iNet M1001 Motherboard Replacement: Schritt 2, Bild 1 von 2 iNet M1001 Motherboard Replacement: Schritt 2, Bild 2 von 2
    • Press the small suction cup on the back cover, and then pull the small suction cup to remove the back cover.

  3. iNet M1001 Motherboard Replacement, Motherboard: Schritt 3, Bild 1 von 3 iNet M1001 Motherboard Replacement, Motherboard: Schritt 3, Bild 2 von 3 iNet M1001 Motherboard Replacement, Motherboard: Schritt 3, Bild 3 von 3
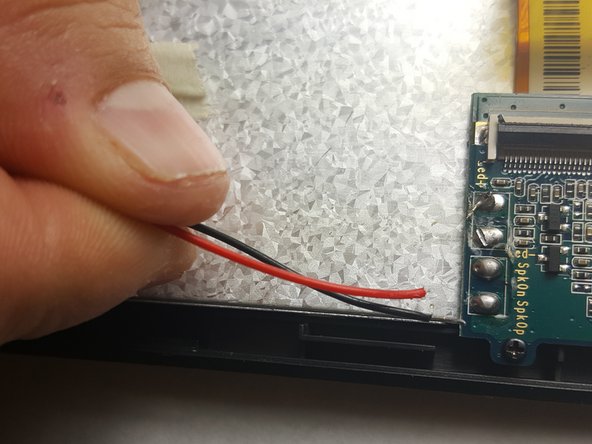
    • Desolder the black and red wires and pull them off of the motherboard.

    • Check out this awesome guide for tips on soldering and desoldering.

  4. iNet M1001 Motherboard Replacement: Schritt 4, Bild 1 von 3 iNet M1001 Motherboard Replacement: Schritt 4, Bild 2 von 3 iNet M1001 Motherboard Replacement: Schritt 4, Bild 3 von 3
    • Desolder the grey wire and pull it off the motherboard.

  5. iNet M1001 Motherboard Replacement: Schritt 5, Bild 1 von 3 iNet M1001 Motherboard Replacement: Schritt 5, Bild 2 von 3 iNet M1001 Motherboard Replacement: Schritt 5, Bild 3 von 3
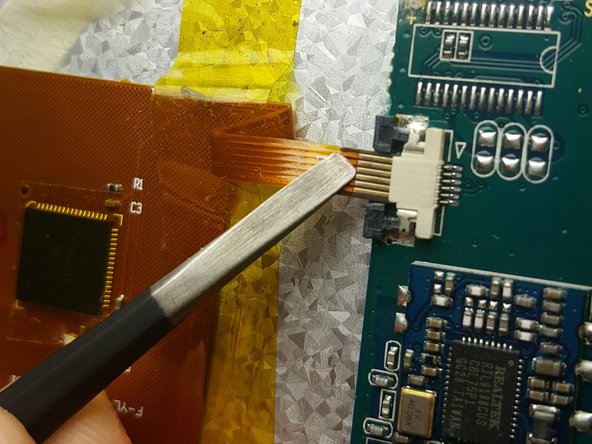
    • Push out the ribbon cable connectors with a tweezer and pull out the ribbon cable.

  6. iNet M1001 Motherboard Replacement: Schritt 6, Bild 1 von 3 iNet M1001 Motherboard Replacement: Schritt 6, Bild 2 von 3 iNet M1001 Motherboard Replacement: Schritt 6, Bild 3 von 3
    • Lift up the zero insertion force clip with a tweezer and pull out the ribbon cable.

  7. iNet M1001 Motherboard Replacement: Schritt 7, Bild 1 von 3 iNet M1001 Motherboard Replacement: Schritt 7, Bild 2 von 3 iNet M1001 Motherboard Replacement: Schritt 7, Bild 3 von 3
    • Lift up the zero insertion force clip with a plastic opening tool and pull out the ribbon cable.

  8. iNet M1001 Motherboard Replacement: Schritt 8, Bild 1 von 3 iNet M1001 Motherboard Replacement: Schritt 8, Bild 2 von 3 iNet M1001 Motherboard Replacement: Schritt 8, Bild 3 von 3
    • Remove the five 5.7mm PH00 screws with a screwdriver and pull out the motherboard.

Abschluss

To reassemble your device, follow these instructions in reverse order.

Abdulateef Abola

Mitglied seit: 03/08/17

401 Reputation

4 Anleitungen geschrieben

Team

IUPUI, Team 4-1, Baechle Spring 2017 Mitglied von IUPUI, Team 4-1, Baechle Spring 2017

IUPUI-BAECHLE-S17S4G1

2 Mitglieder

8 Anleitungen geschrieben

0 Kommentare

Kommentar hinzufügen

Seitenaufrufe:

Letzte 24 Stunden: 0

Letzte 7 Tage: 2

Letzte 30 Tage: 8

Insgesamt: 282