Einleitung
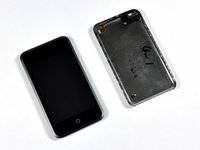
Ist das Display gebrochen oder defekt? Tausche es aus!
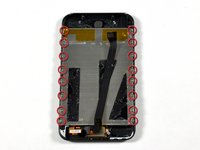
Was du brauchst
-
-
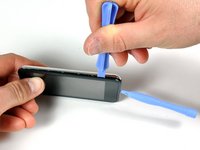
Stecke das kleine Kunststofföffnungswerkzeug in die Naht zwischen der Kunststoffanzeigetafel und der Metallrückwand. Die abgewinkelte Kante sollte zur Metallrückwand zeigen.
-
Halte das Werkzeug an Ort und Stelle, sobald es innen verkeilt ist und die beiden Paneele getrennt sind.
-
-
-
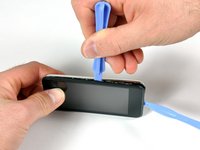
Stecke das große Öffnungswerkzeug in die rechte Seite des iPod, wobei der Rand des Werkzeugs auf die Metallrückseite zeigt.
-
Vergrößere vorsichtig den vorhandenen Spalt, indem du das große Öffnungswerkzeug wackeln und nach rechts bewegst.
-
Fahre damit fort, bis die rechte Seite des iPod locker ist.
-
-
-
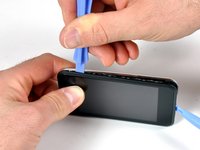
Wechsele zur anderen Seite des iPod.
-
Befolge das gleiche Verfahren wie im vorherigen Schritt, um die sieben Clips loszulassen, die die Bedienfelder an Ort und Stelle halten.
-
Sobald die Panels auf dieser Seite getrennt sind, kann die Rückseite vom Rest des iPod getrennt werden.
-
-
-
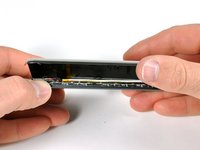
Hebe die Rückwand vorsichtig mit den Fingern an.
-
Die Vorder- und Rückseite des iPod sollten nun vollständig getrennt sein.
-
-
-
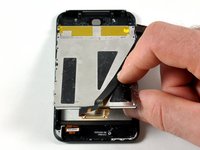
Drehe den iPod um 180°, so dass er wie im Bild gezeigt liegt.
-
Setze den Spudger sorgfältig zwischen Akku und Display ein. Unter dem Akku verlaufen Kabel, du musst deshalb langsam hebeln.
In step five I was very careful with the spudger at getting the battery loose from the LCD screen but now after reassembly I have white bleed through all around three sides of the LCD screen. It shows up easily on light colored screen backgrounds like the Set up screen. It looks like the spudger some how damaged the back side of the LCD screen during disassembly. Is this glue heat sensitive or is there an alternative to using the spudger that a user can suggest?
Zitat von DUSTmurph:
Could I possibly just cut the battery cables in this step and solder them to the wires on the new battery??
I am thinking about trying this myself - It seems a lot less labor intensive than desoldering in that very tight location. I guess the big concern is if there is room for insulation on the spliced wires when the unit gets closed up.
Zitat von barlowdo:
I am thinking about trying this myself - It seems a lot less labor intensive than desoldering in that very tight location. I guess the big concern is if there is room for insulation on the spliced wires when the unit gets closed up.
I will add that there is really not a lot of wire length to do a splice on and it may be as difficult to do as soldering to the circuit board.
Yes, even without de-soldering/soldering, one can simply cut the two wires then put a jumper wire on re-installation.
I agree with DUSTmurph's, comment.
Is there any jumper little enough to fit in it?
You could cut the cables and solder the new batt's to these, but I'd make sure the total length of the splice is the same to the original. Also use the smallest-diameter heat-shrink tube to insulate so as not to make a bump that prevents the trinket to close properly.
-
-
-
-
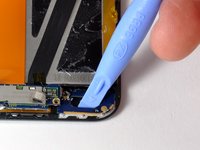
Entferne die goldfarbene Antenne mit einem Spudger (oder deinen Fingernägeln). Die Antenne verbiegt sich leicht, drücke deswegen nicht so fest. Setze die Antenne beim Zusammenbau zuerst ein, bevor du die Antennenplatinen einbaust.
-
Entferne den Stecker auf der linken Seite mit einem Spudger.
-
Entferne die beiden Kreuzschlitzschrauben.
There is a gold spring coil on the side of the board near the left side. BE VERY CAREFUL! It extremely brittle metal and if smashed down, won't connect with the power switch. Once smashed down, attempting to stretch it back out will break it. I found out the hard way and the only way to fix it is to replace the logic board.
Are these really Phillips 00 screws? My supposedly 00 screwdriver is way too big. Maybe they are really Phillips 000. The screws in my device were set with blue locktight (grr). I was able to unscrew three of the six with very small straight edge screwdriver but had to sand off the heads of three more with a Dremel tool. This is dangerous. During the process I barely nicked a component near where the antenna cable connects to the logic board. Now I have a new battery and no WiFi.
-
-
-
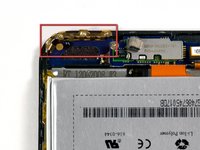
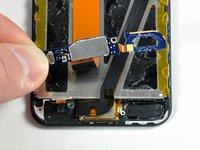
Die Antennenschleife muss hochgehebelt werden(sie ist festgeklebt). Verschiebe vorsichtig die Platine mit der Antennenschleife mit einem Öffnungswerkzeug oder einem Spudger. Die Platine ist mit einem dünnen Flachbandkabel an der Antennenelektronik angeschlossen. Diese Konstruktion aus zwei Platinen ist ziemlich fragil.
-
Hebe die beiden Platinen der Antenne zusammen hoch und löse das orangene Kabel vom Display ab.
-
-
-
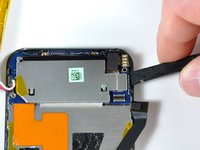
Entferne das schwarze Klebeband mit einem Spudger. Darunter werden die zwei im Bild gezeigten Schrauben sichtbar.
-
Drehe die vier Kreuzschlitzschrauben heraus.
-
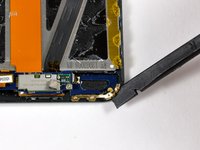
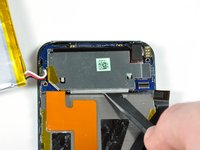
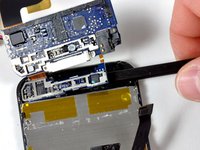
Trenne den schwarzen Stecker mit einem Spudger ab.
Actually you can skip all this taking apart sequence - just remove older battery, clean the soldering holes and solder wires back from top. just put some thin plastic film under logic board where the soldering points are while soldering wires in. I replaced god knows how many batteries like this and they all are fine. that way you can replace battery in 5minutes!
Right, this is what I did. Although it took me more than 5 minutes just to get the case open.
-
-
-
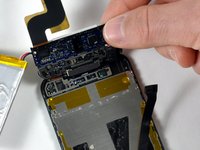
Löse das Logic Board an verschiedenen Seiten mit dem Spudger ab. Das Logic Board ist zusätzlich zu den im vorigen Schritt entfernten vier Schrauben festgeklebt.
-
-
-
Hebe das Logic Board (mit angeschlossenen Bauteilen) nach oben.
-
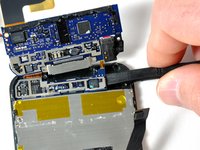
Schiebe den Spudger unter den kleinen Abschnitt des Logic Boards. Das Board sollte sich ablösen, wenn der Spudger an der anderen Seite angelangt ist.
I've managed to strip a screw. Be careful of that!
When I did this, the headphone jack cable sheared completely. The headphone jack was still down and the board flipped up. There was almost no resistance to indicate something was tearing. Luckily, installing a new headphone jack is pretty easy if you have a fine tip soldering iron. But it was a big delay as I had to order the part.
Zitat von jonathan:
When I did this, the headphone jack cable sheared completely. The headphone jack was still down and the board flipped up. There was almost no resistance to indicate something was tearing. Luckily, installing a new headphone jack is pretty easy if you have a fine tip soldering iron. But it was a big delay as I had to order the part.
Zitat von Ryan:
Do you have any specific info or guide on how to replace the headphone jack? I agreed to help a friend with their iPod and it turns out a new headphone jack is in order. I have never done a repair on an iPod requiring soldering. I think myself and many others would be grateful for a tutorial.
Zitat von Ryan Lacy:
Do you have any specific info or guide on how to replace the headphone jack? I agreed to help a friend with their iPod and it turns out a new headphone jack is in order. I have never done a repair on an iPod requiring soldering. I think myself and many others would be grateful for a tutorial.
Well what worked for me was keeping the old connector on the soldered part. The new ribbon has two holes on each solder connecting point. If the ribbon isn't already ripped, go ahead and rip/cut it. Then simply place the new ribbon on top of the existing end with the solder blobs on it. Press down with the heated tip from on top of the solder pads and the heat should be enough to melt the solder beneath. It should flow right up through the holes with the pressure and voila.
Jonathan did you post any photos or a video of your soldering the new headphone jack to the logic board? I did as you did and broke the small ribbon or cable connecting the headphone jack to the logic board. This is my first attempt at repairing an electronic device, and it ended very badly.
I do it without removing the smaller card : it is more safety !!
-
-
-
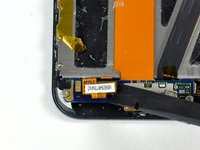
Ziehe das orangene Klebeband von der Rückseite des Displays ab, um die sechzehn Kreuzschlitzschrauben freizulegen.
-
Entferne die sechszehn Kreuzschlitzschrauben #00.
-
-
-
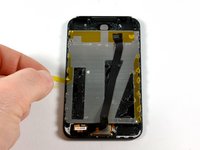
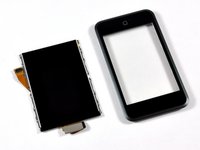
Hebe das Display vorsichtig hoch und löse es vom Frontpanel ab.
-
Das Display und das Frontpanel sind nun komplett voneinander getrennt.
hi,
after you take the display unit out. You have to separate the display from the al. backing plate. it is held on with glue so gentle prying with the spudger tools will do it for you. i started from one of the loose corners and used the opening tool to enable the spudger to get in.
fantastic teardown,keep up the good work
jigs
Some questions on re-assembly. I took mine apart because it got wet, so stopped after Step 13--I don't see a reason to take the front panel off--altho I may hit it w/the hair dryer just to ensure everything is dry. I'm also gently scrubbing the connectors and boards to remove built-up dust and crap. Any other suggestions?
My Q's: do you re-use the various pieces of tape that were removed during dis-assembly? what about the glue--just stick things back on whatever glue is left or should I apply some anew? If so, what kind of glue do I use?
I'm optimistic I'll be able to put it back together, thanks to this great site! Hopefully it will work as good as new.
-


Um dein Gerät wieder zusammenzubauen, folge den Schritten in umgekehrter Reihenfolge.
Um dein Gerät wieder zusammenzubauen, folge den Schritten in umgekehrter Reihenfolge.
Rückgängig: Ich habe diese Anleitung nicht absolviert.
42 weitere Personen haben diese Anleitung absolviert.
Besonderer Dank geht an diese Übersetzer:innen:
100%

Diese Übersetzer:innen helfen uns, die Welt zu reparieren! Wie kann ich mithelfen?
Hier starten ›

Ein Kommentar
where can i buy front screen and lcd display for my iPod touch 1 generation
I found the little plastic tools to be useless. I finally got the case apart using jeweler's screwdrivers, guitar picks, and believe it or not, a wood chisel to split the sides of the case open. And believe it or not, I got back together again - not quite as good as new, but good enough.
I'd REALLY love to know how Apple technicians get this little beast apart without damaging or nicking the case.
phinegan - Antwort
Who's betting the actually replace the back with a brand-spanker - if they repair them at all!
marc draco - Antwort
They do replace it with a new back, thats why they said that if you have words on the back (engraved) by someone other then apple, your going to lose those but if there done by apple then they'll do it again (when replaceing the battery they say that)
shadowfox00101 - Antwort
I replaced my battery in my 1st gen iPod and it still doesn't hold a charge for more then 5 min. Any ideas?
ae86keidori - Antwort
mine has the same problem. My 1st gen iPod touch dropped in water. after that It still works but can't hold a charge for more than 5 mins. I changed the battery and still the same.
One of my friend give me some advices, I simply clean the whole logic board with some non water alcohol, and it works. It works perfect now. You can have a try.
Liku - Antwort
I found a method that worked for me in opening the case. I started at the top, and used a sewing needle. I'm sure a straight pin world work also. Using some padding between the back of the needle and my hand, I worked the point of the needle between the casing and the metal back. Don't push straight into the gap, push on the edge of the gap down toward the back of the iPod. Once you feel the needle slip in, use it as a guide to get your prying tool in there.
Paul Jones - Antwort
Hey, I made it, it's open! My opener tool was useless. A swiss army knife and lots of brute force is your friend. My tool broke apart not resisting such force that is necessary.
http - Antwort
lol i dropped my iPod this fixedit because it had no back
elais - Antwort
Count get past step 1 :( began seperating the back but the metal back sooner bent than the clips letting loose. I heard something chip then the ipod started getting very hot so I think I punctured the battery :( its going to live outside for a while before I throw it out.
Mike - Antwort