Zum Hauptinhalt wechseln

Modell A1418 / Ende 2013 / 2,7 & 2,9 GHz Core i5 oder 3,1 GHz Core i7 Prozessor

254 Fragen Alle anzeigen

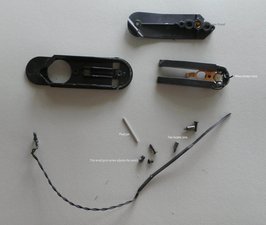
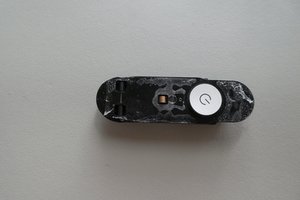
How to: replace power button

I need help!

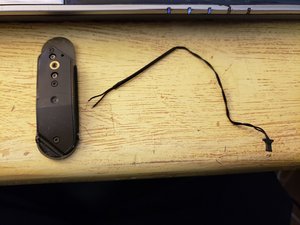
when i replacing the HDD for an SSD in my machine. I cut the power cord from the power button.

someone could help me with a tutorial video or maybe writing about how to replace this piece ?

Beantwortet! Antwort anzeigen Ich habe das gleiche Problem

Ist dies eine gute Frage?

Bewertung 6
11 Kommentare

My power button cable was also damaged while adding an SSD to my iMac. The conector that connects to the logic board to be more precise. Is there anything that can be done to fix this issue?

von

@Andrew - Do you still have the connector end or is it broken?

von

It's broken. I don't even know where it went. I got the logic board reseated and looked up and it was broken.

von

To update my situation, I fixed my problem by cutting the wires off the old power button, purchasing a rear housing off eBay and splicing the wires together with the connector from the purchased housing. Everything works great and my computer now has 2 new hard drives. Thanks for the help and answers!

von

It's possible to take off the power button ?

von

6 weitere Kommentare anzeigen

Einen Kommentar hinzufügen

7 Antworten

Gewählte Lösung

Ouch! So the cable is completely cut. You should be able to splice the cut sections together the button is not polarized so you don't need to worry which way it's wired. If you must add a segment of wire to give you enough length as well as make it so the seams don't get in the way. Some heatshrink tubing should do.

War diese Antwort hilfreich?

Bewertung 3
Einen Kommentar hinzufügen
Hilfreichste Antwort

Here’s a quick overview on how to get the button housing out of the case. I got so mad at the prospect of having to buy an entire new rear shell because of one little broken cable that I resolved to find a way. It’s epoxied in, so take a deep breath, find some inner calm and then arm yourself with a heat gun. Remove all the extra stuff anywhere near the button housing (including that little strip of black folds that runs along the bottom of the screen area, held in by five tiny screws). Point the heat gun at the back of the case, just where the button housing sits. Let it heat up real good, and then take a spudger or small flat screwdriver and try prying at the button housing. Be patient, it took me about ten minutes of heating and poking to get it out. But it is do-able, and when you get it, you will attain a deep and magnificent joy. When putting it back, use hot glue to make life easier for anyone who might have to get it out again.

War diese Antwort hilfreich?

Bewertung 8

3 Kommentare:

Thanks! The heat gun did the trick. Even the adhesive strip stayed intact, so I could just put the button back in the case after soldering.

von

What heat gun do you use (brand and model)?

von

Paint stripper 2000 Watt. Heat the corner, avoid the button and it will fall off by itself.

von

Einen Kommentar hinzufügen

I followed this procedure and had some success.

Some points:

I used Loctite GO2 Gel adhesive with no trouble.

I completely disasembled my switch to solder the wires. There is a hex screw in the back which adjusts the space between the contacts. I found it was quite critical in its adjustment. A bit like tuning a carburettor! If it is too tight or too loose the switch will not function correctly.

Block Image

Block Image

War diese Antwort hilfreich?

Bewertung 4
Einen Kommentar hinzufügen

Im a fool and did the same thing , I managed to get the power button out, now the only question would be , wherer to solder it ?

since it came completely of, do you know where to solder it ?

Photo attached

Block Image

War diese Antwort hilfreich?

Bewertung 3

1 Kommentar:

Ok found out what to do , for those looking for an answer, you need to open the button case, inside you'll find the cut wires ,

von

Einen Kommentar hinzufügen

Solder the wires directly to the pads where the connector was. Makes no difference which wire went to which, the button simply completes the circuit -power pad then to ground pad turns smc on.

War diese Antwort hilfreich?

Bewertung 2
Einen Kommentar hinzufügen

Does anyone know what type of wire is used for this part? I’d like to get a longer wire to splice in as I lost quite a bit while trying to remove the outer casing.

War diese Antwort hilfreich?

Bewertung 0

2 Kommentare:

I had to splice in some wire - I had an old mouse sitting around, so I snipped off a bit of the usb cable and used one of the several little wires inside. It worked fine! I don't think the exact type of wire is important, just so long as the gauge is similar enough to allow a decent solder.

von

The wire needs to be very very light. It rides on the switch and the flex becomes part of the movement of the button. I had to also carve out the switch cover so the wire was not binding. I used a 45 watt tiny tip and the soldering was easy.

Getting the switch back in, I found impossible to get it set perfect. I used a scotch tape double sided - very thin but good sticky. So the button is indented in the case a little bit. I was almost about to pull it out to redo it. And Not put tape on the bottom as the speaker box jams hard against it anyway. But it is just VERY tight and hard to set in. At least on this, my first try.

von

Einen Kommentar hinzufügen

Sorry to revive this, but anyone knows the type of connector that is? Trying to put an iMac motherboard into a case.

War diese Antwort hilfreich?

Bewertung 0

1 Kommentar:

Apple iMac A1418 A1419 Intel 21.5" 2012 2013 2014 2015 Power Switch Button Kit

von

Einen Kommentar hinzufügen

Antwort hinzufügen

Christian wird auf ewig dankbar sein.
Seitenaufrufe:

Letzte 24 Stunden: 2

Letzte 7 Tage: 13

Letzte 30 Tage: 33

Insgesamt: 9,875