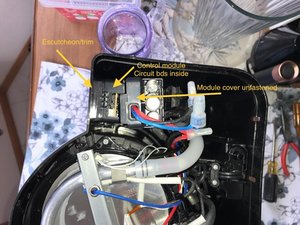
Aha! I managed to figure out how the circuit board module was fitted in there. It slides into grooves via tabs on its sides, and that part was obvious. Not so much, at first, was that the “chromed” escutcheon was then pressed in from the side opening, snapping onto the outside of the module with the typical multiple tabs around its edge.
I managed to ferret a narrow blade screwdriver into the two barely visible slots on top of the module case, twisted, and forced the escutcheon back towards the side opening. Then I barely got the screwdriver into the first (and only other accessible) pockets down the case’s sides, and forced the tabs to let go. Getting those first ones loose put enough stress on the remaining ones that they finagled loose, and the escutcheon finally came out the side. Without the escutcheon holding it, the module easily slid up and out! Yayyy!
Now to expose and clean the “zebra” strips, after reviewing videos I watched about that two months ago. Hopefully someone else with the same issue, and confounded by the same control box mounting I ran into, will come across this posting and have some encouragement. The escutcheon side “tabs” are very minimalist and with patience can be overcome.]
Note how slim the escutcheon tabs are around its rim. Their corresponding pockets on the module case are relatively deep, but that can allow more leverage for a narrow blade flat screwdriver, or the #4 blade in the iFixit Essentials Toolkit. Thanks to iFixit for coming up with that kit, so very handy for us non-professional home repair enthusiasts!
Items needed for this job:
Regrettably I can’t add imagery (apparently) if I submit comments, so I have to keep you apprised here in the “Answer” mode.
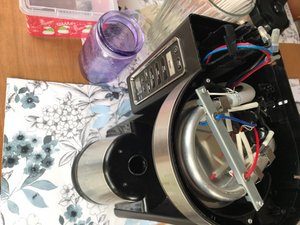
The crystal/LED device I ran into is unlike others described for repair in videos. You can see that not all the crystals/LED’s light up. There’s no obvious “zebra” strip I can clean with a cotton cloth or Kemwipe and alcohol. It has 12 pins that are soldered through the board. How the pins interact with the screen I can’t tell yet. Any idea how to get at that? There is an outer black plastic shell that has 4 round feet going thru the board, either glued or heat-melted in place; the assembly is so precise I can’t tell. Popping that off may expose the screen contact interface, but I don’t want to force the shell as it may be clipped somehow to the screen.
Has anyone dealt with this type of screen assembly before?
Unit plugged in:
Unit unplugged:
I thought there were more comments here before, and don’t see them now, about the cb components and testing each LED lead.
Mention was made about the “Zener” diodes, and I tested them albeit in place on the board. ZD1 allowed flow in one direction. ZD2 in both directions. And ZD3 in neither direction. Not that I know what I’m doing with it, but my fancy tweezers tester (LCR Research) read “Damage” for all three. Should I assume that ZD1 is flowing electrons in the wrong direction, ZD2 should only flow one direction like any good diode should, and ZD3 is just plain shot?
War diese Antwort hilfreich?
Bewertet
Rückgängig machen
Bewertung
0
Abbrechen
Schau durch den Thread, bis du den richtigen Platz für diesen Kommentar gefunden hast. Klicke dann auf "Den Kommentar diesem Post zuordnen", um ihn zu verschieben.


2 Kommentare
Many fascia plates are snapped-in place with precision for assembly, not lending themselves for disassembly. This may require inflicting marring plastic as you pry apart the escutcheon plate if it is a separate snap-in for access to the control module. A search turned up a used Ninja CE200 for $17 on ebay. Perhaps buying this can let you experiment on disassembly, making any mistakes as a learning curve to repairing yours plus have spare parts if needed.
von F Dryer
Sorry this is 2 months+ tardy. The Ninja’s been on the wife’s dinner table for that time while other matters took precedence. The Keurig 2.0 has earned new users in the interim. Thanks F Dyer for the input.
I reckon when time affords I’ll try prying the case open/out. Maybe I can do it without damaging the escutcheon’s appearance from the front of the machine. I don’t really want to throw any more $ at it or have a second machine laying around. A Dremel may be used to cut into part of the electronics case so I can see from its inside how it’s actually fastened in, though you are probably right; some machine parts snap in and are never designed to be removed. I might end up deliberately cutting or breaking the escutcheon, removing it all together, and glueing the case back in place.
I was kinda hoping iFixit techs might be curious enough to tear down a Ninja like ours, one of their popular models.
von Hafcanadian