Zum Hauptinhalt wechseln

Was du brauchst

Einführungsvideo

Dieser Teardown ist keine Reparaturanleitung. Um dein Shoe zu reparieren, verwende unsere Fehlerbehebungsseite.

  1. Pleaser Flashdance Shoe Teardown, Pleaser Flashdance Shoe Teardown: Schritt 1, Bild 1 von 2 Pleaser Flashdance Shoe Teardown, Pleaser Flashdance Shoe Teardown: Schritt 1, Bild 2 von 2
    • I had already pulled apart the first shoe before filming.

    • When I went to pull apart the second one, I found that the last time the sole had been repaired, the bonding worked really really well.

    • This made it very difficult to pull the shoe apart. So instead I'll show the shoe I had already pulled apart.

  2. Pleaser Flashdance Shoe Teardown: Schritt 2, Bild 1 von 3 Pleaser Flashdance Shoe Teardown: Schritt 2, Bild 2 von 3 Pleaser Flashdance Shoe Teardown: Schritt 2, Bild 3 von 3
    • Before getting to the electronics the common spots for these shoes to fail is:

    • The sole starts to lift from the platform,

    • The suede on the front of the toe rips and peels,

    • The ankle strap tears,

    • The toe strap tears.

  3. Pleaser Flashdance Shoe Teardown: Schritt 3, Bild 1 von 3 Pleaser Flashdance Shoe Teardown: Schritt 3, Bild 2 von 3 Pleaser Flashdance Shoe Teardown: Schritt 3, Bild 3 von 3
    • The shoe works by charging with a micro USB next to the power button on the shank of the shoe.

    • The power button also cycles the colours and modes.

    • To protect the electronics, the shoes come with a warning to avoid excessive banging and moister.

  4. Pleaser Flashdance Shoe Teardown: Schritt 4, Bild 1 von 3 Pleaser Flashdance Shoe Teardown: Schritt 4, Bild 2 von 3 Pleaser Flashdance Shoe Teardown: Schritt 4, Bild 3 von 3
    • The RGB LED light strip is glued to the platform.

    • The strip ran down the shank of the shoe and then wrapped around the shell containing the battery and board.

    • This board shell in held in place under the sole in the box of the platform. The plastic box was sealed with glue.

    • Warning: It was difficult to remove the glue that sealed the shell. The battery could have been damaged when removing it from the case.

  5. Pleaser Flashdance Shoe Teardown: Schritt 5, Bild 1 von 3 Pleaser Flashdance Shoe Teardown: Schritt 5, Bild 2 von 3 Pleaser Flashdance Shoe Teardown: Schritt 5, Bild 3 von 3
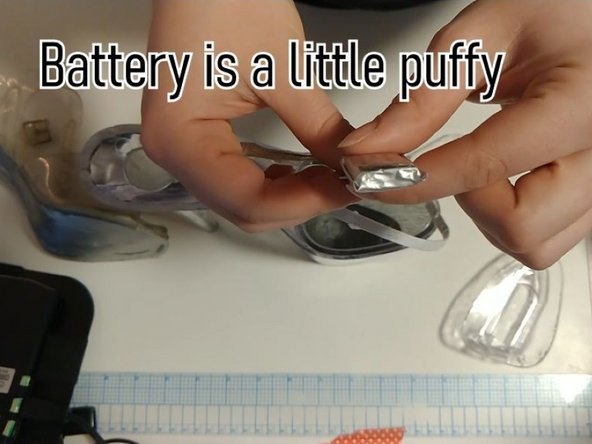
    • The shell cracked, especially at the center, there's a clear indent from the chip in the middle of the board.

    • Unfortunately, after taking this shoe apart, while I was trying to take detail shots, the wire that connects to the button and USB charge port broke.

  6. Pleaser Flashdance Shoe Teardown: Schritt 6, Bild 1 von 3 Pleaser Flashdance Shoe Teardown: Schritt 6, Bild 2 von 3 Pleaser Flashdance Shoe Teardown: Schritt 6, Bild 3 von 3
    • I also found some burning where the battery is soldered to the board and the battery is a little bit of a spicy pillow.

  7. Pleaser Flashdance Shoe Teardown: Schritt 7, Bild 1 von 1
    • All the pieces.

Stashtree

Mitglied seit: 02/16/22

145 Reputation

1 Anleitung geschrieben

0 Kommentare

Kommentar hinzufügen

Seitenaufrufe:

Letzte 24 Stunden: 3

Letzte 7 Tage: 5

Letzte 30 Tage: 29

Insgesamt: 981