Einleitung
Vor fast genau einem Jahr haben wir das Galaxy S5 auseinander genommen, aber Samsung ist mit dem Design des Galaxy S6 Edge um Lichtjahre vorwärts gesprungen. Nur ein Teardown wird zeigen, ob es durch seine Glas-Aluminium-Konstruktion und seinen gebogenen Bildschirm auch ebenso zukunftsorientiert ist wie das futuristische Design uns Glauben machen mag. Begleite uns auf den Weg an den Rand der (neuesten) Galaxie!
Damit du nichts verpasst, folge uns auf Twitter, schließe dich unserem inneren Kreis auf Facebook an, oder sieh dir ein paar Fotos auf Instagram an, die nicht von dieser Welt sind.
Was du brauchst
Einführungsvideo
-
-
Dieses neue Mobiltelefon hat einen ziemlichen Sechsappeal. Nennenswerte Verbesserungen sind unter anderem:
-
5,1" Super AMOLED kapazitiver Touchscreen (1440 x 2560, ~577 ppi, 16M Farben)
-
Samsung Exynos 7 Octa 7420 Prozessor mit integrierter Mali-T760 GPU und 3 GB Speicher
-
16 MP Rückkamera mit HDR, LED Flash, und 4K Videoaufnahme
-
Eingebaute Unterstützung für Qi und Powermat kabelloses Laden
-
32/64/128 GB Speicheroptionen (aber kein microSD Slot)
-
Corning Gorilla Glass 4 Rückseite
-
-
-
Bisher sind wir ziemlich beeindruckt vom Edge. Mit seinen eleganten Kurven und dem scharfen Display liegt das S6 in der Handfläche wie ein Infinity-Pool...
-
... bis auf die Tatsache, dass es sich wesentlich weniger ergonomisch anfühlt, und ein totaler Magnet für Fingerabdrücke ist.
-
Ein kurzer Blick von beiden Seiten zeigt das Info-Feature, das alle wichtigen Nachrichten, Wetter und Benachrichtigungen seitlich am Bildschirm anzeigt.
-
Wir werfen einen Blick auf die Näherungs- und Gestensensoren sowie auf die Frontkamera, die alle hinter dem Gorillaglas des Edge eingesperrt sind.
-
-
-
An der Kante des neuen Galaxy befinden sich der Lautsprecher und das Mikrofon, sowie der Kopfhöreranschluss und ein USB 2.0 Port.
-
Der nun vertraute Herzfrequenzmesser ist unter dem LED Blitz sichtbar, gleich neben der Rückkamera.
-
Leider haben Manche schon Probleme mit dem Sensor.
-
Auf der Oberkante des Smartphones befindet sich ein zweites Mikrofon, sowie der IR Blaster und das SIM Kartenfach.
-
-
-
Sehen wir uns die Rückseite dieses hochmodernen Gerätes an. Wir nehmen die Modellnummer SM-G925T zur Kenntnis und machen uns daran, die Rückabdeckung zu entfernen.
-
Die Rückabdeckung klebt bombenfest und ist zudem sehr fest in den Rahmen eingepasst. Selbst geduldiges Arbeiten mit dem iOpener reicht nicht aus, und wir müssen den großen Saugheber rausholen, um ein Plektrum unter die Abdeckung schieben zu können. Macht definitiv keinen Spaß.
-
Wir blicken wehmütig zurück auf eine Zeit, als Samsung noch extrem nutzerfreundliche Öffnungen zum Ersetzen des Akkus hatte. RIP.
-
-
-
Unsere Opening Picks (Plektren) sind sehr hilfreich, um in das Innere des Edge zu gelangen.
-
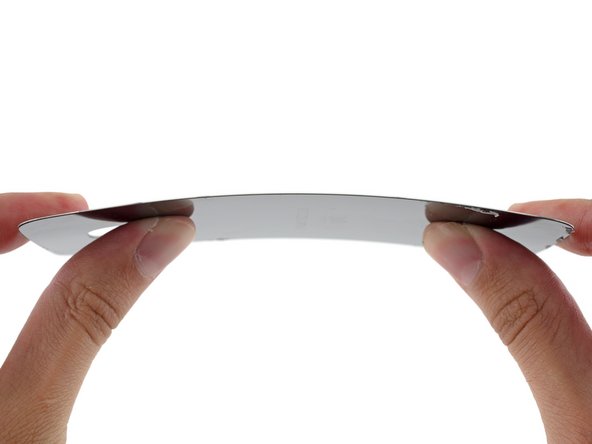
Aber selbst unsere dünnen Plektren haben Schwierigkeiten, die Kanten dieses Glases zu bewältigen.
-
Mit
ein bisschensehr viel Hilfe von unserem Freund, dem iOpener und einem Haufen Geduld schieben wir uns um die Kanten des Gerätes herum. -
Die Rückseite ist entfernt (wenigstens fast). Darunter treffen wir auf eine ziemlich klebrige Situation ... aber das sollten wir hinkriegen.
-
-
-
Mit ein paar Zauberworten (und etwas wohlangebrachter Kraft) löst sich das festgeklebte Panel vom Rest des Smartphones.
-
Nachdem das Panel nun endlich entfernt ist, kann der Kleber leicht vom Glas abgezogen werden, aber auf dem Mittelrahmen aus Metall bleiben klebrige Rückstände.
-
Als wir hörten, dass das S6/S6 Edge mit einem Glaspanel geliefert wird, hatten wir einen Flashback ins Jahr 2011, aber nach unserem komplexen Stresstest scheint es, als sei Glas in vier Jahren weit gekommen.
-
-
-
Bei jedem vorherigen Galaxy Smartphone, inklusive dem Galaxy S5 vom letzten Jahr, das reparaturtechnisch ein ziemliche Herausforderung war, war das jetzt eigentlich der Moment, in dem wir den Akku einfach mit dem Fingernagel rausholen konnten.
-
Unsere guten alten Freunde, der Schraubendreher und das Plastiköffnungswerkzeug, kommen uns zur Hilfe. Wenigstens sieht es so aus, als seien wir mit dem Kleber fertig, denn der Mittelrahmen lässt sich recht leicht entfernen und wir können all die netten Dinge darunter entdecken.
-
-
-
-
Nachdem der Mittelrahmen entfernt ist, können wir uns endlich den Akku und das Motherboard anschauen.
-
An diesem Punkt können wir normalerweise den erweiterbaren Speicher in Form einer MicroSD Karte entfernen. Aber wo ist sie? Ach ja richtig, Samsung hat sie eliminiert. Wenn du also zusätzlichen Speicher brauchst, solltest du ihn von vornherein kaufen, denn du kannst ihn hinterher nicht mehr hinzufügen.
-
Der Mittelrahmen ist voller netter Dinge, da gibt es haufenweise Federkontakte, eine NFC/kabellose Ladespule und einen Lautsprecher.
-
Wir hätten wirklich gerne jetzt sofort den Akku herausgeholt, aber im Moment müssen wir uns wohl damit begnügen, ihn vom Motherboard abzutrennen.
I fix phones for a living, and today I ran across what seems to be a later revision of this phone that has BIG PROBLEMS here. The screws on either side of the charging port are missing from this one - the antenna runs straight across and the screw holes are gone. On the inside, the plastic part of the speaker includes an extra bracket that basically has the charging port sandwiched between the housing and the speaker. There's also a screw holding the headset jack to the front housing that can't be removed until the rear housing is off.
The end result is that taking this other version apart will probably result in the charging port flex destroying itself and the need to replace the back housing and speaker.
The model number on this one was SMG925VZWA, a US Verizon version. I didn't have any other ones handy to compare the model number, but you can definitely see the difference once the back glass is off. If those screw holes are missing, be VERY careful taking it apart, and expect to need more parts.
-
-
-
Beschriftete Antennen auf dem Mittelrahmen, wie niedlich.
-
Samsung zufolge sind die Antennen durch Ultraschallverschweißung auf den Mittelrahmen geschweißt, was für Stabilität sorgt und Platz spart.
-
Wir haben auch ein Loch für die Einschalttaste im
RaumzeitkontinuumMittelrahmen gefunden.
Space continuum cracked me up.
Me too! I had to do a double read it made me laugh out loud!
whats the function of the golden belt lining that touches the black cover on 2 ends and goes round the camera
-
-
-
Nachdem jetzt alle Stecker gelöst sind, ist das Motherboard fast frei vom Display, es teilt sich noch die gleiche wackelige, verkehrte IO Board Verbindung, die wir zum ersten Mal im Galaxy S5 gesehen hatten.
-
Wir entfernen die Hauptkamera vom Motherboard, um einen besseren Blick auf die Hardware auf der Leiterplatte werfen zu können:
-
Winbond W25Q32FW serieller Flash-Speicher
-
InvenSense IDG-2030 Zwei-Achsen Gyroskop für die optische Bildstabilisierung
-
Neben der 16 MP OIS Rückkamera sieht die 5 MP Seife-Kamera aus wie ein Zwerg.
-
-
-
Wie Chipworks in seiner jüngsten Galaxy S6 Analyse bemerkte, werden immer mehr Chips in den Samsung Flaggschiff-Smartphones firmenintern hergestellt. Auf der Vorderseite des Motherboards finden wir folgendes:
-
Samsung Exynos 7420 Octa-core Prozessor - 64-bit, 2.1 GHz Quad + 1.5 GHz Quad, mit einer eingeschichteten Samsung K3RG3G30MM-DGCH 3 GB LPDDR4 RAM
-
Samsung KLUBG4G1BD 32GB NAND Flash
-
Skyworks 78041 Hybrid Multimodus Multiband (MMMB) Frontmodul (FEM)
-
Avago AFEM-9020 PAM
-
Wolfson Microelectronics WM1840 Audio Codec und Maxim MAX98505 Class DG Audio-Verstärker
-
Samsung N5DDPS3 - ähnlich wie das N5DDPS2 im Galaxy S6, wahrscheinlich ein NFC Controller
-
InvenSense MP65M 6-Achsen Beschleunigungsmesser + Gyroskop und Samsung C2N89U (wahrscheinlich ein Bildprozessor)
Does the phone support MHL? I did not see the chip for MHL like S5
-
-
-
Auf der anderen Seite des Motherboards befindet sich noch mehr Steuerungs-Hardware sowie eine Menge Power-Management-ICs:
-
Samsung Shannon 928 RF Sende-Empfänger
-
Broadcom BCM4773 GNSS Location Hub
-
Avago ACPM-7007 PAM
-
Maxim MAX77843 Companion PMIC
-
Verschiedene Samsung Shannon PMICs
-
-
-
Eine Glasrückseite und ein hartnäckig verklebter Akku? Samsung, hast du dich etwa mit Apple herumgetrieben?
-
Nur schade, dass du nicht auch gleich andere praktische Dinge von Apple übernommen hast. Keine Spur von Zuglaschen zum Beispiel, also muss dieser fiese Kleber Streifen für Streifen abgepult werden.
HAHAHAHAHAHA now THAT was hilarious :D
I loved the jokes. Thanks guys for making this article so fun
-
-
-
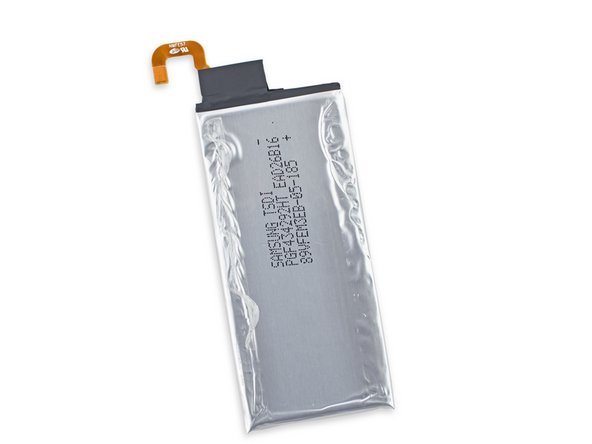
Losgelöst von diesem klebrigen Zeug können wir uns den 3,85 V, 10,01 Wh Akku besser anschauen.
-
Samsung ist von dem 2800 mAh Akku des Galaxy S5 wieder abgekommen und nutzt jetzt wieder einen 2600 mAh Akku, wie schon im S4.
-
Samsung behauptet, dass der Akku des Edge 12 Stunden LTE Internetsurfen ermöglicht, sowie 26 Stunden 3G WCDMA Sprechzeit und bis zu 58 Stunden Musikwiedergabe.
-
Und er ist ganz nagelneu! Ehrlich, schau dir das Datum an.
-
-
-
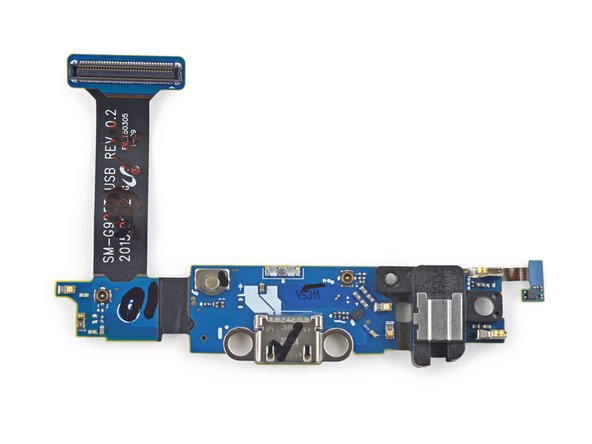
In einem (weiteren) offensichtlichen Rückschritt, ist beim S6 Edge der blitzschnelle Micro-B USB 3.0 Port des Galaxy S5 zugunsten eines ganz banalen microUSB (2.0) Ports ausgetauscht worden.
-
Willkommen im Jahr 2000.
With the very least frame modding and loss of headphone jack. If you use the s5 modular cable. If it will even plug in or work.
-
-
-
Wir haben das Edge in ein iOpener Nest gebettet, hoffentlich erwacht es frisch und munter und mit losgelöstem Kleber.
-
Wir heben das Glas an und ... Moment, ist das normal?
-
Es scheint so, als ob wir durch das Hebeln im gebogenen Teil des Glases das Display ein bisschen abgetrennt haben. Ups.
Did you just break the screen? Does it still work? If it doesn't is there any way to replace the home button without breaking the display?
My screen is cracked and I really don't want to pay 200 dollars for it to be fixed. Is it really impossible to replace just the glass without breaking the digitizer?
repair-ability is a 3 when the apple watch got a 5 where the majority of the apple watch is "unrepairable". Something needs to be done with yalls scale as currently it looks like your an apple supporter and Samsung basher. Having to mod your tool with a file just to remove the screws on the apple watch trumps a glued back or glued battery in my opinion of repair-ability. Not trying to create any waves just pointing out the lack on continuity across your repair-ability ratings. Thanks for giving me a heads up look at the teardown for these devices as it's much appreciated.
Look at what you have to do to replace the screen on both devices. the edge needs to have complete disassembly the watch just pops off. the battery on the edge requires removing the back glass and a complete teardown, the watch just remove the screen and there sits the battery
wesley burson, the phone doesn't need a full disassembly. At stage 8 you can remove the LCD.
Point taken for screen and battery replacements... what about everything else tho? On the apple watch jut about everything else was "unrepairable". How is a device with multiple components "unrepairable" ranked higher then a device that is reparable regardless of the difficulty. I would think "unrepairable" would have a lower score for the simple fact that if one of those components have an issue there is no repair option where with the S6 at least it's possible to repair. We are talking repairability here on an over all scale not just screens and batteries.
I believe there should be subcategories like:
1. Openability
2. Repraceability
3. Destructibility
4. Separability/Removability
Then the average will give the Repairability score. :)
dyanro -
Is the glass able to separate from lcd?
there is a missing part you didn't mentioned on top of the phone named "Ear Speaker & RCV Sensor - GH96-08091A" which controls proximty, front led and also speaker voice. why? http://i.hizliresim.com/BPLWZQ.jpg http://i.hizliresim.com/Zk9jLo.jpg
-
-
-
Es biegt sich! Beim Ablösen des Displays kann man genau sehen, wie sich das Samsung Display in die gebogenen Kanten einpasst.
-
Auf der Rückseite des Displays befindet sich der übliche Touchscreen-Controller, dieses Mal handelt es sich um einen STMicro FT6BH.
Hi
When removing the glass did you break the digitizer... from what I know the digitizer is glued to the screen glass but yet is connected to the lcd.. so when you remove the glass from the lcd you inadvertently break the digitizer in the process.. did you have any issues with this...
Many thanks
Steven Steward
Hi...I actually have a problem with the reciver of the phone and also the aux isn't working..which part should I buy to get it fixed..
Jayesh -
My phones voice reciver and the aux ain't working which paet do I need to buy to fix it...
Jayesh -
S6 egde voice reciver and the aux isnt working which part do I need to replace for it...model no g925t
Charge port handled all of those features
Wow! 50% yield. That's terrible. Very interesting reading iFixit! Thank you.
That's insane. That just gave me a reason to not buy a galaxy. They need to figure out a better way of manufacturing the screens. Which also explains why Samsung parts are so expensive compared to Apple. The yield. You are actually layig Samsung for 2 screens that's ridiculous.
-
-
-
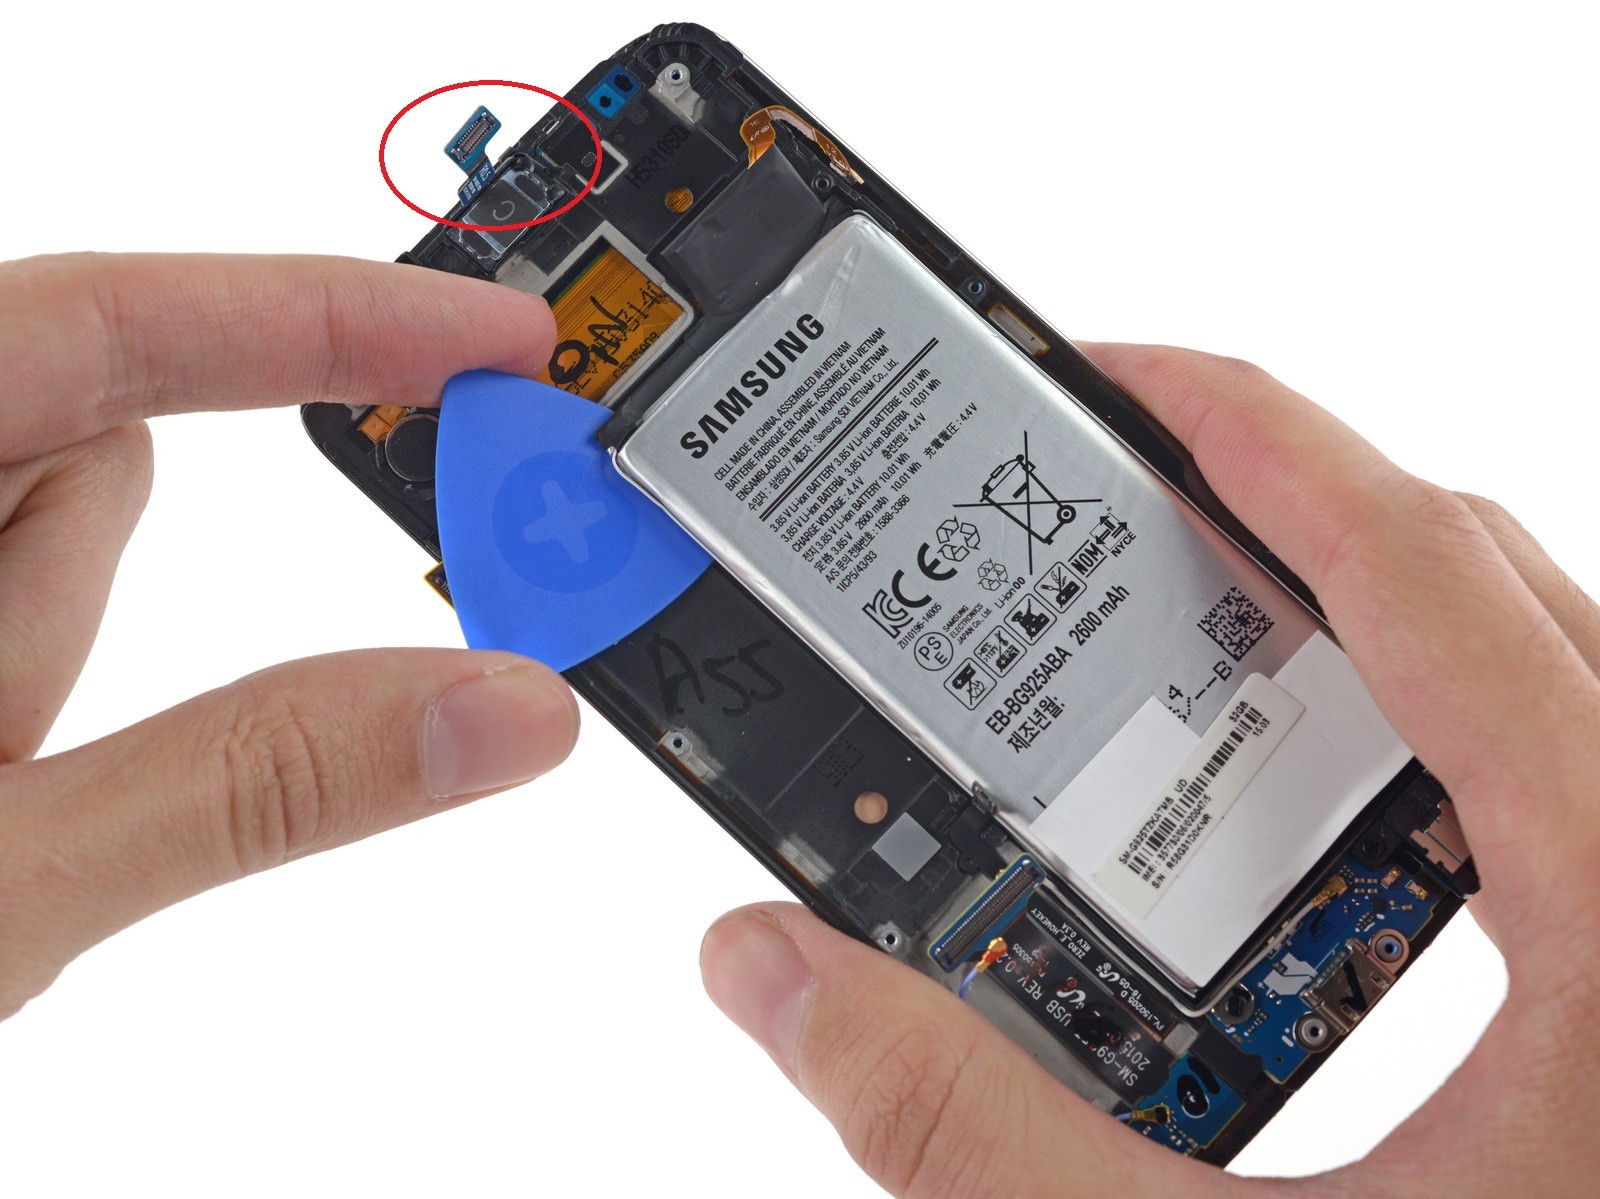
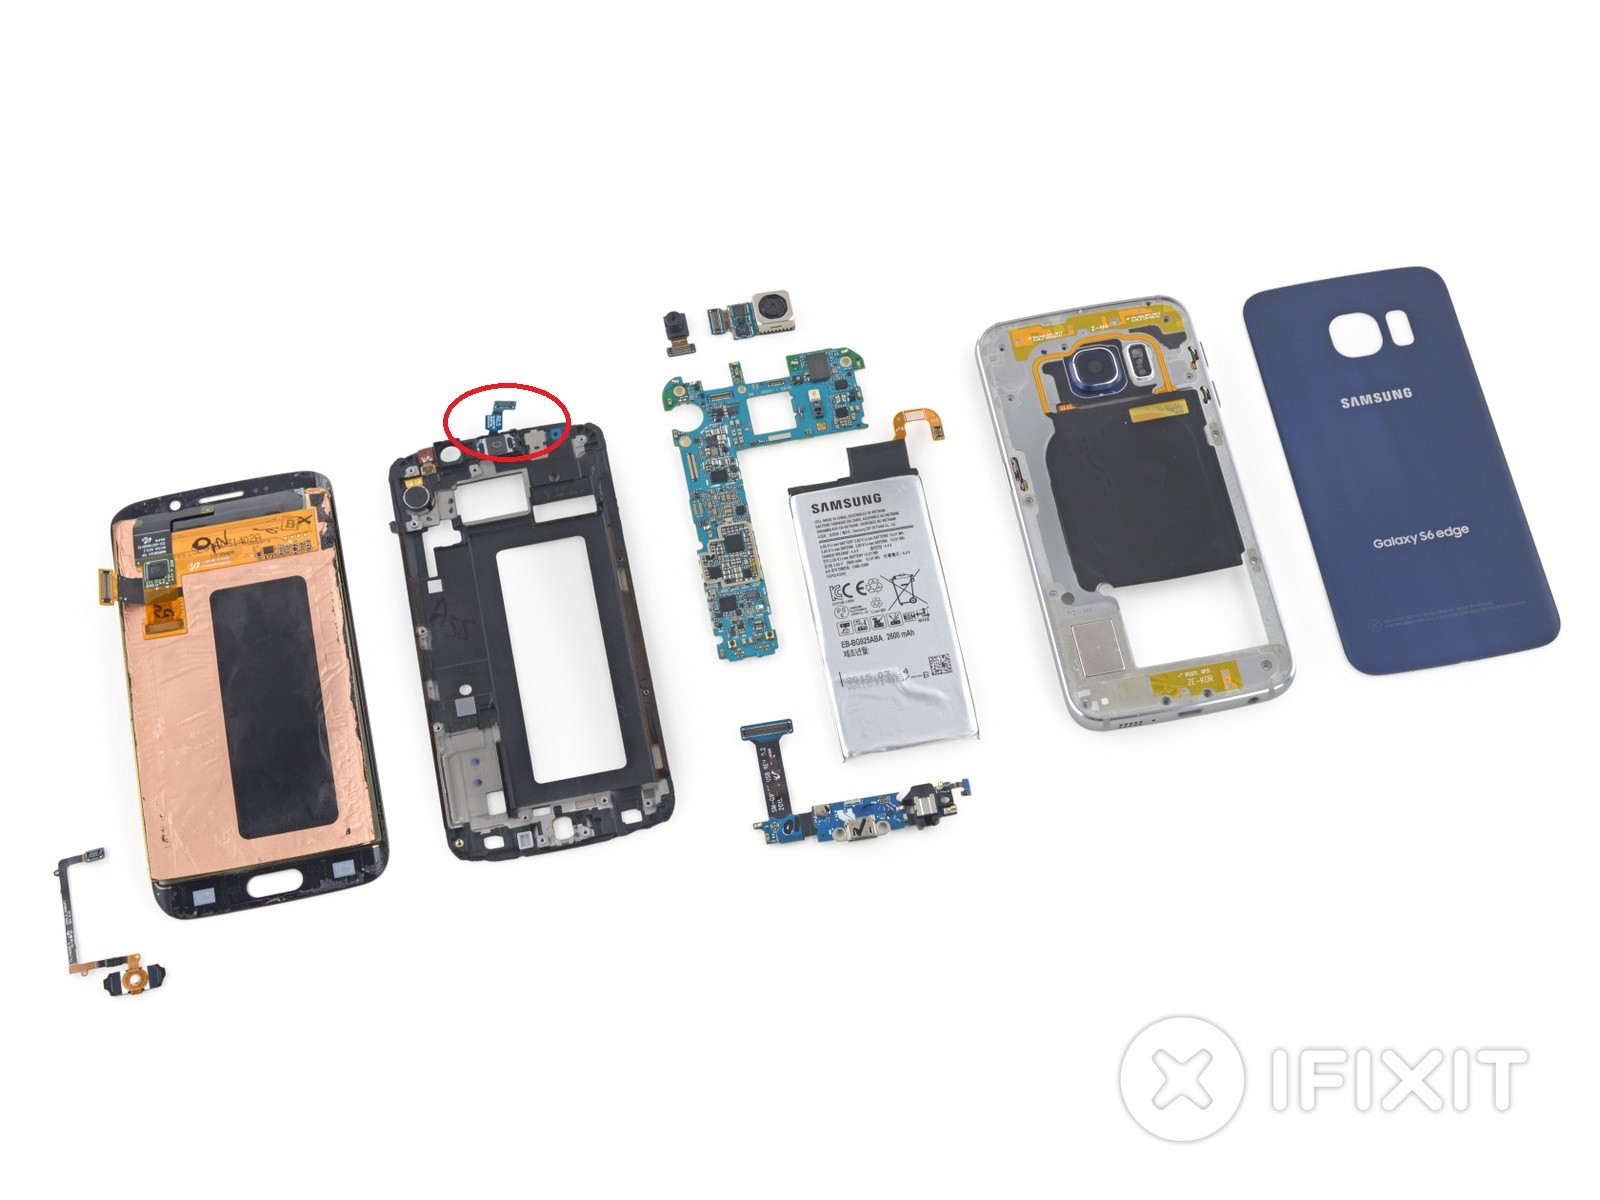
Die letzte Komponente, die von der Displayeinheit entfernt wird, ist der modulare Home Button.
-
Ebenfalls im Gegensatz zum S5, sind geheime Falltüren unnötig.
-
Der Weg zum Home Button ist ja jetzt Gott sei Dank ein anderer als im letzten Jahr, als wir das Theater mit dem Display hatten, das zuerst entfernt werden musste. Hm, aber ist dieser Weg wirklich besser? Naja, schlimmer kanns ja kaum werden.
-
-
-
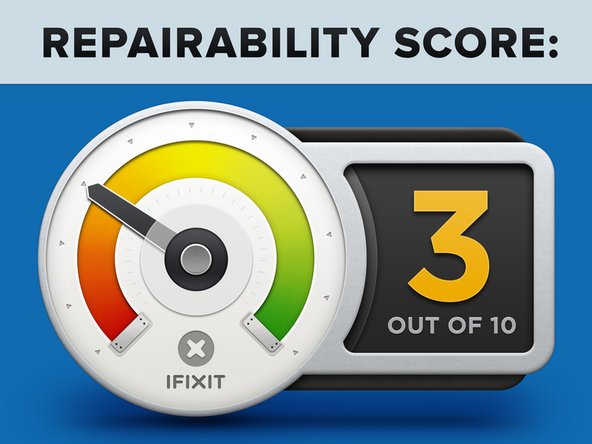
Das Samsung Galaxy S6 Edge erhält 3 von 10 Punkten auf unserer Reparierbarkeits-Skala (10 ist am einfachsten zu reparieren).
-
Viele Komponenten sind modular und können unabhängig voneinander ersetzt werden.
-
Im Vergleich zum Design des S5 ist es eine Verbesserung, dass das Display nicht mehr entfernt werden muss, um ins Innere des Smartphones zu gelangen und das Motherboard zu ersetzen.
-
Eine Vorder- und eine Rückseite aus Glas verdoppelt die Zerbrechlichkeit und starker Kleber auf der Glasrückseite erschwert den Zugang zum Inneren des Gerätes.
-
Der Akku ist sehr fest mit der Rückseite des Displays verklebt und er ist völlig unter dem Mittelrahmen und dem Motherboard vergraben.
-
Es wird wohl sehr schwierig werden, das Glas zu ersetzen, ohne das Display zu zerstören.
Buongiorno,
complimenti per una guida così chiara.
Il punto è che avendola seguita, ho cambiato la scheda madre del mio S6 Egde (925F).
Funziona tutto egregiamente ma la ricezione e soprattutto l’invio dati sotto copertura 3G, 4G, LTE è lentissima.
Lo Speedtest spesso dice che la velocità di upload è zero. Ho anche fatto un factory reset, ma niente…
Cosa posso aver sbagliato? Cosa devo controllare?
Grazie mille in anticipo per la risposta
-


Besonderer Dank geht an diese Übersetzer:innen:
95%


Diese Übersetzer:innen helfen uns, die Welt zu reparieren! Wie kann ich mithelfen?
Hier starten ›

24 Kommentare
Holy He11 you guys got the phone that says "A S S" in it. I wouldn't rate this a "3" this is more like a 5 in my book. You guys rate a m7 as a "1" which is one of the more difficult phones out there but its still easier than some of the older Motorolas.
Do I know you??????
That sure looks like a MicroSD receptacle on image "Step 11" on the bottom left corner of the board. Is that the Simm Card receptacle or a MicroSD receptacle?
That's the SIM card receptacle.
Ryan -
SD Card Yeah Nelson Bush, that is an SD card slot. Everybody in Samsung forgot they put it there. Ooops.
Hi,
I've just replaced a broken screen, everything went well, but soft keys (Back and Recent apps) not working on new screen ! Are those keys being controlled by screens digitizer of the daughter board that has the LEDs for them ?! should I send back the new screen as faulty ?! or sth happened to daughter board when I opened it (which I doubt).
Any suggestion ?!
Thanks
The soft keys are part
Of the screen on the s6 edge. The standard s6
Soft keys are on the charge port. So faulty screen
Incorrect. The touch buttons on the S6 Edge are also on the daughterboard, but are not ribbons that attach to the screen frame (as with the S6). Instead, they are on the opposite side of the daughterboard and are pressed into place by the natural pressure of the board against the screen. This makes the replacement of a charging port much easier due to not having to remove the LCD from the frame, which is tedious. Replacing the home button is the same as on the S6 - you will have to remove the screen frame from the LCD to access it.
mbrulla -
UPSM ON
UPSM OFF
Work?
would the main motherboard from a G925T work with the parts from a G925i
i dropped my phone in water. is there any way to recover the data or fix the phone?
How To Remove The Wi-Fi Adapter? (For Kid-Safe Phone)
It's much easier to root the phone and disable the wifi chip in the build.prop file. Google that.
I would be more worried about disabling cellular than disabling wifi.
Hello! Where can one get a genuine battery replacement. Samsung in my country won't replace my faulty battery saying I didn't buy the phone from the region.
I have my s6edge+ all in pc's I need digitizer LCD battery. And the main belt wire front face glass weird mine was plexiglass and I'm ready to assemble.
Hello Guys i have probleme in my phone samsung galaxy s6 edge the probleme is many stop in work and many time i restard my phone his stopped in samsung logo of depart please help me when probleme hardware or software thanks.
Hi, I replaced the sim card reader (not the tray) and now the phone does not turn on wifi. It attempts to turn on wifi for about 10 minutes and gives up. Would appreciate if you can suggest any solutions. Thanks
Why have a fake picture of the phone for this??
iliketurtuls - Antwort
Yeah omg i just noticed it!
allafman5 -
Good question.
HakanEr -
Wait, what? Which picture?
Lucas Gallindo -
I am so sick of being told no by manufacturers when it comes to repairs. The argument about needing to design a device this way to make it thin is a big fat lie.
gallardo - Antwort
Isn't the reversion to usb 2.0 for the rapid charging to work?
codycowgill - Antwort