Einleitung
Dieser Teardown bringt noch ein bisschen Geschichtskenntnisse mit. :)
Hier wird ein Sony TR-63 Transistorradio gezeigt - die iFixit Sony Teardown Promotion erinnerte mich daran, dass ich noch ein längst vergessenes in der Schublade hatte. Wenn wir schon Teardowns von aktuellen Sony-Produkten erstellen, warum fangen wir nicht mit einem der ersten an?
Der TR-63 erschien 1957 - es war der erste je produzierte Taschen-Transistorradio und das erste von Sony nach den USA exportierte Gerät. Die Firma hieß damals noch Tokyo Tsushin Kogyo Company (Tokyo Telecommuncations Engineering Corporation). Es wurde ein großer kommerzieller Erfolg, über 100,000 Stück wurden verkauft.
"Taschenradio" war wohl eine damalige Marketingaussage - das TR-63 war zwar kleiner als alle Konkurrenzprodukte, aber doch etwas zu groß für eine o normale Hosentasche. Man erzählt die Anektode, dass die Verkaufsleute von Sony Kleidung mit extra geschneiderten großen Taschen zu Demonstrationszwecken trugen. Anders als die Kofferradios von heute, die ja ausdrücklich als Gerät für überall beworben werden, wurde der TR63 angepriesen als etwas, was eine Person für sich alleine benutzen und mitnehmen sollte. Eine Vorahnung für den Walkman und den iPod?
Der TR-63 hat überwältigende 6 Transistoren. Zum Vergleich: der Chip im PS3 enthält zwei- bis dreihundert- Millionen Transistoren. Das zeigt den enormen Fortschritt der Elektronikindustrie in den vergangenen Jahrzehnten.
In Japan wurde der TR-63 für 13 800 Yen verkauft, der ursprünglich Exportpreis war U$39,95. Es gab ihn in vier Farben (gelb, rot, grün und schwarz).
Folge nun dem Teardown dieses wichtigen Stücks von historischer Konsumelektronik.
Was du brauchst
-
-
Noch ein paar Trivialitäten...
-
Die Mitgründer der Firma merkten, dass es für Fremde schwer war, sich die japanischen Namen zu merken und auszusprechen. Sie entschieden sich für die Namensänderung, um zu expandieren und weltweit bekannt zu werden. Wie es so schön heißt: der Rest ist Geschichte.
-
-
-
Genug geplaudert, an die Arbeit. Hier kommt der wirklich erste Schritt 1...
-
Oben auf Radio siehst du die Kopfhörerbuchse.
-
Drehe die Metallhülse heraus, benutze dazu einen Flachschraubendreher oder ein anderes geeignetes Werkzeug.
-
-
-
Drehe die große Dekorschraube mitten im Einstellrad für die Sender mit der Hand heraus.
-
...dann kannst du sie entfernen und das Einstellrad abheben.
-
-
-
Lege das Radio so, dass die Rückseite zu dir zeigt.
-
Die Garantie ist mit Sicherheit schon lange abgelaufen - wir können also ohne Angst weitermachen.
-
-
-
Fange mit dem Aufhebeln vorsichtig an der Unterkante des Gehäuses an.
-
Mann, das geht leichter als am iPod! Einen (Spudger brauchst du dazu nicht)
-
Im Inneren der Rückseite ist ein Produktaufkleber. Hier steht auch der ursprüngliche Firmenname Tokyo Tsushin Kyogo Ltd. Ich habe Fotos von späteren Versionen des TR63 gesehen, wo hier "Sony Corporation" aufgedruckt ist.
-
Keine Ahnung, warum die Ecken des Aufklebers abgefressen sind. In all den Jahren in meiner Schublade war da vielleicht ein Grue dran?
-
-
-
Hier ist die Leiterplatte in all ihrer Pracht.
-
Dieses Radio hat eine Batterie, die der Benutzer leicht auswechseln kann! (Eine Standard 9V Batterie).
-
-
-
-
Entferne die einzelne Kreuzschlitzschraube #1, mit der die leiterpzin der Mitte befestigt ist.
-
Zum Glück war die Torx -Schraube in der Zeit, wo dieses Radio gebaut worden ist, noch nicht erfunden.
-
-
-
Hebe jetzt die Leiterplatte behutsam heraus.
-
Eventuell musst du ein bisschen wackeln. Das Einstellrad für die Lautstärke muss aus ihrer Öffnung herauskommen, bevor sich die Leiterplatte ausbauen lässt.
-
-
-
Der Kopfhöreranschluss besteht aus einigen Metallstreifen. Er funktioniert auch als Schalter; wenn der Kopfhörer angeschlossen wird öffnen sich die Kontakte und der Lautsprecher wird abgeschaltet.
-
Hebe den Kopfhöreranschluss sorgfältig heraus und lege ihn neben das Gehäuse, immer noch mit dem Lautsprecher verbunden.
-
-
-
Der Lautsprecher ist mit zwei Metallösen befestigt, die mit zwei Muttern festgeschraubt sind.
-
Löse die beiden Muttern mit einer 5 mm Nuss.
-
Wenn die Muttern gelöst sind, kannst du den Lautsprecher vom Gehäuse entfernen.
-
-
-
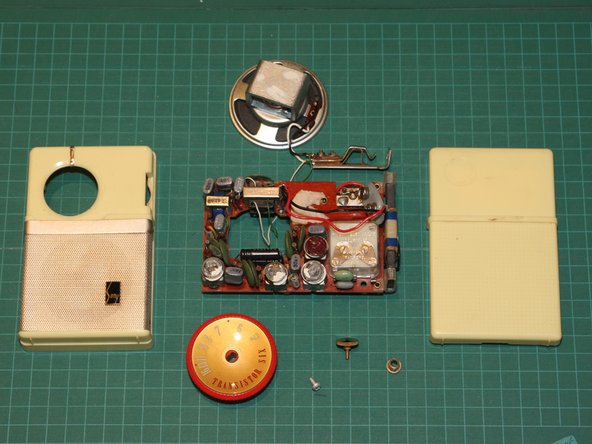
Im Bild sind die Leiterplatte, die Kopfhörerbuchse und der Lautsprecher nach der Demontage zu sehen.
-
Beachte, dass Bauteile auf beiden Seiten der Leiterplatte montiert sind. Sind die Widerstände und Kondensatoren auf der Lötseite vielleicht technische Änderungen der letzten Minute?
-
Andererseits ist die Leiterplatte auf der Bestückungsseite so dicht gepackt, dass einfach nicht genug Platz für alles war.
-
-
-
Hier eine Nahaufnahme der Leiterplatte von der Lötseite her.
-
Anders als bei moderner Elektronik sieht man gleich, dass dieses Radio noch mit der Hand zusammengebaut und verlötet worden ist.
-
Ich frage mich, welche Note mein Techniklehrer aus alten Schultagen wohl dafür gegeben hätte?
-
-
-
Das Bild zeigt die Leiterplatte von der Bestückungsseite her.
-
Die verschiedenen Bauelemente sind gut zu erkennen. Denke dran - das sind alles diskrete Bauelemente, keine integrierte Schaltungen. Das war damals Spitzentechnik mit ganz höher Packungsdichte.
-
Die sechs grauen Bauteile mit ovalem Querschnitt (mit "Sony" markiert) sind Transistoren.
-
Das siebte ähnliche graue Bauteil ist ein Varistor. Er ist im dritten Foto vorne rechts auf der Leiterplatte zu sehen.
-
Werden die Farbcodes für Transistoren heutzutage immer noch in der Schule unterrichtet?
They do! But there's also an app for that. ;)
-
-
-
Das hier ist eine Nahaufnahme des Einstellrads für die Lautstärke/ der Ein-, Ausschalter.
-
Eine Exzenternocke in der Mitte des Einstellrads öffnet oder schließt einen Kontakt (grün markiert) für die Stromversorgung.
-
-
-
Wenn wir schon dabei sind: hier noch ein paar mehr Bauteile...
-
Die grauen Bauteile mit dem ovalen Querschnitt sind die Transistoren.
-
-
-
Hier sind alle Bestandteile des komplett zerlegten TR63 Transistorradios von der Vorder- und Rückseite aus zu sehen.
-
Das war's.
-
Das ist nur eines von vielen Sony Gadgets die ich im Laufe der Zeit erwerben möchte. Ich hoffe, dass dir dieser Teardown gefallen hat.
This is phenomenal. I love the background grid. What size are the squares?
Also, since we always get asked this: Did it work before you took it apart?
This is such a piece of history, I feel like the parts should go in a museum somewhere, laid out like in your final photo.
thanks Kyle. the background grid is one of those self healing cutting mats that you'd find in an art supply store. the lines are on a 1cm square grid.
Actually the radio does still need repair, I think there might be a break in the battery leads or connector but I didn't want to desolder/replace those before taking the photos and I didn't have time to debug further yet. But I definitely want to see if I can get it working again
BTW, I don't know if I'll get a chance to tear it down but I managed to dig up another old Sony radio! this time a 1959 model TR-714, which was the first two-band (AM & SW) pocket transistor radio. with 7 transistors! and fortunately that one still works perfectly :)
The story I heard about Sony's entry into the US market went like this. At the time, IBM was building mainframe computers out of discrete transistors, having just phased out vacuum tubes. IBM was having transistors made by Fairchild in Mountain View, CA. One large batch of transistors failed to meet IBM specs. They were good transistors, but not up to IBM standards. An enterprising genius in the Fairchild marketing dept. took a bag of 1000 of these transistors, and a schematic of a reference design for a transistor radio he had Engineering draw up, and went to Japan. He plopped the bag of transistors and the schematic on the desk of the CEO of the Japanese company and said, "Would you like to make transistor radios out of these?" The result was Sony. Perhaps of you scrape the grey paint off one of those devices it might carry a Fairchild part no.
This teardown reminds me of my childhood days. I was about 5 or 6 and I got my first transistor radio. I proceeded to take it apart to see if I could get distant stations in "better." (and I lived in Brooklyn, NY!) I never got the thing to work right after I tinkered with it, and the parents always said that it was the LAST radio they were getting me. However, with each subsequent radio, came the tinkerer in me that would tear it apart, and sometimes get it back together.
It got me interested in electronics, and in Junior High School, I would roam the neighborhood on garbage day, with a friend, looking for old TVs that we could scrounge parts from. Zeniths were our favorites. We built up a great mass of parts, and built all sorts of oscillators, and neat things that made noises, but there were so many parts, that his mother got angry, and told us that unless we made something useful, she was going to throw them all out!
Well, Brooklyn was the home to Eico, a manufacturer of electronics kits. Their warehouse was in an industrial part of the neighborhood, and it was a good place to go dumpster diving on Saturday, when they were closed. I found a schematic to one of their oscilloscopes, and realized that we had most of the parts. We built the thing, only having to go to Canal St., and get a surplus CRT from one of the many surplus dealers at the time. We built the o-scope, and donated it to the Jr. High School, to the awe of our electric shop teacher. (It wasn't much to us, just like reading a map)
That was then, and today, I am a tech for a local government agency, maintaining about 2000 users and their network. PCs were a natural progression to me, and I have done my tinkering there too, but that's another story.
Thanks for this nostalgic teardown, it really brings back quite fond childhood memories for me!
Dit verhaal is om van te smullen
-


Besonderer Dank geht an diese Übersetzer:innen:
100%
VauWeh hilft uns, die Welt in Ordnung zu bringen! Wie kann ich mithelfen?
Hier starten ›
8 Kommentare
This was really cool, thanks!
The first transistor radio hit the consumer market on October 18, 1954. The Regency TR-1 featured four germanium transistors operating on a 22.5-volt battery that provided over twenty hours of life.
Please do a disassembly video for a Sony TR 620, I'm afraid to mess it up even with my experience. Even a chassis picture with the screws circled showing which ones. Thanks so much.
Thank you so much!
visit also my website