Zum Hauptinhalt wechseln

Extracción del puerto de carga para reemplazo de pantalla en el Nokia G42 5G

Hinweis: Du bearbeitest eine grundständige Anleitung. Alle Änderungen, die du vornimmst, betreffen alle 3 Anleitungen, die diese beinhalten.

Englisch
Spanisch
Schritt 3
Nokia G42 5G Charging Port Removal for Screen Replacement, Unseat the antenna cables: Schritt 0, Bild 1 von 3 Nokia G42 5G Charging Port Removal for Screen Replacement, Unseat the antenna cables: Schritt 0, Bild 2 von 3 Nokia G42 5G Charging Port Removal for Screen Replacement, Unseat the antenna cables: Schritt 0, Bild 3 von 3
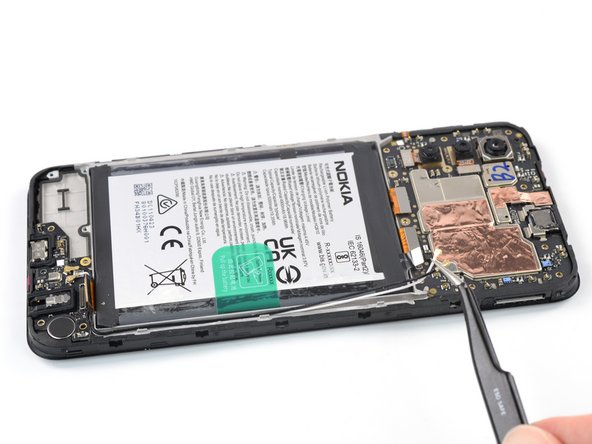
Unseat the antenna cables
  • Use a pair of tweezers or your fingers to lift the antenna cables out of their recess in the frame.

  • During reassembly, connect the white antenna cable to the motherboard before connecting the black antenna cable. Then reseat the antenna cables into their recess.

Utiliza unas pinzas o tus dedos para sacar los cables de antena de su alojamiento en el marco.

Durante el reensamblaje, conecta el cable de antena blanco a la placa base antes de conectar el cable de antena negro. A continuación, vuelve a colocar los cables de antena en sus alojamientos.

[title] Unseat the antenna cables
-[* black] Use a pair of tweezers or your fingers to lift the antenna cables out of their recess in the frame.
+[* black] Use a pair of [product|IF145-020|tweezers] or your fingers to lift the antenna cables out of their recess in the frame.
[* icon_reminder] During reassembly, connect the white antenna cable to the motherboard before connecting the black antenna cable. Then reseat the antenna cables into their recess.

Deine Beiträge sind lizenziert unter der Open-Source Creative Commons Lizenz.