Zum Hauptinhalt wechseln

Eine Apple Wireless Tastatur reparieren, ohne sie zu zerstören

Englisch
Deutsch
Schritt 8
Repairing Apple Wireless Keyboard without destroying it., Removing the damaged membrane: Schritt 0, Bild 1 von 3 Repairing Apple Wireless Keyboard without destroying it., Removing the damaged membrane: Schritt 0, Bild 2 von 3 Repairing Apple Wireless Keyboard without destroying it., Removing the damaged membrane: Schritt 0, Bild 3 von 3
Removing the damaged membrane
  • Finally, we're in!

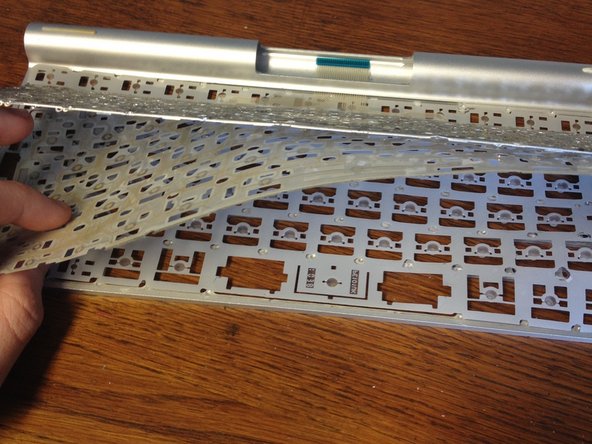
  • Now you've removed the metal plate, you'll be presented with the membrane we need to repair.

  • The ribbon cable from earlier is a part of it, and it needs to be fished through it's tiny slot before you can remove the membrane. There may be a little glue holding the membrane down, in which case pull up slowly at a shallow angle to release it.

  • Underneath the membrane it is a sheet with tactile domes serving to press the pads on the membrane together. This sheet can stay here as it's of no concern to us.

Jetzt sind wir endlich drin!

Nachdem du endlich die Metallplatte angenommen hast, wird die zu reparierende Membran sichtbar.

Das Flachbandkabel von vorhin ist ein Teil von ihr. Es muss durch den schmalen Schlitz durchgefädelt werden, bevor sich die Membran entfernen lässt. Die Membran ist eventuell ein wenig angeklebt, in diesem Fall musst du sie vorsichtig in einem flachen Winkel zum Ablösen nach oben ziehen.

Unter der Membran befindet sich eine Folie mit beweglichen Kuppeln, die dazu dienen, die Pads auf der Membran zusammenzudrücken. Dieses Blatt kann an Ort und Stelle bleiben, da es für uns keine weitere Bedeutung hat.

Deine Beiträge sind lizenziert unter der Open-Source Creative Commons Lizenz.