Zum Hauptinhalt wechseln

Retina MacBook 2015 Teardown

Englisch
Deutsch
Schritt 6
Retina MacBook 2015 Teardown: Schritt 0, Bild 1 von 3 Retina MacBook 2015 Teardown: Schritt 0, Bild 2 von 3 Retina MacBook 2015 Teardown: Schritt 0, Bild 3 von 3
  • Time to rip off that boring, plain ol' aluminum lower case, and get to the good—

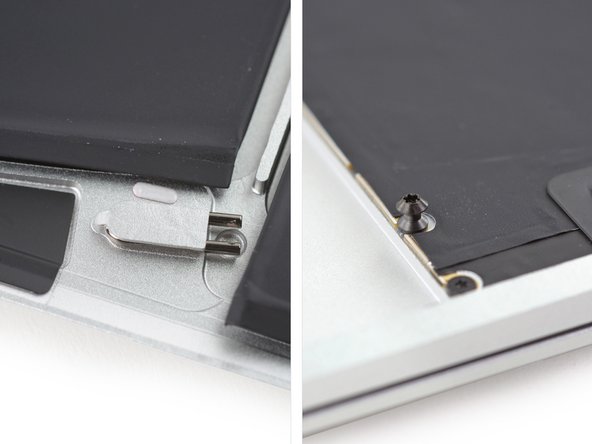
  • What is this new devilry? Cables!? A battery and logic board in the lower case?

  • The standard pop-open-at-the-hinge practice still holds, but then the cables go taut. Then you have to hinge the case back forward to access the connectors and open the case.

  • What is this, a mid-gen iPhone?

  • The standard plastic clips of old are replaced with futuristic pegs and weird spring clips.

  • "If it ain't broke, make it out of, like, three more metal pieces in funky shapes." — Some Apple designer, we assume.

Es ist an der Zeit dieses langweilige, popelige Gehäuseunterteil aus Aluminium abzulösen, um an die wirklich wichtigen Sachen zu kommen —

Was sind das für neue Sachen? Kabel? Ein Akku und das Logic Board am Gehäuseunterteil?

Das Standardverfahren mit Aufhebeln am Scharnier funktioniert noch, dann werden aber die Kabel stramm angepannt. Dann musst du das Gehäuse wieder etwas zurück und nach vorne klappen, um an die Stecker zu gelangen und das Gehäuse zu öffnen.

Die Standard Plastikclips von früher wurden durch futuristische Stifte und ungewöhnliche Federklammern ersetzt.

"Wenns nicht kaputt geht, dann machen wir es aus, sagen wir, drei Metallstücken in verrückten Formen." - ein paar Apple Entwickler, nehmen wir an.

Deine Beiträge sind lizenziert unter der Open-Source Creative Commons Lizenz.