Zum Hauptinhalt wechseln

ASUS VivoBook S400C LCD / Touch Screen Assembly Replacement

Was du brauchst

  1. ASUS VivoBook S400C LCD / Touch Screen Assembly Replacement, Remove the Bottom Cover: Schritt 1, Bild 1 von 1
    • Flip the device over and remove the ten 5.7 mm screws with a Phillips #0 screwdriver.

  2. ASUS VivoBook S400C LCD / Touch Screen Assembly Replacement: Schritt 2, Bild 1 von 2 ASUS VivoBook S400C LCD / Touch Screen Assembly Replacement: Schritt 2, Bild 2 von 2
    • Use a spudger or your fingers to go around and lift the edges and release the back panel.

  3. ASUS VivoBook S400C LCD / Touch Screen Assembly Replacement, Disconnect the Battery: Schritt 3, Bild 1 von 1
    • Using a spudger, lift up the plug connecting the battery to the motherboard.

  4. ASUS VivoBook S400C LCD / Touch Screen Assembly Replacement, Heat Shield: Schritt 4, Bild 1 von 2 ASUS VivoBook S400C LCD / Touch Screen Assembly Replacement, Heat Shield: Schritt 4, Bild 2 von 2
    • Remove the black shield covering the display connector and the heat sink.

    • You may need to use double-sided adhesive tape to resecure the shield.

  5. ASUS VivoBook S400C LCD / Touch Screen Assembly Replacement, Display Assembly: Schritt 5, Bild 1 von 1
    • Remove the black tape securing the keyboard ribbon cable to the display connector.

    • Fold the ribbon cable the opposite way, resecuring it to the hard drive to keep it out of the way.

  6. ASUS VivoBook S400C LCD / Touch Screen Assembly Replacement: Schritt 6, Bild 1 von 2 ASUS VivoBook S400C LCD / Touch Screen Assembly Replacement: Schritt 6, Bild 2 von 2
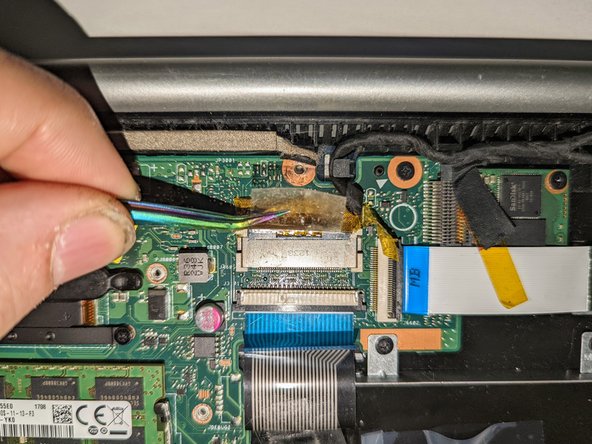
    • Peel off the clear tape from the motherboard display connector.

  7. ASUS VivoBook S400C LCD / Touch Screen Assembly Replacement: Schritt 7, Bild 1 von 2 ASUS VivoBook S400C LCD / Touch Screen Assembly Replacement: Schritt 7, Bild 2 von 2
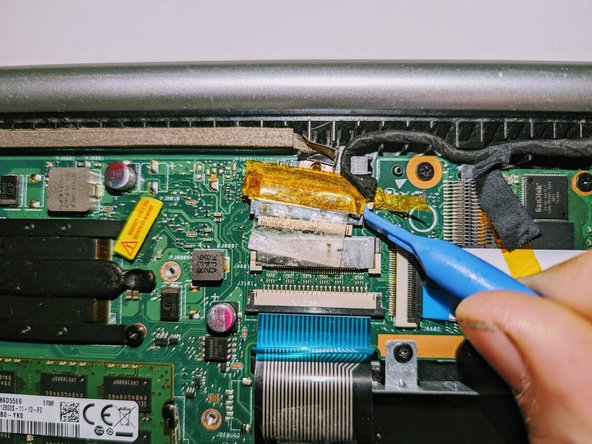
    • Position spudgers on the white tabs on either side of the connector and push evenly to unplug the display.

  8. ASUS VivoBook S400C LCD / Touch Screen Assembly Replacement: Schritt 8, Bild 1 von 3 ASUS VivoBook S400C LCD / Touch Screen Assembly Replacement: Schritt 8, Bild 2 von 3 ASUS VivoBook S400C LCD / Touch Screen Assembly Replacement: Schritt 8, Bild 3 von 3
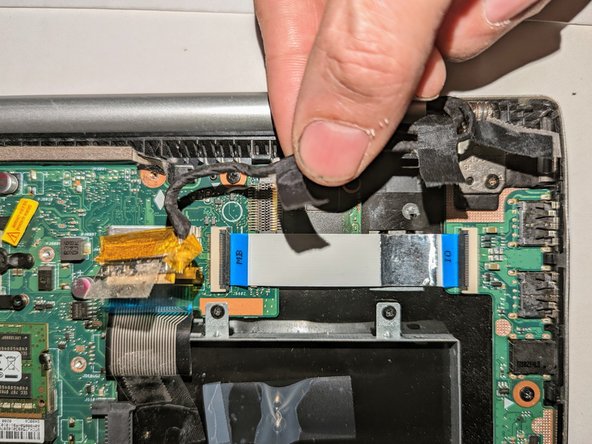
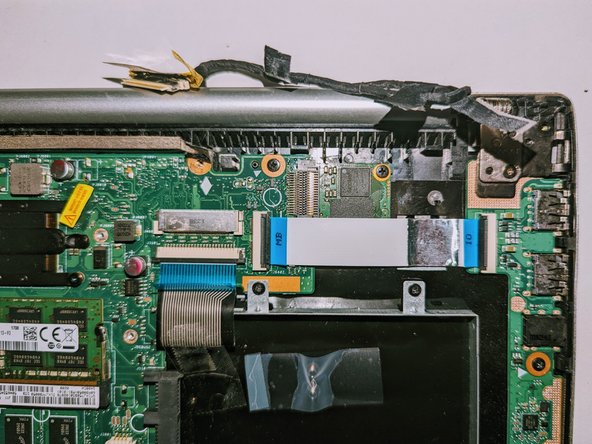
    • Peel off the three pieces of black tape securing the display cable to the motherboard.

    • Deroute the cable from the channel it sits in.

    • Move the cable to the side, out of the way.

  9. ASUS VivoBook S400C LCD / Touch Screen Assembly Replacement: Schritt 9, Bild 1 von 3 ASUS VivoBook S400C LCD / Touch Screen Assembly Replacement: Schritt 9, Bild 2 von 3 ASUS VivoBook S400C LCD / Touch Screen Assembly Replacement: Schritt 9, Bild 3 von 3
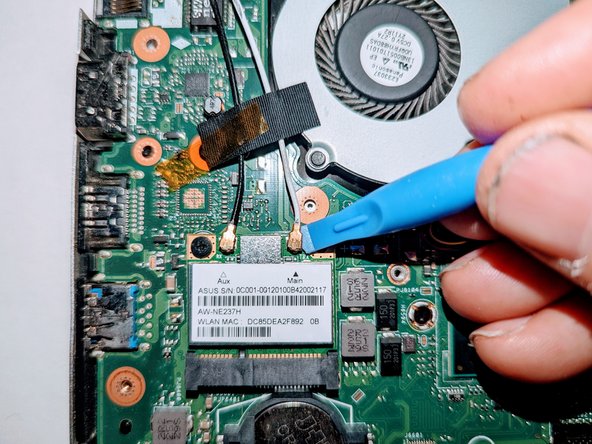
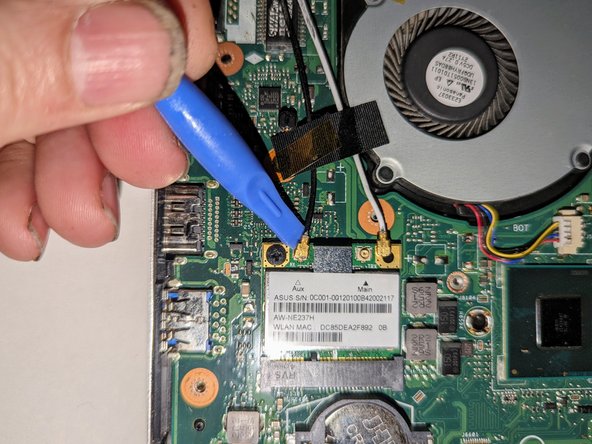
    • Use a spudger to release the cables from the wifi card.

  10. ASUS VivoBook S400C LCD / Touch Screen Assembly Replacement: Schritt 10, Bild 1 von 3 ASUS VivoBook S400C LCD / Touch Screen Assembly Replacement: Schritt 10, Bild 2 von 3 ASUS VivoBook S400C LCD / Touch Screen Assembly Replacement: Schritt 10, Bild 3 von 3
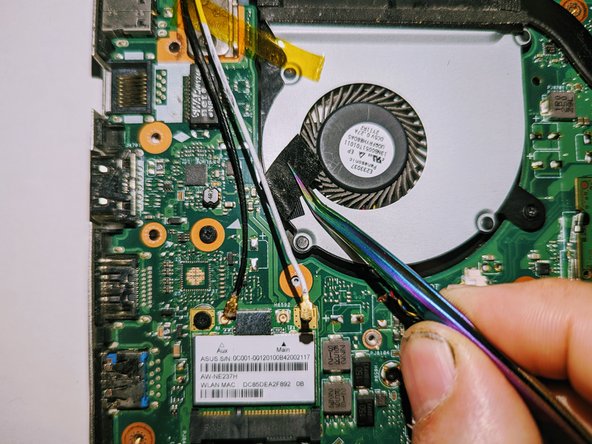
    • Lift the tapes securing the wires to the motherboard.

    • Move the wires to the side out of the way.

  11. ASUS VivoBook S400C LCD / Touch Screen Assembly Replacement, Disconnect the Hinges: Schritt 11, Bild 1 von 2 ASUS VivoBook S400C LCD / Touch Screen Assembly Replacement, Disconnect the Hinges: Schritt 11, Bild 2 von 2
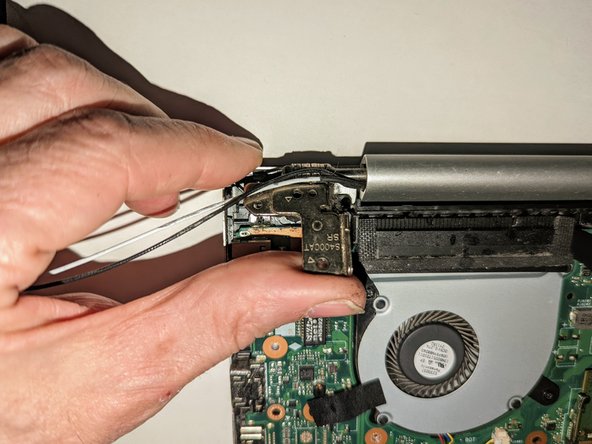
    • Remove the two screws securing the hinge on the left.

    • Pry the hinge up by hand to a 90 degree angle.

  12. ASUS VivoBook S400C LCD / Touch Screen Assembly Replacement: Schritt 12, Bild 1 von 2 ASUS VivoBook S400C LCD / Touch Screen Assembly Replacement: Schritt 12, Bild 2 von 2
    • Remove the two screws securing the hinge on the right.

    • Pry the hinge up by hand to a 90 degree angle.

  13. ASUS VivoBook S400C LCD / Touch Screen Assembly Replacement, Remove the Display: Schritt 13, Bild 1 von 3 ASUS VivoBook S400C LCD / Touch Screen Assembly Replacement, Remove the Display: Schritt 13, Bild 2 von 3 ASUS VivoBook S400C LCD / Touch Screen Assembly Replacement, Remove the Display: Schritt 13, Bild 3 von 3
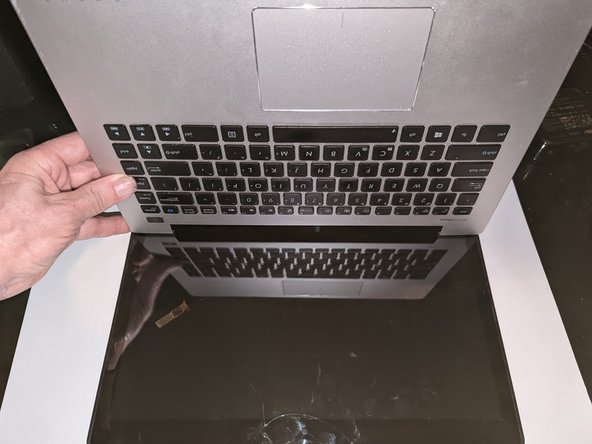
    • Lift the base of the laptop from the front.

    • Raise it to a 90 degree angle.

    • Slide it forward slightly to clear the hinges.

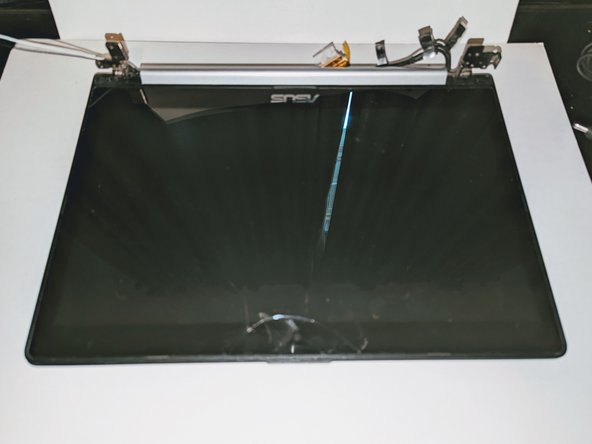
    • The display is now free.

  14. ASUS VivoBook S400C LCD / Touch Screen Assembly Replacement, Remove the Display Retaining Screws: Schritt 14, Bild 1 von 3 ASUS VivoBook S400C LCD / Touch Screen Assembly Replacement, Remove the Display Retaining Screws: Schritt 14, Bild 2 von 3 ASUS VivoBook S400C LCD / Touch Screen Assembly Replacement, Remove the Display Retaining Screws: Schritt 14, Bild 3 von 3
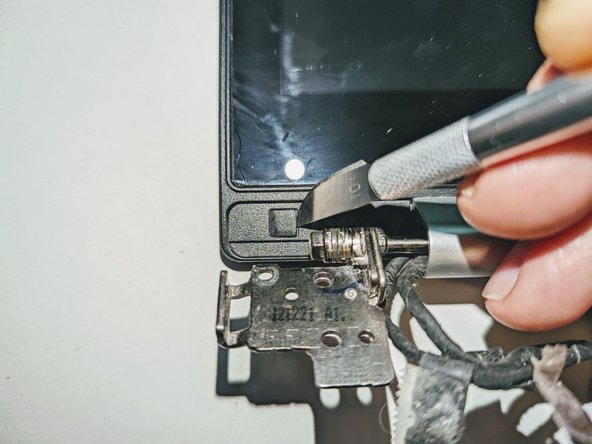
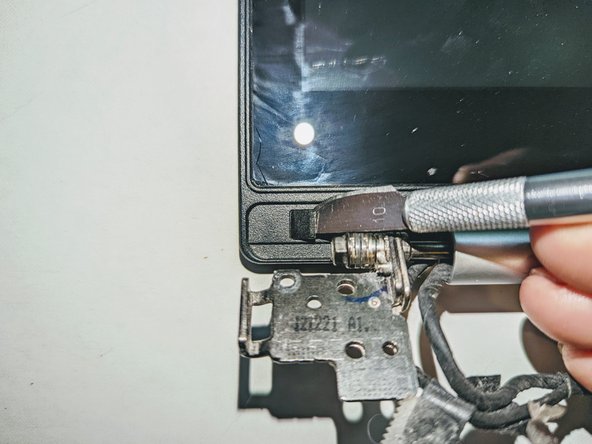
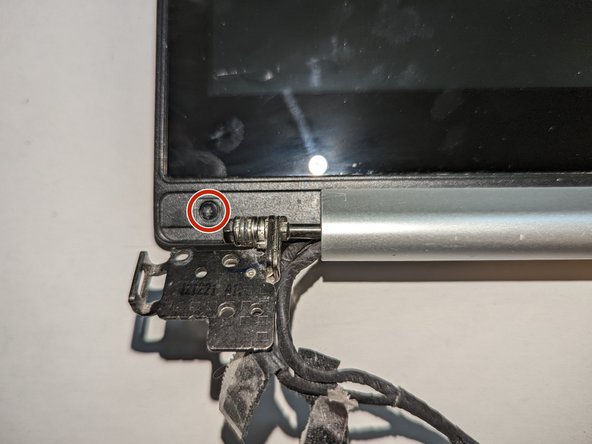
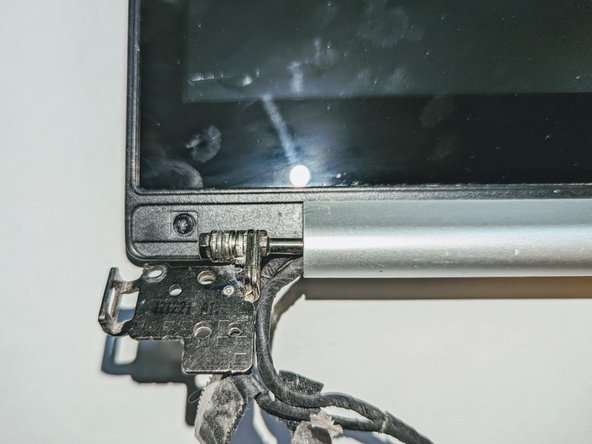
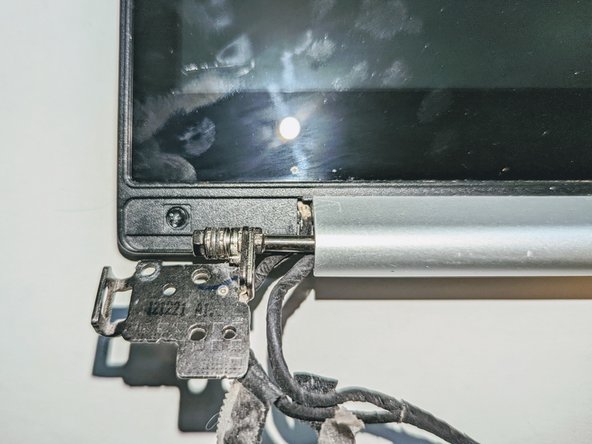
    • There are two black square plastic tabs covering the retaining screws. The tabs are fixed in place with light adhesive.

    • Using a thin blade, pry off the tabs covering the screws.

  15. ASUS VivoBook S400C LCD / Touch Screen Assembly Replacement: Schritt 15, Bild 1 von 2 ASUS VivoBook S400C LCD / Touch Screen Assembly Replacement: Schritt 15, Bild 2 von 2
    • With a Phillips #0 screwdriver, remove the two 3.8 mm screws holding the bezel in place.

  16. ASUS VivoBook S400C LCD / Touch Screen Assembly Replacement, Remove the Hinge Cover: Schritt 16, Bild 1 von 3 ASUS VivoBook S400C LCD / Touch Screen Assembly Replacement, Remove the Hinge Cover: Schritt 16, Bild 2 von 3 ASUS VivoBook S400C LCD / Touch Screen Assembly Replacement, Remove the Hinge Cover: Schritt 16, Bild 3 von 3
    • Grasp the hinge cover and slide it to the right. It will only move about 3mm (1/8 inch).

  17. ASUS VivoBook S400C LCD / Touch Screen Assembly Replacement: Schritt 17, Bild 1 von 2 ASUS VivoBook S400C LCD / Touch Screen Assembly Replacement: Schritt 17, Bild 2 von 2
    • Tilt the hinge cover toward you and pull up to remove it.

    • It may catch on the parts it's covering as you remove it. If that happens, just wiggle it around until it comes free.

    • No force should be needed to remove it. You do not have to pry on it to take it out.

  18. ASUS VivoBook S400C LCD / Touch Screen Assembly Replacement, Release the Display Panel: Schritt 18, Bild 1 von 2 ASUS VivoBook S400C LCD / Touch Screen Assembly Replacement, Release the Display Panel: Schritt 18, Bild 2 von 2
    • Slide the screen down to release the catches holding it in place.

    • It will only move about 3mm (1/8 inch) and will stop when it has moved sufficiently.

  19. ASUS VivoBook S400C LCD / Touch Screen Assembly Replacement: Schritt 19, Bild 1 von 3 ASUS VivoBook S400C LCD / Touch Screen Assembly Replacement: Schritt 19, Bild 2 von 3 ASUS VivoBook S400C LCD / Touch Screen Assembly Replacement: Schritt 19, Bild 3 von 3
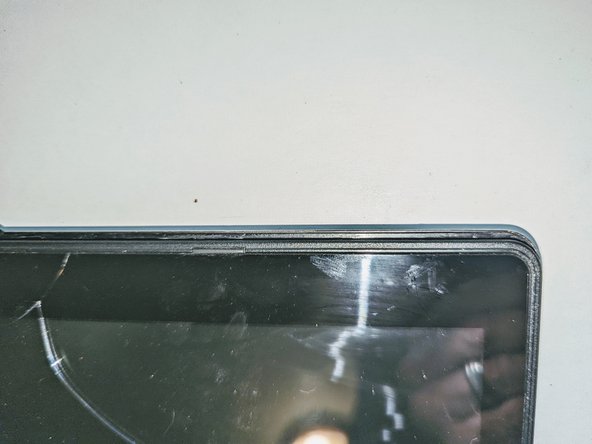
    • Lift up on the now-exposed bottom edge of the screen. Go around the edges, lifting it away from the housing. If it is still caught anywhere, remember to slide it down to free it.

    • Again, no force is needed. You do not have to pry on it to take it out. Doing so will damage the housing and/or the bezel.

    • Slide the screen out from under the hinges and remove it.

  20. ASUS VivoBook S400C LCD / Touch Screen Assembly Replacement, Disconnect the LCD Cable: Schritt 20, Bild 1 von 2 ASUS VivoBook S400C LCD / Touch Screen Assembly Replacement, Disconnect the LCD Cable: Schritt 20, Bild 2 von 2
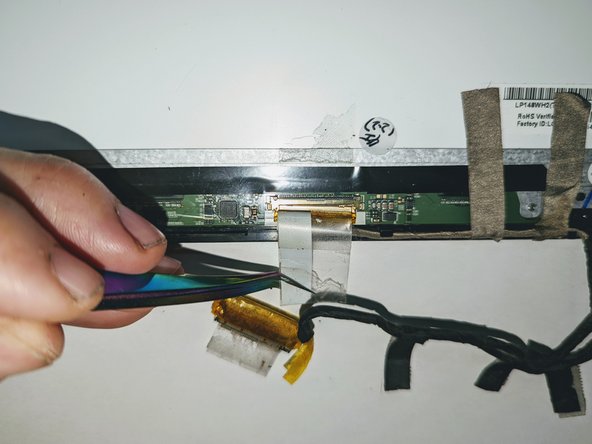
    • Flip the touch screen assembly over and peel the clear tape covering the LCD connector off the LCD panel.

  21. ASUS VivoBook S400C LCD / Touch Screen Assembly Replacement: Schritt 21, Bild 1 von 2 ASUS VivoBook S400C LCD / Touch Screen Assembly Replacement: Schritt 21, Bild 2 von 2
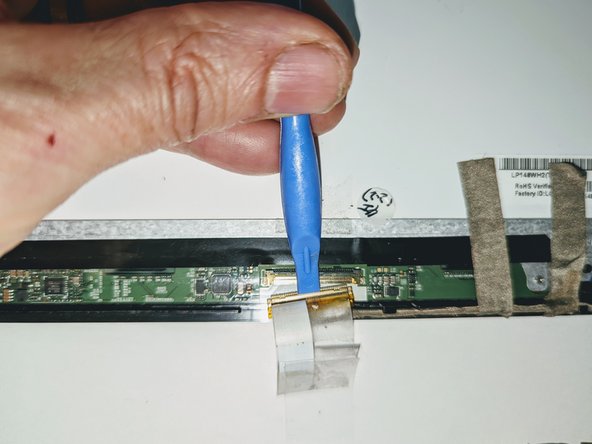
    • Using a spudger, slide the connector out in the direction of the bottom of the screen.

  22. ASUS VivoBook S400C LCD / Touch Screen Assembly Replacement, Dismount the Touchscreen Controller Board: Schritt 22, Bild 1 von 3 ASUS VivoBook S400C LCD / Touch Screen Assembly Replacement, Dismount the Touchscreen Controller Board: Schritt 22, Bild 2 von 3 ASUS VivoBook S400C LCD / Touch Screen Assembly Replacement, Dismount the Touchscreen Controller Board: Schritt 22, Bild 3 von 3
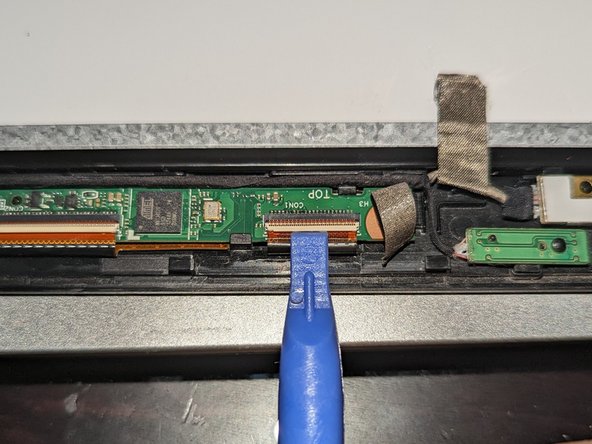
    • The next few steps are easier if you rotate the display so the top of the screen is facing you.

    • Peel off the tape providing a ground point to the LCD frame.

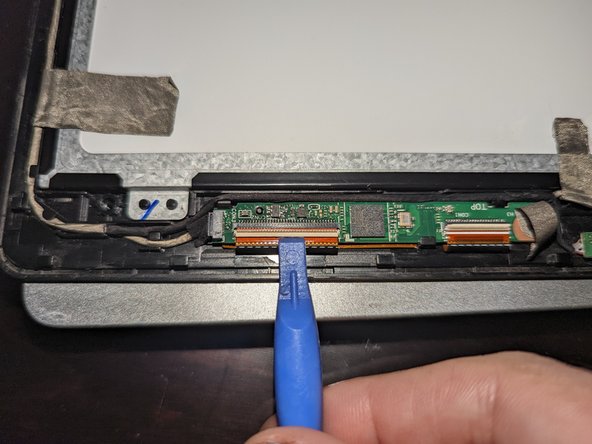
    • Use the flat end of a spudger to flip up the latch on the right connector.

  23. ASUS VivoBook S400C LCD / Touch Screen Assembly Replacement: Schritt 23, Bild 1 von 2 ASUS VivoBook S400C LCD / Touch Screen Assembly Replacement: Schritt 23, Bild 2 von 2
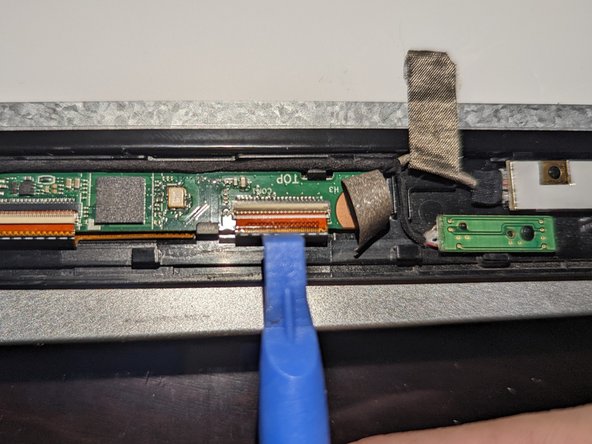
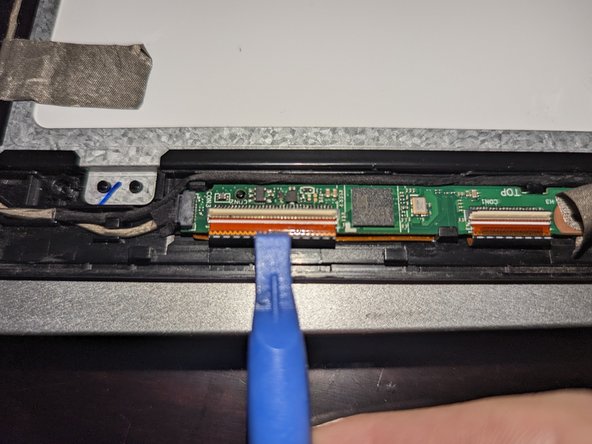
    • Use the flat end of a spudger to flip up the latch on the left connector.

  24. ASUS VivoBook S400C LCD / Touch Screen Assembly Replacement: Schritt 24, Bild 1 von 2 ASUS VivoBook S400C LCD / Touch Screen Assembly Replacement: Schritt 24, Bild 2 von 2
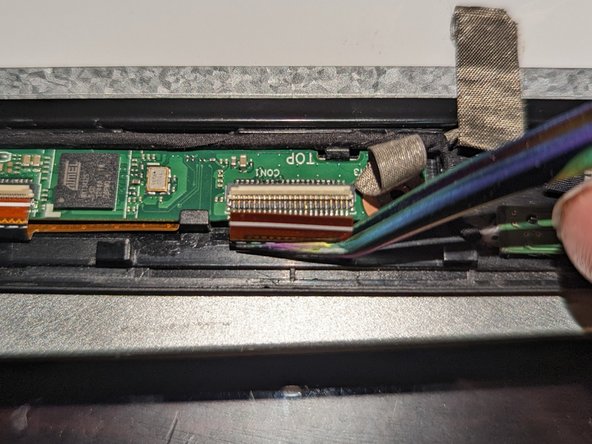
    • Use fine tip tweezers to slide the right ribbon cable out of the connector.

  25. ASUS VivoBook S400C LCD / Touch Screen Assembly Replacement: Schritt 25, Bild 1 von 2 ASUS VivoBook S400C LCD / Touch Screen Assembly Replacement: Schritt 25, Bild 2 von 2
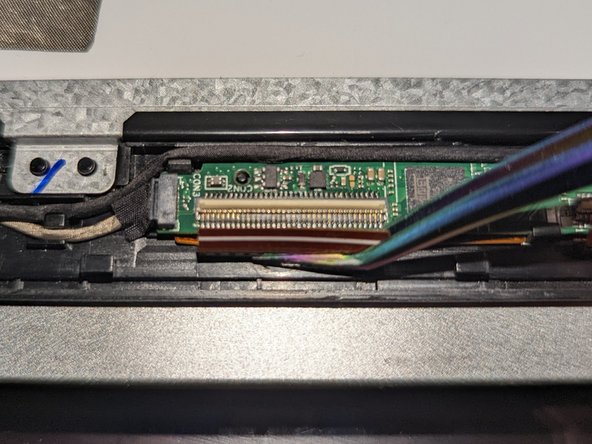
    • Use fine tip tweezers to slide the left ribbon cable out of the connector.

  26. ASUS VivoBook S400C LCD / Touch Screen Assembly Replacement: Schritt 26, Bild 1 von 3 ASUS VivoBook S400C LCD / Touch Screen Assembly Replacement: Schritt 26, Bild 2 von 3 ASUS VivoBook S400C LCD / Touch Screen Assembly Replacement: Schritt 26, Bild 3 von 3
    • The touchscreen board is secured to the bezel with two latches on the far side and a plastic hook on the near side.

    • Use a spudger to open the right latch while gently prying up with an opening tool or a fingernail.

    • Use a spudger to open the left latch while gently prying up with an opening tool or a fingernail.

  27. ASUS VivoBook S400C LCD / Touch Screen Assembly Replacement: Schritt 27, Bild 1 von 2 ASUS VivoBook S400C LCD / Touch Screen Assembly Replacement: Schritt 27, Bild 2 von 2
    • Rotate the board toward you while sliding it forward slightly to free it from the bottom hook.

    • Lift the board away from the bezel and move it aside.

  28. ASUS VivoBook S400C LCD / Touch Screen Assembly Replacement, Dismount the Microphone Board: Schritt 28, Bild 1 von 2 ASUS VivoBook S400C LCD / Touch Screen Assembly Replacement, Dismount the Microphone Board: Schritt 28, Bild 2 von 2
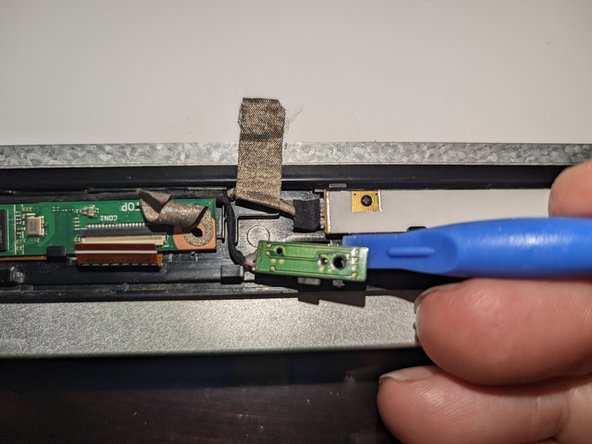
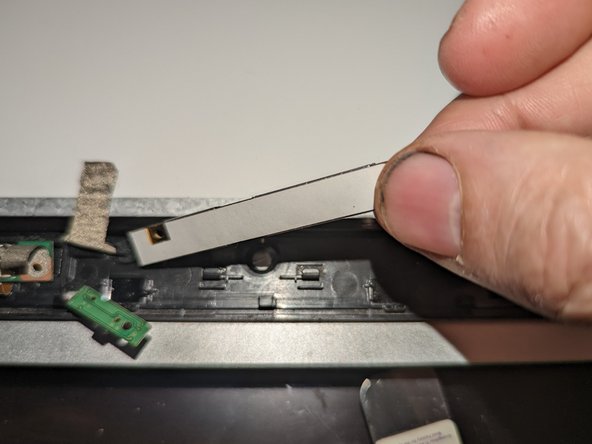
    • The microphone daughterboard is held in place by being pressed down onto a plastic pin.

    • Pry it up off the retaining pin with a plastic spudger.

  29. ASUS VivoBook S400C LCD / Touch Screen Assembly Replacement, Dismount the Camera Board: Schritt 29, Bild 1 von 2 ASUS VivoBook S400C LCD / Touch Screen Assembly Replacement, Dismount the Camera Board: Schritt 29, Bild 2 von 2
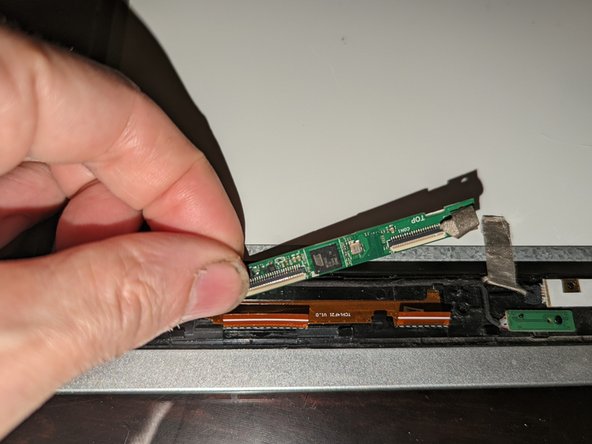
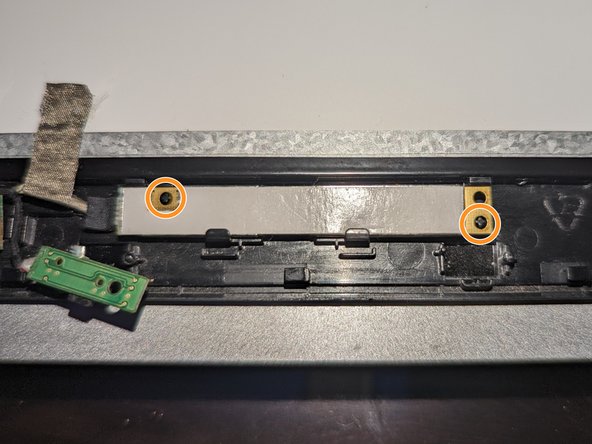
    • The camera daughterboard is held in place with two latches along the top of the board and two hooks on the bottom.

    • It is seated on two plastic guide pins as well.

    • Be sure the board is fully seated on the guide pins when reassembling.

  30. ASUS VivoBook S400C LCD / Touch Screen Assembly Replacement: Schritt 30, Bild 1 von 3 ASUS VivoBook S400C LCD / Touch Screen Assembly Replacement: Schritt 30, Bild 2 von 3 ASUS VivoBook S400C LCD / Touch Screen Assembly Replacement: Schritt 30, Bild 3 von 3
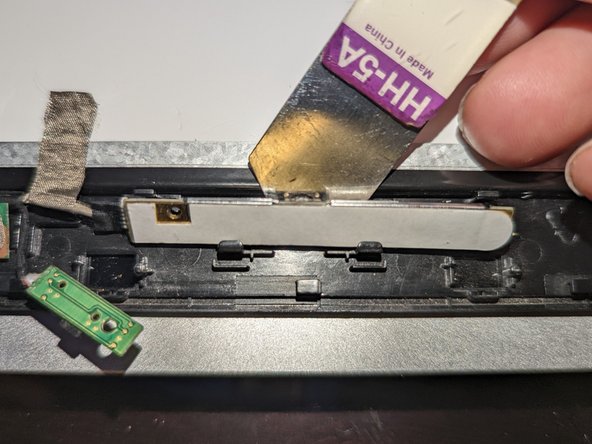
    • Slide a thin pry tool between the top of the camera board and the lip of the bezel.

    • Gently pry up on the board to free it from the latches and the guide pins it sits on.

    • Lift it up and away from the bezel and set it to the side.

  31. ASUS VivoBook S400C LCD / Touch Screen Assembly Replacement, Remove the Wiring Harness: Schritt 31, Bild 1 von 3 ASUS VivoBook S400C LCD / Touch Screen Assembly Replacement, Remove the Wiring Harness: Schritt 31, Bild 2 von 3 ASUS VivoBook S400C LCD / Touch Screen Assembly Replacement, Remove the Wiring Harness: Schritt 31, Bild 3 von 3
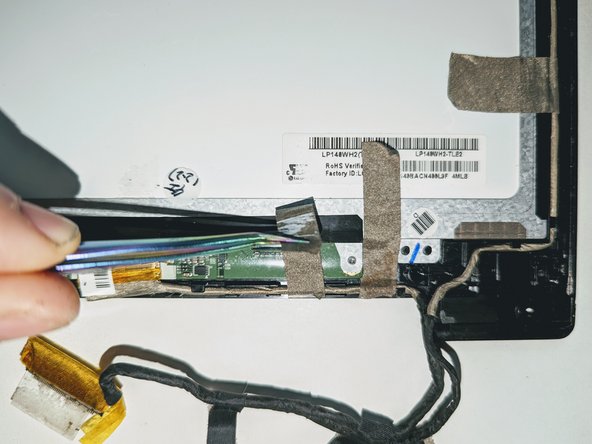
    • Carefully remove the five pieces of conductive tape securing the cables to the LCD frame.

  32. ASUS VivoBook S400C LCD / Touch Screen Assembly Replacement: Schritt 32, Bild 1 von 3 ASUS VivoBook S400C LCD / Touch Screen Assembly Replacement: Schritt 32, Bild 2 von 3 ASUS VivoBook S400C LCD / Touch Screen Assembly Replacement: Schritt 32, Bild 3 von 3
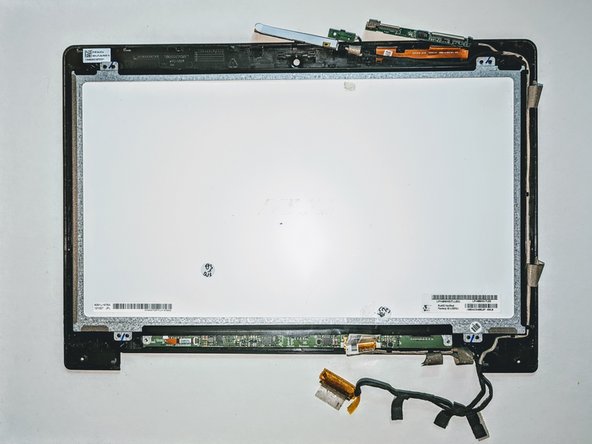
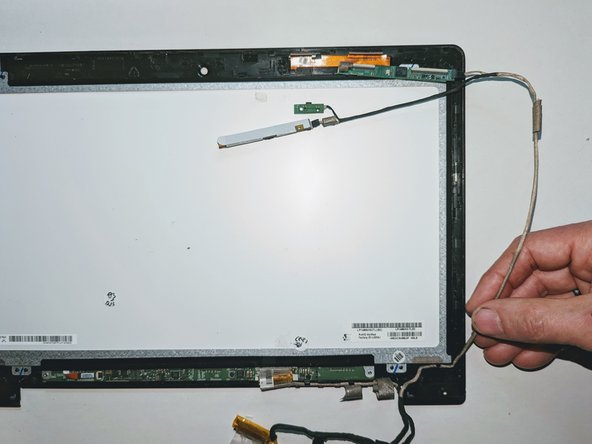
    • Deroute the wiring to the daughterboards from the front bezel.

  33. ASUS VivoBook S400C LCD / Touch Screen Assembly Replacement: Schritt 33, Bild 1 von 3 ASUS VivoBook S400C LCD / Touch Screen Assembly Replacement: Schritt 33, Bild 2 von 3 ASUS VivoBook S400C LCD / Touch Screen Assembly Replacement: Schritt 33, Bild 3 von 3
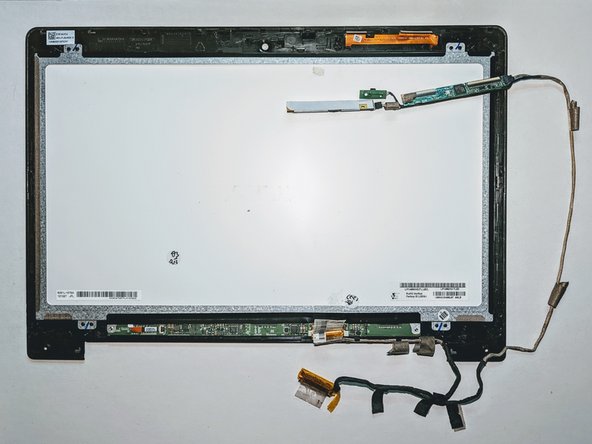
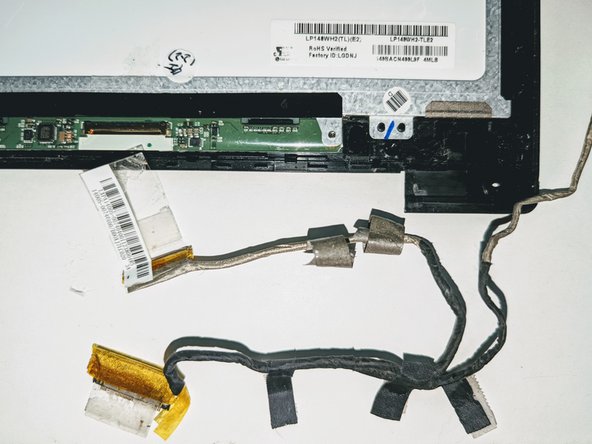
    • Deroute the LCD cable from the display.

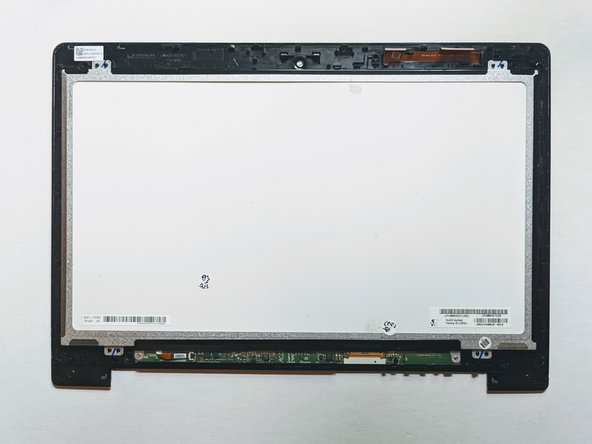
    • The LCD / digitizer assembly is now free.

Abschluss

To reassemble your device, follow these instructions in reverse order.

Jerry Wheeler

Mitglied seit: 03/21/22

57.635 Reputation

69 Anleitungen geschrieben

Team

Oregonians Mitglied von Oregonians

Community

7 Mitglieder

176 Anleitungen geschrieben

0 Kommentare

Kommentar hinzufügen

Seitenaufrufe:

Letzte 24 Stunden: 0

Letzte 7 Tage: 0

Letzte 30 Tage: 8

Insgesamt: 312