Was du brauchst
Einführungsvideo
-
-
Es ist schwer, das Gehäuse auseinanderzubauen, weil das Gehäuse 2 feste Punkte hat und der mittlere Festgeklebt ist. Das Gehäuse kann sehr schnell kaputt gehen. Sei also vorsichtig, wenn du das Gehäuse auseinanderbaust.
-
-
-
Baue ein Öffnung-Tool mit eine 0,1 mm Metallplatte. Schneide die Platte zurecht mit einer Schere.
-
Schleife die Ecken des Metallteils mit einem Sandpapier.
This is what I would consider a "careless method of disassembly." A few thin plastic picks work great at doing this step, no need to make your own, especially with metal (as that would be stupidity in action). Remember that plastic is safe for prying on plastic, metal isn't, and plastic is by far the safest for work involving lithium batteries, metal isn't. Fortunately, most electronics repair kits include several picks, both thin and thick. Also, with plastic there's no need for the kapton tape around the outside of the case.
Thin plastic picks are 0.5 mm. this step calls for 0.1 mm.
It's nice of iFixit to suggest something that they don't sell and don't provide a link for. Given the shapes they suggest creating, I'm unclear as to how plastic picks would work. It would require stretching the shell by 1.2 mm instead of 0.4 mm. presumably the tape is to limit the amount of stretch. It's not even clear why high temp tape is required since no heat is being applied. So, there doesn't really seem like the repair, as described, can actually be accomplished. The cost of the minimal tools + battery would be about $40 plus shipping. Apple will replace the case for $49. Seems like it would be crazy to attempt this unless you already have everything except the battery.
-
-
In diesem Schritt verwendetes Werkzeug:Tweezers$4.99
-
Biege das Metallteil mit einer Zange.
-
Verwende eine Pinzette um eine Abschirmplatte zu erstellen.
-
-
-
Um zu verhindern, dass das Gehäuse beschädigt wird, wickle Klebeband um das Plastik, welches Hitze-Beständig ist.
-
Als nächstes musst du dein Öffnungs-Tool einstecken, wie auf dem Bild.
-
Benutze das Tool um eine Lücke zu erstellen.
-
-
-
Stecke die Abschirmplatte ein.
-
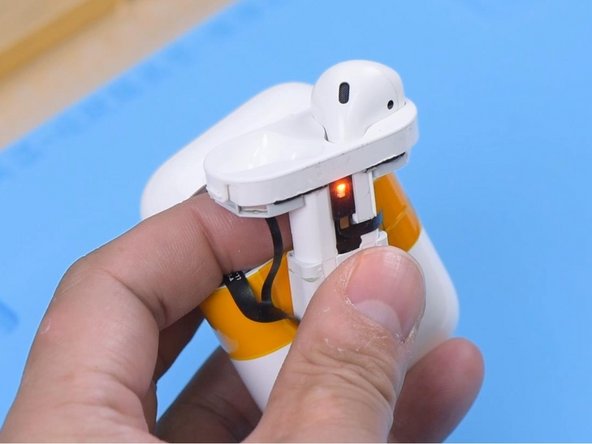
Stecke die Pinzette ein.
"Insert the shielding plate"... where?
"Insert the tweezers"... Why? Why are we putting metal tweezers into a plastic case (it's going to mar the plastic)? And why are we pointing sharp metal tweezers into the case containing a lithium battery? I don't remember reading a step saying "Discharge the battery before attempting this guide". Did I just miss it? If so, it must not have been very prominently visible.
-
-
-
-
Stecke dein Öffnung-Tool in die Lücke um den Ladeteil des Gehäuses auszuhebeln.
-
-
-
Wenn du das Gehäuse immer noch nicht öffnen kannst, dann versuche es mit einem selbstgebauten Werkzeug aus zwei Kabelhüllen mit eingedrehten Schrauben.
-
-
-
Befeste das Lade-Gehäuse am Halter und gebe ein bisschen Alkohol auf den Akku.
-
Hole die Batterie aus dem Gehäuse.
-
Dann musst du das Batterie-Flachbandkabel herausnehmen.
-
-
-
Entferne die Batterie.
-
Nachgemessen, hat der Akku keine Spannung mehr.
-
Bekomme einen neuen Akku mit einer stabilen Spannung von 3,6-4,0 Volt.
-
-
-
Bringe das doppelseitige Klebeband an der neuen Batterie an.
-
Baue die neue Batterie in das Gehäuse ein und verbinde Flachbandkabel für die Batterie.
-
-
-
Stecke das Ladekabel ein. Das Gehäuse sollte sich nun aufladen.
-
Stecke ein AirPod in das Lade-Gehäuse, dieser sollte sich nun ebenfalls laden.
-
-
-
Entferne die Schutzfolie des doppelseitigem Klebenband und baue die neue Batterie ein.
-
Baue die Ladeschale wieder ein.
-
-
-
Verbinde die AirPods mit deinem Telefon. Das Ladegehäuse und die AirPods können nun wieder normal geladen und genutzt werden.
-


Rückgängig: Ich habe diese Anleitung nicht absolviert.
10 weitere Personen haben diese Anleitung absolviert.
Besonderer Dank geht an diese Übersetzer:innen:
100%
Diese Übersetzer:innen helfen uns, die Welt zu reparieren! Wie kann ich mithelfen?
Hier starten ›

4 Kommentare
I feel like this guide could be a lot more descriptive and helpful, especially including tips on what to do and not do for each step, rather than assume we know exactly what you mean when you give each step in one sentence bearing half a dozen words or so. Also, there's absolutely no need to build a pair of pry tools, plastic picks work fine, and won't risk damaging either the case or the battery inside. Metal tools and lithium batteries are a no-no! Geez. With a pick wedged in the seam on each side of the case, like it shows in the picture, one final pick to the front seam can then safely pry out the holder from the case. Only the last pick will be used to pry, the other two just separate the inner case and outer case keeping the clips/catches unengaged, allowing for easy lifting/prying up and removal of the inner case.
Are really sure that can use it plastic picks!?
Paolo -
Great guideline. It helps me to replace the battery for my AirPods. Thank you.
What exactly are these pictures supposed to be showing? I suppose it would make more sense to someone who has already torn down their case, but for those who have not, I find a picture to be worth a thousand words, yet a sentence or two worth of description to be most illuminating, as we don't have to figure out ourselves what is most important, this isn't art appreciation after all.
Thousand Sunny - Antwort
Great guideline. It helps me to replace the battery for my AirPods. Thank you.
Tony Lopez - Antwort