Einleitung
This guide will walk you through how to create a repair guide on iFixit.com for the Dare to Repair Contest.
For more information about the contest, including rules, submission guidelines, and prizes, refer to our Dare to Repair contest announcement '''here'''. As a reminder, your submissions are due on Monday, May 14.
-
-
First things first—you'll need to create an account. Go to iFixit.com, then click Join on the top-right corner of the homepage. Next, fill in the boxes with your information and click that big blue Create My Account button to finish.
-
So far, so good! Now that you have an account, you’re ready to start creating content on the site.
 Frag FixBot
-
-
-
Behind every great repair guide, there are quality photos. Don't worry—you don't need a professional camera to take good photos. We put together a few guides with some photography tips and tricks to help get you started:
-
Now that you're primed to be the next Ansel Adams, you can start documenting your repair process. Take a photo for every step of your repair process. We'll show you how and where to upload them in a bit.
-
-
-
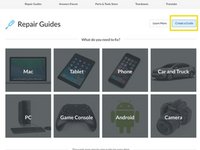
Your beautiful pictures need a guide to live in! Before you getcha' guide on, check to see if your device already exists on the iFixit site by searching for your device on the iFixit homepage.
-
If your device exists, click Create a Guide located to the right of the device photo.
-
Didn't find your device? No problem. Just click Create a Guide from the Guide Homepage.
-
-
-
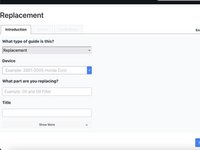
Now, select what type of guide you will be writing.
-
For the Dare to Repair contest, select Replacement.
-
Then, fill out the section “What part are you replacing ?”
-
-
-
-
Then you click Show more to get started on your guide introduction!
-
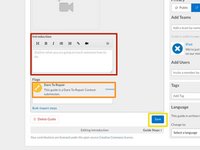
Your Introduction should outline what your guide covers, and why someone would need it. Introductions appear at the top of the guide.
-
We'd also like you to include a brief explanation that tells us why you chose to model your replacement part.
-
Under Flags, select Dare to Repair from the drop down list.
-
Save your work by clicking that big blue Save button on the bottom right of your screen.
-
-
-
At the top of your screen, you'll see three tabs. Click the Details tab to add information about your modeling procedure. Then upload the raw files. Here's a list of the file types we accept:
-
(.3ds) (.amf) (.blend) (.c4d) (.dwg) (.fbx) (.ma) (.obj) (.stl)
-
Click Add New to attach any documents you want us to see.
-
Hit Save.
-
-
-
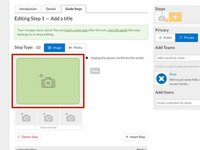
Now sharpen your keyboard and get ready to write. In the text box to the right of the empty picture box, write the instructions for the first step of your repair.
-
Once you're happy with your text, it’s time for images!
-
To add a new step, select the white plus sign in the yellow box at the top right of your screen. Then add text to your new step. Rinse and repeat for every step in your guide.
-
-
-
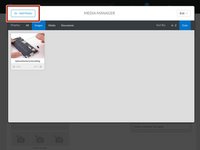
Time to add all those pretty pictures you took. Click the camera icon in the photo box to open the Media Manager.
-
Once you're in the Media Manager, upload photo files from your computer by selecting Add Media.
-
Once your photo has uploaded, click on it to place it on the guide step.
-
To rearrange the order of the photos, click and drag the photo to move it to the desired position on the image shelf.
-
-
-
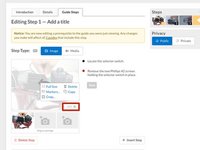
Photo editing tools can be found by clicking Edit, located at the bottom right corner of the image.
-
If you’d like to highlight something specific in your image—like the location of small screws or connectors—select Markup.
-
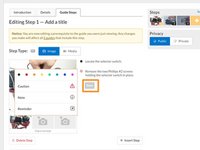
Pro Tip: You can change the color of the corresponding bullet by clicking on it. Color coding your bullets to match the pictures in a step makes it easier for readers to follow along. Plus, colors are fun.
-
You know what else is fun? Adding Caution, Note, and Reminder bullets to your guides. The easier it is to follow your guide, the more people will use it. The more people that use it, the more devices we save from the landfill. So basically, we're relying on you to help us save the world. No pressure, tho.
-
And PLEASE Don't forget to save your work! The world needs to see your guide.
-
-
-
If you're not happy with your guide (or you're a crazy perfectionist), you can always go back and edit. Just select Edit on the top right corner of the guide to re-open your work.
-
That's it! That’s everything you need to know to create a guide. Feel free to comment below with any questions. Thanks for contributing and happy fixing!
-


Thank you for your contribution!
Rückgängig: Ich habe diese Anleitung nicht absolviert.
2 weitere Personen haben diese Anleitung absolviert.
Angehängte Dokumente
