Zum Hauptinhalt wechseln

Fairphone 1 Motherboard Assembly Replacement

Grundständige Anleitung
Dies ist eine grundständige Anleitung, die nur als Teil einer anderen Anleitung verwendet werden sollte.

Was du brauchst

  1. Fairphone 1 Motherboard Assembly Replacement, Motherboard Assembly: Schritt 1, Bild 1 von 3 Fairphone 1 Motherboard Assembly Replacement, Motherboard Assembly: Schritt 1, Bild 2 von 3 Fairphone 1 Motherboard Assembly Replacement, Motherboard Assembly: Schritt 1, Bild 3 von 3
    • Use tweezers to remove the volume rocker and power buttons from the display assembly.

    • During reassembly make sure the orientation of the buttons is correct. The rubber backings must fit into the channels in the assembly.

  2. Fairphone 1 Motherboard Assembly Replacement: Schritt 2, Bild 1 von 1
    • Use the flat end of a spudger to disconnect the antenna cable connector.

    • Make sure to only disconnect the connector from its socket, and not the entire socket from the board.

  3. Fairphone 1 Motherboard Assembly Replacement: Schritt 3, Bild 1 von 2 Fairphone 1 Motherboard Assembly Replacement: Schritt 3, Bild 2 von 2
    • Use tweezers to remove the adhesive foam tape from the top of the digitizer cable ZIF socket.

  4. Fairphone 1 Motherboard Assembly Replacement: Schritt 4, Bild 1 von 3 Fairphone 1 Motherboard Assembly Replacement: Schritt 4, Bild 2 von 3 Fairphone 1 Motherboard Assembly Replacement: Schritt 4, Bild 3 von 3
    • Use the tip of a spudger to flip open the tab on the digitizer ZIF connector.

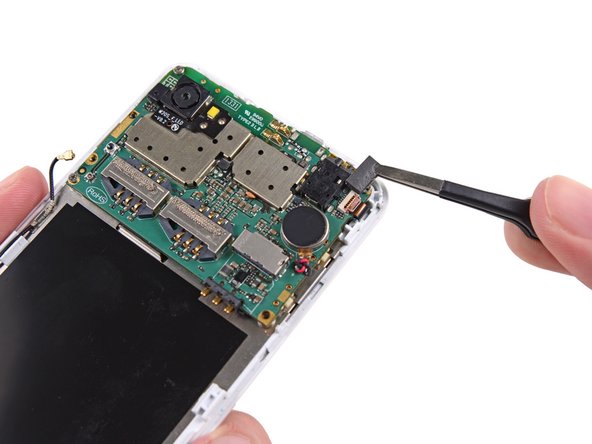
    • Use tweezers to pull the digitizer cable away from its socket on the motherboard.

  5. Fairphone 1 Motherboard Assembly Replacement: Schritt 5, Bild 1 von 1
    • Remove the three 2.5 mm Phillips #000 screws securing the motherboard to the display assembly.

  6. Fairphone 1 Motherboard Assembly Replacement: Schritt 6, Bild 1 von 2 Fairphone 1 Motherboard Assembly Replacement: Schritt 6, Bild 2 von 2
    • Do not try to remove the motherboard just yet, as it is still connected to the display assembly by the display data cable.

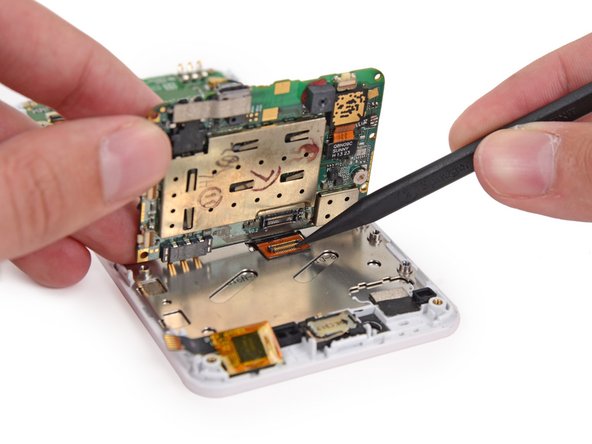
    • Gently lift the top end of the motherboard up to expose the display data cable.

    • The rear-facing camera may be adhered to the display assembly. Try to pry it and the motherboard up together.

  7. Fairphone 1 Motherboard Assembly Replacement: Schritt 7, Bild 1 von 2 Fairphone 1 Motherboard Assembly Replacement: Schritt 7, Bild 2 von 2
    • Use the tip of a spudger to disconnect the display data cable from the back of the motherboard.

  8. Fairphone 1 Motherboard Assembly Replacement: Schritt 8, Bild 1 von 1
    • Remove the motherboard from the display assembly.

Abschluss

To reassemble your device, follow these instructions in reverse order.

3 weitere Nutzer:innen haben diese Anleitung absolviert.

Team

iFixit Mitglied von iFixit

Staff

135 Mitglieder

16.817 Anleitungen geschrieben

0 Kommentare

Kommentar hinzufügen

Seitenaufrufe:

Letzte 24 Stunden: 0

Letzte 7 Tage: 0

Letzte 30 Tage: 0

Insgesamt: 2,366