Einleitung
This guide will show you how to replace the headphone module of the Fairphone 2.
Was du brauchst
-
-
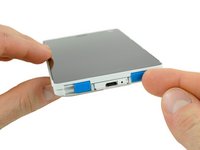
Pick a corner of your slim case and get between the two parts with your thumb's fingernails.
-
Pull up the back part of the slim case to separate the small snap fit connections.
-
Remove the back part of the slim case.
-
-
-
Get in between the front part of the slim case and the phone's body with your thumb nail.
-
Separate the snap fit connectors on the front part by pulling it to the side and pushing against the display.
-
-
-
-
Push the battery toward the top of the phone.
-
Pull the battery out away from the phone.
It isn't necessary to remove the rim if all you are doing is changing the battery. That becomes necessary if you are to proceed farther into the phone.
It might be good to begin by saying switch the phone off. The Fairphone is for everybody and most will have no experience of disassembling electronic devices.
-
-
-
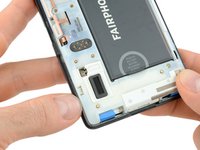
After taking out the battery you can unlock the display assembly.
-
Flip the two blue switches to the inner position.
-
Slide the display assembly towards the bottom of the phone.
Being technically nervous I couldn't do this. I didn't know how much pressure, pull or push was required.
After I'd watched the video my confidence increased!
It was a bit stiff and not so easy.
You don´t mention taking the rim off the display first. That stymied me completely. Do add that to your otherwise clear and helpful instructions. Best wishes - Walt Patterson
This guide is based on the old bumper made in one piece. We should update to the sandwich bumper with a top and bottom part.
I agree. Took a while to figure that one out!
Sorry, I can not slide away the display assembly to change the main camera module. The 2 blue switches seem to be locked. Cristiano, Italy
I replay to myself: I did it at last! ! But it was very, very, very, very hard!
Can’t get any movement at all on screen been trying for over an hour and others too ! there is no way to grip it as its so slippery have tried putting as much presure as possible on display by pushing far end of it with thin plastic implement and endless wiggling and pressing of every possible part of lower case no joy ! feels like its attached at mid sides. Elinor Rivers
try sliding along the display while applying some pressure two or three times. it worked really easily for me
I could slide the display case off very easily after watching the video, but when it came to doing the sequence in reverse I was fiddling about for ages trying to ‘slide’ it back on, until I realised this just wasn’t going to work and needed to click it back into place. Posting here in case this is helpful for others.
-
-
Impossible de déplacer l'écran vers le bas chez moi. Je n'ose pas forcer... c'est normal?
I can not slide the display assembly. Some help?
The display sits very tight.
So you need to gently apply a little force to slide it open the first time.
It is hard to get a good grip on the two parts for a successful "magic move".
Leider kann ich weder mit "little force" noch mit "much force" das Display nach der Entriegelung bewegen. Wer kann mit mehr Details helfen?
It did work for me. Make sure, you have unlocked the blue switches in step 3 (sorry, had to mention that). if you can't get a grip, you might try to lay a ruler or two credit cards on top of each other on a table that is tight at the wall,
- place the ruler/credit cards on the table and just attaching the wall
- place the PF2 with the display upside down on the table in front of the ruler/credit cards with the blue switches towards you and the headphone plug attaching the ruler/cards.
- then gently but with increasing force push your two thumbs towards the top of the main FP2 unit (or use more fingers to push both in the centre as well as on the two edges). make sure you push horizontally and that the ruler is not higher than the border of the display unit (1.5-2 mm).
(hope i could explain myself in and understandable way! ;-) )
Thank you a lot ! This worked for me.
Thanks, it worked for us as well.
deRahier -
great tip! Thanks so much
Really helped! This way finally worked for me. Thanks :)
thank you !!
Unglaublich fair, dass ich mich mit diesem Kack alleine beschäftige - wenn ich so weitermache, werde ich demnächst die Trümmer meines Fairphones wahrscheinlich durch Ungeschicklichkeit so beschädigen, dass es unbrauchbar ist!
-
-
Remove the two Phillips #0 screws of the headphone module marked by the blue circles.
Tips for doing this:
- don't use a Pozidriv (PZ) screw, only a Philips
- 00 will probably work better than 0
- turn the screw anti-clockwise to get it out
if it clicks and doesn't come out, stop at the point just after it clicks - you should be able to shake it out (https://linustechtips.com/main/topic/200...)
- buy a replacement for any screws that are awkward to get out, rather than putting them back in
-
-
-
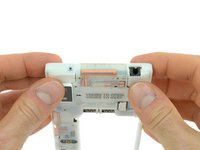
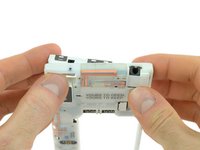
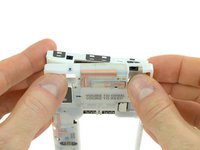
Turn the mainframe around so you're looking at it from the back and can see the two blank parts of the module.
-
Take out the module by first pushing the left part out with your thumb while holding the right side in place.
-
Then push out the right part with your other thumb.
-


To reassemble your device, follow these instructions in reverse order.
Information on what to do with the old module can be found on the FairPhone support page and in the FairPhone forum.
To reassemble your device, follow these instructions in reverse order.
Information on what to do with the old module can be found on the FairPhone support page and in the FairPhone forum.
Rückgängig: Ich habe diese Anleitung nicht absolviert.
37 weitere Personen haben diese Anleitung absolviert.

Team

Tobias Isakeit - Repairability Engineer Mitglied von Tobias Isakeit - Repairability Engineer
Business
1 Mitglied
1.131 Anleitungen geschrieben
10 Kommentare
Die beiden Schrauben, die blau gekennzeichnet sind - es sind vier Schrauben. Soweit bin ich jedoch nicht gekommen, da der Bildschirm sich auf beide genannten Weisen nicht abschieben lässt. Schraubstock und leichte Schläge mir einem breiten Schraubenzieher werden keine sinnvollen Werkzeuge sein. Schraubenzieher: Im Baumarkt gibt es keinen PH 0 sondern PH 0 x 60. Der Verkäufer meinte, es müsste der PH 00 x 60 sein; also beide mitgenommen. Zum Testen, welcher der richtige ist, bin ich nicht gekommen, siehe oben. Vielleicht sind auch beide falsch und es gibt per Internet tatsächlich den PH 0. Außerdem muss ich nicht das Kopfhörerteil austauschen, sondern den Lautsprecher, den ich nach Schwierigkeiten inzwischen erhalten habe. Über Lautsprecheraustausch finde ich keine Anleitung. cw@actanol.de
Hallo, die zwei blauen Schrauben lösen das Modul vom Rahmen, die beiden anderen sind Torx Schrauben und öffnen das Modul selbst. Das Display sitzt recht fest und muss ein wenig lose gewackelt werden. Eventuell hilft es Gummihandschuhe zu verwenden oder das Fairphone mit der Displayseite auf eine rutschfeste Matte zu legen und dann durch Hin-und Herbewegen zu lockern. Die Anleitung für das Mikrofonmodul zeigt, dass darin auch den Lautsprecher sitzt: Fairphone 2 Mikrofon-Modul ersetzen
Um einen Fussel aus der Klinkenbuchse zu entfernen, benötigt man zusätzlich zum Philips #0 ,
einen Torx #5 um die beiden kleinen Schrauben zu lösen. Die Metallklammern solten kein Problem darstellen.
Nach dem Tausch muss der Näherungssensor (Proximity Sensor) neu kalibriert werden, sonst bleibt das Display beim Telefonieren immer schwarz!
Einstellungen->System->Wartung->Näherungssensor
Hilfe…ich habe den Sensor kalibriert über den Nährungssensor. Seitdem habe ich mehrere fehler: ich kann die obere Leiste nicht mehr herunterwischen, wo Wlan, Ton, Bluetooth, Einstellungen einzusehen sind, der rechte untere seitliche Button zum Aktivieren der Kamera geht nicht mehr und auf dem Display ist der mittlere runde und der rechte viereckige Button nicht mehr zum Aktivieren… Ich habe nochmal ein Update gemacht vom gesamten Handy, auch damit keinen Erfolg…
Wer kann mir helfen???
Awesome. Did this and the camera module. It’d be great if it gave guidance at the end as to where to send the old parts for recycling, thus completing the circle. Thanks fairphone and great guide Tobias!
Hat prima funktioniert dank einfacher Anleitung und einfacher Bauweise. Auch die anschliessende Kalibrierung des Sensors war völlig unproblematisch. Alles bestens!
Great instructions - very easy to use. Thanks a lot!
Grandios! echt einfach mit dieser klaren Anleitung, DANKE!