Zum Hauptinhalt wechseln

HKC P886A Status LED Replacement

Was du brauchst

  1. HKC P886A Status LED Replacement, Disassembling HKC P886A Overall Device Disassembly: Schritt 1, Bild 1 von 2 HKC P886A Status LED Replacement, Disassembling HKC P886A Overall Device Disassembly: Schritt 1, Bild 2 von 2
    • Insert the flat tip of the metal spudger into the seam between the back panel and the screen.

    • The easiest insertion point for the metal spudger is at the corners of the device.

    • Slide the spudger across the perimeter of the device and gently pry apart at each corner.

    • When the screen is separated from the back panel there will be two connected ribbon cables between the two halves of the device. These cables must be disconnected before further disassembly.

    • After the pressure clamps are released orient the device so that the speaker is to the right and the screen is tilted away from you.

  2. HKC P886A Status LED Replacement: Schritt 2, Bild 1 von 2 HKC P886A Status LED Replacement: Schritt 2, Bild 2 von 2
    • The device is oriented with the camera to the right and the external button towards the top of the picture.

    • Locate the shorter ribbon cable and the black pressure tabs that hold the ribbon cable in place.

    • The tabs used to connect the ribbon cables are fragile and can easily be damaged.

    • Use the plastic spudger to gently slide the tabs about 2mm away from connector.

    • Once tabs are successfully disconnected the ribbon cable should come out of the port without resistance.

  3. HKC P886A Status LED Replacement: Schritt 3, Bild 1 von 3 HKC P886A Status LED Replacement: Schritt 3, Bild 2 von 3 HKC P886A Status LED Replacement: Schritt 3, Bild 3 von 3
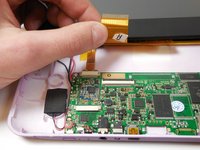
    • Locate the longer ribbon cable and the pressure clamp that holds the cable in the connection port.

    • Using the plastic spudger, flip the black locking clip up.

    • The pressure clip will click when it has been disengaged.

    • Once the clip is unlocked, the cable should slide out without resistance

    • In photo 1 the device is oriented with the camera to the left and external buttons towards the bottom. In photo 2 the device is oriented with the camera toward the user. In photo 3 the camera is to the left.

  4. HKC P886A Status LED Replacement, Status LED: Schritt 4, Bild 1 von 2 HKC P886A Status LED Replacement, Status LED: Schritt 4, Bild 2 von 2
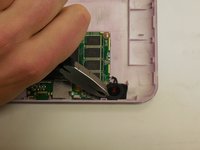
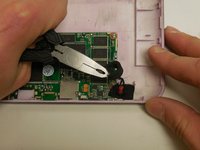
    • Gently grasp the foam ring with pliers and pull upwards to release the adhesive on the bottom of the ring.

    • The foam ring is delicate and can tear if handled improperly or with too much force.

  5. HKC P886A Status LED Replacement: Schritt 5, Bild 1 von 1
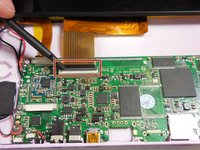
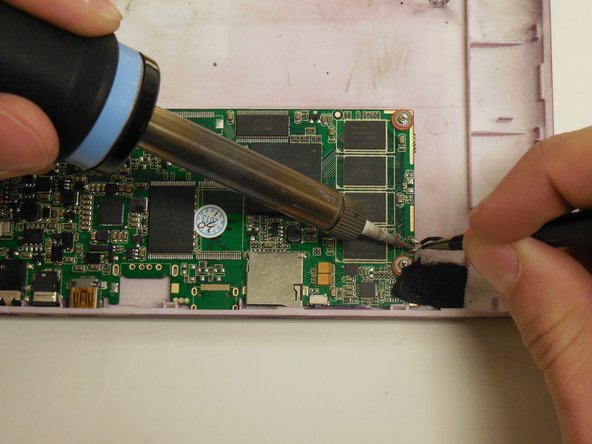
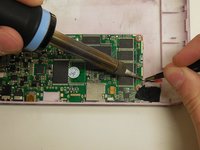
    • Using a soldering iron apply heat to the connection point between the LED and PCB.

    • Solder can be hot and may release toxic fumes. Be familiar with soldering safety guidelines before beginning this step.

    • When the solder is heated sufficiently (turns liquid and shiny) remove the LED lead with tweezers.

    • Repeat for other connection point.

  6. HKC P886A Status LED Replacement: Schritt 6, Bild 1 von 2 HKC P886A Status LED Replacement: Schritt 6, Bild 2 von 2
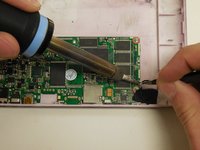
    • Using a soldering iron apply heat to the connection point where the LED connects to the PCB.

    • When the solder is heated sufficiently (turns liquid and shiny) insert the LED lead with tweezers. If necessary add additional solder to ensure a solid electrical connection.

    • When connecting the new LED attach the longer lead to the positive connection point (denoted on the PCB by '+'), and the shorter lead to the negative (denoted by '-').

    • Repeat for the other connection point.

    • If the LED is connected backwards the LED will not work.

  7. HKC P886A Status LED Replacement: Schritt 7, Bild 1 von 1
    • Position the new LED in the same position as the old LED.

    • If the lead's on the LED are not insulated be sure to not allow the two leads to contact each other. This will cause a short.

  8. HKC P886A Status LED Replacement: Schritt 8, Bild 1 von 1
    • Using tweezers or finger, replace the circular foam ring around the new LED.

    • If the foam ring will not adhere to device, then apply a thin amount of adhesive and retry.

Abschluss

To reassemble your device, follow these instructions in reverse order.

Team

Colorado Springs, Team 5-2, Panko Spring 2015 Mitglied von Colorado Springs, Team 5-2, Panko Spring 2015

UCCS-PANKO-S15S5G2

3 Mitglieder

8 Anleitungen geschrieben

0 Kommentare

Kommentar hinzufügen

Seitenaufrufe:

Letzte 24 Stunden: 0

Letzte 7 Tage: 0

Letzte 30 Tage: 2

Insgesamt: 324