Einleitung
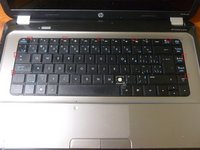
Hier wird beschrieben wie du einen HP Pavilion G6 öffnen und Ventilator und Kühlung reinigen kannst.
Was du brauchst
-
-
Schalte das Laptop aus und ziehe den Netzstecker.
-
Entferne den Akku. Drücke den Schieber in die angezeigte Richtung und hebe den Akku heraus. Lege ihn beiseite.
-
-
-
Löse die beiden Schrauben. (Sie werden sich nicht ganz herausdrehen lassen)
-
Nimm den Spudger und löse die Plastikklammern, fange oben an. An der linken Seite sind keine Klammern sondern nur Laschen.
-
Hebe die rechte Seite an um auch dort die Laschen zu lösen.
My Notebook 2000 does not have the two screws in the location shown in the picture. There are screws around the edges. Do I have a different model and a different way to doing step #2 ?
Thanks!
Petite difference sur le mien : une seule vis (solidaire du capot, ça c'est cool !)
-
-
-
Schiebe die Festplatte nach links, löse die SATA Verbindung und hebe die Platte ganz heraus.
-
Wenn du beim Entfernen der Festplatte Schwierigkeiten hast setze den Spudger in den Spalt an und lüpfe vorsichtig die Festplatte weg vom SATA Anschluss.
-
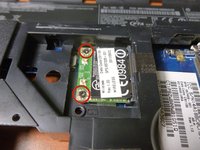
Entferne die Schraube des optischen Laufwerks und schiebe es heraus.
-
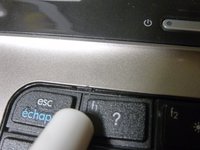
Entferne auch die Schraube die die Tastatur festhält.
J'ai retiré la vis du lecteur optique et… rien… je ne vois pas ce que ça a débloqué… j'ai aussi une autre flèche sur le mien indiquant le lecteur optique… il y a une vis mais à 90° complètement inaccessible…
-
-
-
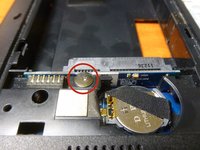
Bewege die beiden Halteklammern nach außen um das RAM zu befreien, ziehe ihn dann heraus. Wiederhole für das andere RAM.
-
-
-
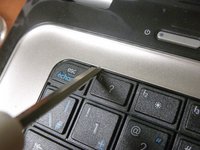
Neun Plastikrasten halten die Tastatur fest.
-
Hier im Detail zu sehen.
-
Um diese Rasten zu lösen musst du sie mit einem Schraubendreher oder etwas Ähnlichem wegdrücken während du gleichzeitig die Tastatur hochhebst. Die ersten Rasten gehen am schwersten.
-
-
-
-
Um es zu lösen öffne die schwarze Sicherungsklappe bis sie senkrecht steht. Ziehe dann das Kabel heraus.
It is not clear how to do it (absence pictures), but it
is a critical step and could be easily mishandles causing
connector permanently damaged.
That happened far too often.
In some following steps for ribbon cable disconnecting,
you references to that step, but connectors do not look
like the keyboard connector.
Looking forward to get better explanation.
Thanks,
Anthony
Hi Anthony,
The ribbon connectors are all the same in principal, they just vary in size - the others are much smaller than the keyboard ribbon.
Lift up the black notch from the side the ribbon enters the connection, remove ribbon. When replacing the ribbon ensure they are inserted flush then replace the black connector by clipping it back on top of the ribbon.
-
-
-
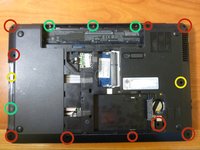
Entferne alle angezeigten Schrauben.
-
Beachte dass diese Schrauben kleiner sind als die rot markierten.
-
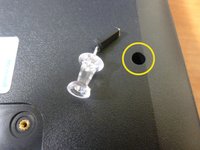
Die Schraube auf der rechten Seite ist unter einem Gummistöpsel versteckt. Entferne den Stöpsel mit einem spitzen Werkzeug wie z.B. einer Stecknadel, drehe dann die Schraube heraus.
-
-
-
Löse diese Kabel auf die gleiche Weise wie beim Kabel zur Tastatur ab.
-
Drehe auch die sechs Schrauben mit der Markierung "M2.5 x 4" heraus.
-
-
-
Das Oberteil des Laptops wird von Plastikklammern zusammengehalten. Nimm ein Plektrum, einen Plastiköffner, ein Küchenmesser oder Ähnliches um sie zu öffnen. Am Spalt wo das optische Laufwerk war gehts es normalerweise am Besten.
-
-
-
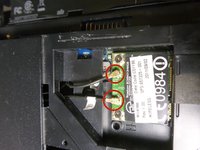
Entkopple die Kabel von der WiFi Karte, schreibe dir aber die Nummern auf den Kabeln auf damit du später weißt, wo sie eingesteckt waren.
-
Ziehe den Stecker vom Displaykabel auf der linken Seite. Siehe zuerst das Klebeband ab, löse dann mit einem Schraubendreher das Kabel ganz ab. Kleine Laschen auf den Seiten helfen dabei.
-
-
-
Entferne diese Schrauben auf der linken Seite um dasScharnier zu befreien.
-
Denke beim Zusammenbau daran das Kabel wieder festzuschrauben.
-
Entferne auch diese Schrauben auf der rechten Seite.
-
Hebe die Bildschirmeinheit weg und lege sie beiseite.
-
-
-
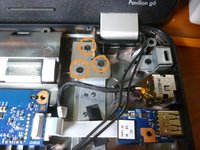
Wende das Laptop um und drehe die Schrauben bei der Funkkarte heraus. Sie wird so wie das RAM herausspringen. Schiebe sie heraus und lege sie beiseite.
-
In der Nähe der rechten oberen Ecke befindet sich die USB Buchse. Löse das Kabel zu ihr, indem du zuerst wieder die schwarze Sicherungsklappe hochhebst und dann das Kabel herausziehst.
-
-
-
Entferne diese Schraube am Boden des Laptops. Hebe dann die linke Seite der SATA Einheit gerade hoch um sie von der Hauptplatine zu entfernen. Lege sie beiseite.
-
Drehe diese Schrauben heraus, bewege dann die ganze Einheit nach rechts um sie von der Hauptplatine zu trennen.
-
-
-
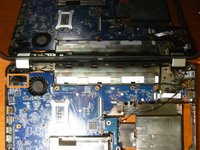
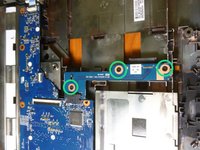
Entferne diese drei Schrauben und bewege die Hauptplatine nach rechts um sie aus dem Rahmen heraus zu heben.
-
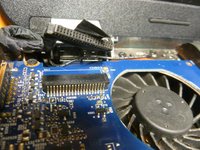
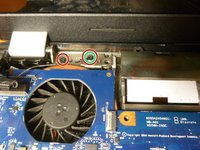
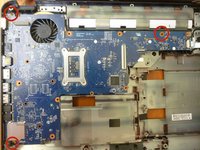
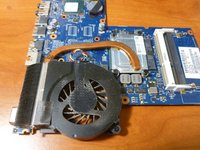
Hier ist die Kühleinheit! Mit Pressluft kannst du sie vom Staub befreien. Ich würde nicht empfehlen auch den CPU Kühler zu lösen, es sei denn du hast Wärmeleitpaste zur Hand um ihn dann wieder anzubringen.
Had a great deal of trouble extracting these three screws (marked M2x3). Ended up stripping them all and had to drill them out.
Very well done! The one I'm fixing is a slightly different model but the instructions were the bomb. Perfect!
Dude, instructions are far from perfect!
hmm778 -
Danke. Die Anleitung ist wirklich gut. Der Laptop wird nicht mehr heiß. Ich brauchte doch viel Mut. Der HP ist aber auch nicht sehr Verbraucher freundlich konfiguriert.
These models tend to overheat and the OEM thermal paste dries out over time. Unfortunately, there’s too many steps and screws involved. It’s easy to screw up. For those who say this is a perfect instructional step, it’s not. It’s not showing the location of M2.5x4 screws and a few other steps. Plus, we are not shown how the heatsink and cpu look.
There’s no instructions on how to take disassemble the heatsink and CPU. Afterall, that’s really the point of taking the laptop apart…to clean up the old paste/residue and reapply some arctic silver or other similar thermal paste.
its really simple to remove the haeatsink and fan, its 4 screws on the cpu and 1 on the fan, plus one small fan connector (remember to plug it back in, i forgot to and had to restart :/)
just letting people know, you dont need to remove the screws from the hinges
-


Um dein Gerät wieder zusammen zu setzen folge den Schritten in umgekehrter Reihenfolge.
Um dein Gerät wieder zusammen zu setzen folge den Schritten in umgekehrter Reihenfolge.
Rückgängig: Ich habe diese Anleitung nicht absolviert.
133 weitere Personen haben diese Anleitung absolviert.
Besonderer Dank geht an diese Übersetzer:innen:
100%
VauWeh hilft uns, die Welt in Ordnung zu bringen! Wie kann ich mithelfen?
Hier starten ›

57 Kommentare
after cleaning and put it back , now my laptop can't start
If you took reasonable precautions against static electricity, you probably forgot to connect one of the cables.
Patrick -
This guide was unbelievably useful, my G6 was heating up to 80+ degrees under light loads and turning off due to overheating, I was about to write it off, thought I might as well try this.
Once you get to the last step, it is possible to partly remove the fan (it stays attached at one corner) and clean out the gap between the fan and the bladed thing that looks like a barber's hair clipper.
That for me was full of a thick cake of dust, now that's gone the computer stays at 50+ degrees, and the battery life is massively improved (I was getting about 20 minutes due to the fan) and the fan is no longer louder than the speakers. Thanks uploader!
Absolutely amazing instructions! Better than the videos out there because the detail is so precise and easy to follow!
thanks i was trying this without instructions and got stuck at the keyboard clips . i didn't even think of static protection .one question . my screen is busted so I use an external display .some times when I power up its difficult to switch screens and type my password . so can i leave the busted screen unplugged when I reassemble ?
Check and make sure your memory modules are seated properly and that they are in the correct slots. http://support.hp.com/ca-en/document/c03...
Patrick -
Excellent guide. But could you explain or include a picture of what spudgering tool is or looks like? Thank you.
A spudger is an antistatic prying and prodding tool, I added it to the tools list, and you can find a better description on its product page =)
Thank you so very much for making this tutorial! My laptop now works like a stalking cheetah(before it was a wild gorilla). You made this possible. Your instructions were precise and intuitive. Lots of love to you!
Hi. Thanks for instructions. I managed to clean the fan it's perfect now and sounds like new ( not like a taking of plane) but now my screen is black and Caps Lock flashing. What did I do to it?
Thanks
Thanks for the guide. It wasn't very difficult, got the fan cleaned out and new thermal paste on and it doesn't sound like a jet engine anymore. They sure make it more difficult than necessary to clean the laptops!
How did you change the paste? Did you order some?
It actually is very difficult. I tried on a dead G6. I wish people would stop misleading others online. It’s like saying running a 40 mile marathon was easy. It might be easy for some, but the majority it’s not.
hmm778 -
After the reassembly I could not get access to the wifi card, where could I have gone wrong
Did you ensure you connected the cables in the right order?
Patrick -
Excellent set of instructions. My G6 was a little different to the pictures shown but nevertheless, job completed and laptop works perfectly. Thanks for your help.
after following the process and booting the laptop has no display and the fan sound a lot what could be the problem plz
Got as far as the display cable and chickened out as no obvious way to pull it out without ripping the thin wires. It was far enough though to clean around the fan and blow the muck out the heat sink. Reversed the instructions and it works and its quiet now. Very useful. Thanks.
Yeah, it's not the most obvious. IIRC I detached it it using a small slot screwdriver. Alternate between sides, gently and gradually prying it loose.
Patrick -
I just opened parts and about to clean hope everything goes well
How did it go?
Awesome tutorial! Thank you so much! ^_^
My touchscreen doesnt work pls help
Great instructions but unbelievable how much disassembly is required just to blow out dust, which should be done frequently!
Oh this is definitely not something you need to do often. Spraying canned air inside the vents should suffice. This is more of a deep clean tutorial - something you'd do once a year or less, depending on where you live.
Patrick -
Oh this is definitely not something you do every time. Spraying canned air into the vents should suffice. This is a deep clean tutorial. I do this about once a year (may vary more or less depending where you live)
Patrick -
Fan cleaned and now working again, thank you
My G6 - 2026tx Have a wifi issue. It’s not connected in first time. After several power cycles it connect. some times I use dongle in few minutes & reconnect wifi, then only it connects. Please help.
My G6 -2027tx have wifi issue. It’s not connect in once, need to reboot several times to connect. Sometimes I connect Broad band Dongle few minites & reconnect wifi then it’s connected. Please help
I have same issue. I have to reboot. My guess is this is a mobo issue. I vow never to buy HP again.
hmm778 -
Great Guide! This Will Help Someone Soon!
Couldn't have done it without the guide.
Great Guide for dissembling. I have cleaned the dust and assembled everything. My laptop power is On, but the display couldn’t come. Where should I check? I have checked everything thrice and everything looks good.
Go back to step 10 and make sure the display cable is firmly seated
Patrick -
while taking it apart I took a look at the motherboard and cpu and I saw there is a piece of thick clear square plastic sticking out in between my cpu and the heatsinc I tried looking it up but could come up with nothing does anybody else have this piece sticking out
Great guide even though my G6 layout is different but it worked. I have to take it apart today as well, because after putting it all back together, now the laptop won’t turn on. I prob. forgot to connect a cable, I hope.
As I commented in the problem areas where there needs to be further clarification/visuals, the instructions are good; however, a lot is still missing especially the key part about removing the heatsink and fan to reapply the thermal paste. The paste wears out over time and must be reapplied every 3-5 years. There is a lot of effort here and risk especially damaging existing parts, stripping of screws, not having the right tools (which should also be listed) but are not.
For me, I’m going to take my laptop to a computer store who will do the work for me. To all those who were successful with the teardown, kudos.
A good guide, the k-board details were important.
I went all in and replaced the thermal paste as well and the heat dropped from 80+ to 45+ Celsius
//Thank you!
Rip I have broke the right click taking it apart
I used this guide about 2 years ago. I could not have disassembled, or reassembled the laptop with out it. The computer is still working but does not yet need another cleaning. I hope this website remains open for years to come.
Thank you so much for your time and help, your guidance helped me a lot.
Merci! Clair, structuré, complet… Nice!
Great! Thanks a lot! Changed the fan and cleaned the heatpipe, runs like on the first day again. 5 Stars for ifixit!
Very useful and matched the variation of model I have. Much more clear than the OEM maintenance manual.
Problème possible sur les HP : la batterie est bloquée avec le verrou coincé en position ouvert. Solution : glisser une ou deux cartes plastique dans l'interstice de la batterie et les faire glisser tout le long pour débloquer la batterie
Sylvain Pelloquin - Antwort
Pour moi le loquet esg bloquer
jonas agudze - Antwort