Zum Hauptinhalt wechseln

Karcher Vacuum Universal 14286230 2014 Power Switch Replacement

Was du brauchst

  1. Karcher Vacuum Universal 14286230 2014 Power Switch Replacement, Unlatch the top assembly: Schritt 1, Bild 1 von 3 Karcher Vacuum Universal 14286230 2014 Power Switch Replacement, Unlatch the top assembly: Schritt 1, Bild 2 von 3 Karcher Vacuum Universal 14286230 2014 Power Switch Replacement, Unlatch the top assembly: Schritt 1, Bild 3 von 3
    • Before you begin, unplug the vacuum and disconnect all hose accessories.

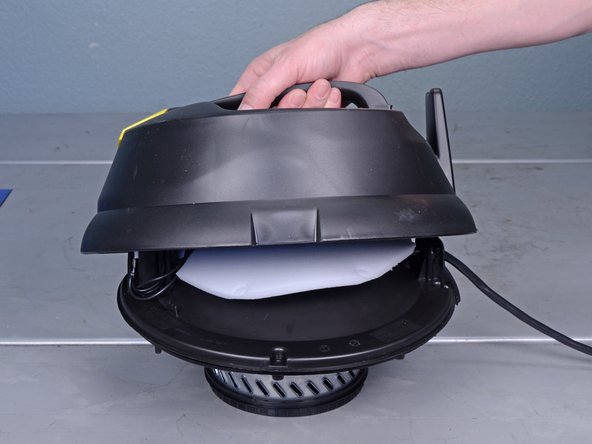
    • Release the two latches locking the top assembly in place.

  2. Karcher Vacuum Universal 14286230 2014 Power Switch Replacement, Remove the top assembly: Schritt 2, Bild 1 von 2 Karcher Vacuum Universal 14286230 2014 Power Switch Replacement, Remove the top assembly: Schritt 2, Bild 2 von 2
    • Lift and remove the top assembly from the tank.

  3. Karcher Vacuum Universal 14286230 2014 Power Switch Replacement, Unscrew the top assembly: Schritt 3, Bild 1 von 1
    • Remove the four T15 screws securing the top assembly.

  4. Karcher Vacuum Universal 14286230 2014 Power Switch Replacement, Remove the top cover: Schritt 4, Bild 1 von 3 Karcher Vacuum Universal 14286230 2014 Power Switch Replacement, Remove the top cover: Schritt 4, Bild 2 von 3 Karcher Vacuum Universal 14286230 2014 Power Switch Replacement, Remove the top cover: Schritt 4, Bild 3 von 3
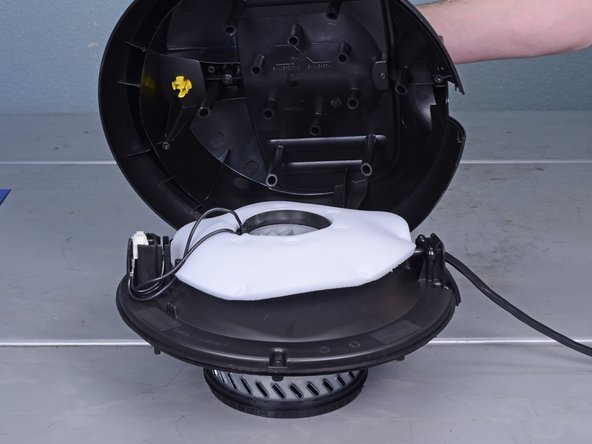
    • Lift and remove the top plastic cover from the motor assembly.

    • These images show the assembly with the filter portion already removed. You don't have to remove the filter for this repair.

  5. Karcher Vacuum Universal 14286230 2014 Power Switch Replacement, Reassembly tip: Schritt 5, Bild 1 von 2 Karcher Vacuum Universal 14286230 2014 Power Switch Replacement, Reassembly tip: Schritt 5, Bild 2 von 2
    • Reassembly tip: Follow these tips to help you re-align the plastic layers:

    • The switch module should line up with the yellow plastic switch plunger.

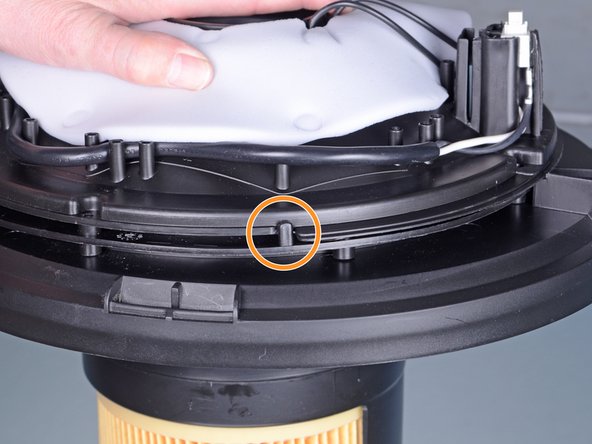
    • The two plastic moulded discs line up using this black tab.

  6. Karcher Vacuum Universal 14286230 2014 Power Switch Replacement, Loosen the switch assembly: Schritt 6, Bild 1 von 2 Karcher Vacuum Universal 14286230 2014 Power Switch Replacement, Loosen the switch assembly: Schritt 6, Bild 2 von 2
    • Slide the switch assembly out of its plastic mount.

  7. Karcher Vacuum Universal 14286230 2014 Power Switch Replacement, Disconnect the switch: Schritt 7, Bild 1 von 2 Karcher Vacuum Universal 14286230 2014 Power Switch Replacement, Disconnect the switch: Schritt 7, Bild 2 von 2
    • Unplug the wires from the switch. These are standard spade terminals that can be pulled apart.

    • Remove the switch.

    • Reassembly tip: When you plug in a new switch, use the middle image to help you properly wire the switch.

Abschluss

To reassemble your device, follow these instructions in reverse order.

Eine weitere Person hat diese Anleitung absolviert.

Arthur Shi

Mitglied seit: 01/03/18

257.458 Reputation

529 Anleitungen geschrieben

Team

iFixit Mitglied von iFixit

Staff

141 Mitglieder

17.895 Anleitungen geschrieben

Ein Kommentar

Part number for the filter nut: Karcher NT 27/1 48/1 Vacuum Hoover Holder Filtering Basket 9.411-954.0

THOMAS - Antwort

Kommentar hinzufügen

Seitenaufrufe:

Letzte 24 Stunden: 0

Letzte 7 Tage: 7

Letzte 30 Tage: 21

Insgesamt: 1,163