Einleitung
Ein kaputter Akku kann eine günstige Reparatur sein für Geräte, die nicht mehr laden oder nur noch eine kurze Akku-Laufzeit haben. Diese Anleitung zeigt, wie man den Akku ersetzt.
Was du brauchst
-
-
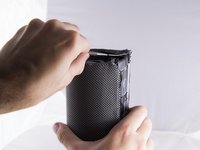
Fange an einem Ende des Lautsprechers an.
-
Führe ein Kunststoff-Öffnungswerkzeug in den Spalt zwischen dem Gummideckel und der Gewebe ein.
-
Hebele den Gummideckel mit einer Aufwärtsbewegung heraus.
-
Mache dasselbe auf der anderen Seite.
-
-
-
Benutze den Jimmy und hebele den Gummistreifen heraus auf dem sich die Lautstärke-Tasten befinden.
-
Entferne den ganzen Gummistreifen nach dem Heraushebeln.
Die Deckelseite mit den Eingängen USB und Aux geht deutlich leichter auf und reicht auch!!!
anschlie0end seitlich den Gummistreifen lockern, dass der Deckel zurück geklappt werden kann.
Dann muss die ca 2cm starke Deckelplatte mit dem kompletten Umfang (ist auf die Box aufgesteckt ab.
Hierzu das Gewebe nur an dieser Seite aus der Halterung fummeln, dann müsste die Abdeckung schon herausgehen, zur Not das Gewebe an der Längsseite lösen.
Resümée: Die Anleitung hier zeigt viel zu viele Schritte, die entscheidenden fehlen aber und dann fängt die Anleitung auch noch am falschen Ende an!
-
-
-
-
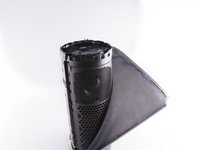
Benutze eine Pinzette um die Kunststoffklemme anzuheben, die das Gewebe in der Röhre fixiert.
-
Hebe die Klemme rund um den Lautsprecher herum heraus.
-
Mache dasselbe auf der anderen Seite.
No need to remove fabric or remove both sides.
I suppose, if you want to swap the external fabric (for what this guide is basically), you have to remove it first ;-)
BenZ78 -
what do you do once fabric removed. can't see how to expose battery
This guide is how to swap the fabric only. To change the battery you can use this guide.
BenZ78 -
-
-
-
Ziehe am weißen Streifen um den Akku heraus zu nehmen.
This skipped the step of pulling out the circuit card on the battery charge/aux-in side. Pry up below the gasket next to the large capacitors on both sides.
A faire après les étapes 5 et 6 (pas besoin d’ouvrir l’autre côté de l’enceinte).
-
-
-
Entferne die innenliegende Kunststoff-Dichtung auf der Platine.
-
Entferne die zweite Kunststoff-Dichtung am äußeren Rand der Platine unter der Gummidichtung.
-


Um dein Gerät wieder zusammen zu bauen, befolge die Schritte in umgekehrter Reihenfolge.
Um dein Gerät wieder zusammen zu bauen, befolge die Schritte in umgekehrter Reihenfolge.
Rückgängig: Ich habe diese Anleitung nicht absolviert.
15 weitere Personen haben diese Anleitung absolviert.
Besonderer Dank geht an diese Übersetzer:innen:
100%

BenZ78 hilft uns, die Welt in Ordnung zu bringen! Wie kann ich mithelfen?
Hier starten ›
Team

Cal Poly, Team S9-G2, Banghart Fall 2017 Mitglied von Cal Poly, Team S9-G2, Banghart Fall 2017
CPSU-BANGHART-F17S9G2
4 Mitglieder
17 Anleitungen geschrieben
24 Kommentare
There is a way to take it apart without all these steps and a complete tear down.
This is huge overkill. Only the bottom cap and circuit board need to be removed for a battery replacement.
I agree. The battery is located on the bottom end only.
Jamin Hu -
^ the person who says that you only need to remove the one end-cap to replace the battery is correct. The process outlined in this article is more likely to damage all the fabric and other end-cap than just opening one end and gently prying it back until you can slide out the battery. FYI, the pull tab on my battery broke right off, and I had to pull it out with pliers.
I’m replacing my ue megaboom battery
can I replace my 7.2 mah 3130 mah battery
with a 7.4 3400 mah battery?
I completed this repair yesterday using a battery with those specifications and it's working fine so far.
Excelente aporte, gracias
I just completely destroyed the opposite endcap trying to get it off when apparently only one needed to come off. It’s probably worth editing the instructions to reflect that
YOU DONT NEED TO TAKE THE OTHER SIDE AND ENTIRE VOLUME PAD OFF. This makes the material look tampered and wavy after reinstalling. Just simply remove the side that has the charging port. You can replace the battery just fine from there. I don’t know why it even bothers instructing you to take apart both sides of the speaker.
You do not need to take the outer cloth layer off to get to the battery.
How to replace a windshield wiper… first remove all the tires to lower the car 6 inches.
This guide for battery replacement is totally wrong and misleading. You only need to remove the cap where the UE plugs in. Removal of the other cap will undoubtably damage the fabric and cap as it is glued down at the non battery end. There are other more informative sources on youtube giving complete step by step instructions on replacing the battery.
There are a couple of clarifications that would help this guide - besides what was mentioned before around only needing to get the bottom cap off in order to have access to what is needed for a battery replacement. 1) include pictures of how to remove the bottom circuit board and to clarify that it should be extracted as level as possible to prevent damaging the speaker connector. 2) for the section above that talks about removing the rubber sidestrip that covers the volume buttons, emphasize that you want to dig your jimmy into the grove of the bracket - not simply behind the rubber - as you will simply remove the rubber from the bracket. More pictures would be useful here too - like show the remove end caps + rubber side with the bracket attached (ie inside view)
Can the battery for a Megablast be changed?
Getting the end cap off was FUN! So much force required but once seeing how it is attached you are actually pretty unlikely to break anything so just gotta muscle through. I ended up using a flat piece of metal that i could grip from both sides (a big metal cooking utensil/spoon). On the side of the end cap opposite to the rubber that runs down the length of the speaker, the flat metal can wedge in between the end cap and the mesh with the help of a spudger I poked in there just to open things up a little. With the flat piece of metal in, my friend held the speaker standing up, with the other end cap flat on the floor. I pulled the metal upwards and slightly towards the rubber strip side. The whole action was like opening a ring pull can. A big pop and it was open and everything inside was accessible for the battery fix.
Got my new battery now. Speaker is working great again.
This is a sh1t guide. Read all the comments. And also: the D-ring thread does not in any way connect the end-cap of the speaker to the body of the speaker. Removing the D-ring is pointless. Better off using the D-ring to apply force to the end-cap to help remove it from the body of the speaker.
You should sort this out IFixit!
Concur - just replaced my battery in about 10 mins following a YouTube video. No need to pull the whole thing apart, so much easier getting in through the bottom. After all, the power source is always near the power input.
Nobody answered yet this question.
If you open the bottom part, does it affect the waterproofing of the device?
You defiantly can stop at the remove end cap stage... what I came here for is reassembly. After replacing battery I"m getting a rattle from the speaker housing. I'm contemplating using caulking to seal it back up and absorb the rattle but was hoping to find a better option. If anyone knows where to get that supper sticky foam tape I'm all ears.
Only thought to look at the comments after denting my top plastic pretty badly. Please fix this guide!
This guy explains it very nicely: https://www.youtube.com/watch?v=9tTPSEa7...
These guys are paid by UE boom to show you the wrong way to do it lol
Pry all the way around with the tool as there are “clips” that hold the cap in place all around beneath the cap. Avoid trying to “pull the lid open” from the opening of a half opened lid.
Jamin Hu - Antwort
Stop! Before you proceed, notice the comments at the end of the guide. You don't have to take apart both sides or remove the mesh fabric. Remove just the bottom cap (with the aux/charge plug).
Then carefully remove the glue securing the circuit board on the sides and gently pull the board out to reveal the battery under it.
Caleb Kelsay - Antwort
FWIW I had no luck opening these caps with the tools I bought on iFixit (plastic pry bar, metal Jimmy). I had a lot more luck using the flat edge of a butter knife! (it still took lots of work on my UE Megaboom 3)
Travis Taylor - Antwort
My megaboom berttrey doesn't charge it becomes like power defending
Lawrence Memsong - Antwort