Einleitung
Diese Anleitung zeigt, wie das obere Gehäuse im MacBook Air (Modelle A1237 und A1304) getauscht werden kann.
Was du brauchst
-
-
Das Gehäuseunterteil ist mit 10 Kreuzschlitzschrauben am Air befestigt. Drehe sie heraus:
-
Sechs 2,8 mm Schrauben
-
Zwei 3,8 mm Schrauben
-
Zwei 5,4 mm Schrauben
-
-
-
Hebe das Gehäuseunterteil in der Nähe der Lüftungsöffnungen leicht an und schiebe es in Richtung hinteres Ende des Computers. Du löst dadurch die Haltezungen.
-
-
-
Entferne folgende neun Kreuzschlitzschrauben, die den Akku befestigen:
-
Vier 2,9 mm Schrauben
-
Vier 3,8 mm Schrauben
-
Eine 7,2 mm Schraube
-
-
-
Hebe den Akku aus dem Air heraus.
-
Wenn du einen neuen Akku einbaust, solltest du ihn nach dem Einbau kalibrieren:
-
Lade ihn auf 100% auf und lasse ihn mind. 2 weitere Stunden laden. Benutze das Gerät normal, um den Akku zu leeren. Wenn die Akkuanzeige niedrig ist, speichere deine Arbeit ab und lasse dein Laptop weiter laufen bis es sich wegen eines leeren Akkus von selbst abschaltet. Warte mind. 5 Stunden, lade dann dein Laptop ohne Unterbrechung auf 100% auf.
-
Falls du nach dem Einbau deines neuen Akkus irgendwelche Probleme oder etwas Ungewöhnliches feststellst, musst du unter Umständen den SMC deines MacBooks zurücksetzen.
-
-
-
Löse das Flachbandkabel zu den Ports vom Logic Board indem du es an seiner schwarzen Zuglasche gerade nach oben ziehst.
-
Das Flachbandkabel zum Audioausgang ist am Gehäuse verklebt. Löse es ab.
-
Heble die kleine Platine mit dem Verbinder des Audiokabels mit einem Spudger weg von der Halterung der Festplatte.
I skipped the step (6c) of prying the audio out ribbon cable connector board off the hard drive bracket (& disconnecting it), since it doesn't come off real easily, and I didn't want to damage it. It only requires a little more care when removing the HD from it's bracket if you skip step 6c.
-
-
-
Löse den Verbinder des Audiokabels aus seinem Sockel auf der kleinen Platine.
Agreed, I encountered no issues when I skipped this on a Rev.B model.
-
-
-
Heble den Verbinder des Festplattenkabels vom Logic Board hoch.
Reversing step 8 is where I ran into trouble. The replacement fan I had was slightly thicker than the original and caused the ZIF cable to work its way out of the tenuous connection it had to the SSD, resulting in a "?" missing boot drive error upon startup. Took me three tries to get it right! The difficulty is to get the drive connector to the logic board to reach and seat without pulling the other end out of the drive.
-
-
-
Fädle das Mikrofonkabel mit dem flachen Ende des Spudgers aus der Halteklammer der Festplatte.
-
Entferne jeglichen Kleber von der Schraubenabdeckung der Festplattenklammer.
-
-
-
Die ganze Festplatteneinheit ist mit vier Kreuzschlitzschrauben am oberen Gehäuse befestigt. Drehe sie heraus:
-
Zwei 4,7 mm Schrauben
-
Zwei 3,9 mm Schrauben
Longer screws on top.
Two 3.9 mm Phillips screws.
Two 4.7 mm Phillips screws.
There is a cable glued to the diskframe that must be loosened with a spudger before you can remove the frame.
-
-
-
Hebe die Festplatteneinheit aus dem oberen Gehäuse.
-
-
-
Ziehe den Stecker am Lüfterkabel mit der Spudgerspitze gerade aus seinem Anschluss auf dem Logic Board heraus.
-
-
-
Eine 5,9 mm Kreuzschlitzschraube
-
Zwei 1,9 mm Kreuzschlitzschrauben
-
Eine 1,9 mm Kreuzschlitzschraube
-
Eine 5,0 mm Kreuzschlitzschraube
-
Fünf 1,9 mm Kreuzschlitzschrauben
-
Eine 2,5 mm Kreuzschlitzschraube
I have replaced several Logic boards at this point on the A1304 model, and realized that I did not need to remove the heatsink (Steps 14 through 17). You need to remove the screws around the fan, and disconnect the microphone cable (step 19). Of course if your replacement logic board doesn't include a heatsink, you need to take it off.
-
-
-
-
Hebe den Kühlkörper vom Logic Board hoch.
I removed the fan at this point as well. Disconnect the small connector from the fan to the logic board and lift out the fan. Good time to blow off the dust!
-
-
-
Heble den Stecker am Audiokabel mit dem Spudger nach oben vom Logic Board weg.
-
-
-
Ziehe den Stecker des Mikrofonkabels gerade aus seinem Anschluss auf dem Logic Board heraus und trenne es ab.
-
-
-
Entferne die beiden kleinen Kreuzschlitzschrauben, mit denen die Halterung des Logic Boards am oberen Gehäuse befestigt ist.
-
Hebe die Halterung des Logic Boards aus dem oberen Gehäuse.
-
-
-
Heble die Stecker am Airport/Bluetoothkabel und Steuerkabel des Trackpads mit dem Spudger nach oben vom Logic Board weg.
-
-
-
Ziehe den Stecker der Stromversorgung gerade aus seinem Anschluss auf dem Logic Board heraus und trenne ihn ab.
-
-
-
Entferne die kleine Kreuzschlitzschraube, mit der die Erdungsklammer des Display-Flachbandkabels am oberen Gehäuse befestigt ist.
-
Ziehe den Stecker des Displaydatenkabels gerade aus seinem Anschluss auf dem Logic Board heraus und trenne ihn ab.
-
-
-
Entferne die drei Kreuzschlitzschrauben, mit denen das Logic Board am oberen Gehäuse befestigt ist.
-
-
-
Entferne die beiden folgenden Schrauben, mit denen die Halterung der Airport/Bluetooth-Karte am oberen Gehäuse befestigt ist:
-
Eine 4,7 mm Kreuzschlitzschraube
-
Eine 3,9 mm Kreuzschlitzschraube
The plastic Airport/Bluetooth bracket provides additional resistance and the 3.9 mm screw is easily stripped. Remove carefully.
-
-
-
Heble die drei Antennenkabel mit dem Spudger von der Airport/Bluetooth-Karte nach oben weg.
-
-
-
Entferne die einzelne Kreuzschlitzschraube von der Erdungsklammer des Mikrofonkabels zum oberen Gehäuse.
-
-
-
Entferne die folgenden fünfzehn Schrauben:
-
Dreizehn 2,3 mm Kreuzschlitzschrauben
-
Zwei Torx T6 Schrauben
-
-
-
Öffne das Air so, dass das Display rechtwinklig zum oberen Gehäuse ist und stelle es wie gezeigt auf die Arbeitsfläche.
-
Halte das Air am oberen Rand mit einer Hand fest und entferne die Torx T6 Schraube von der unteren Displayhalterung.
-
-
-
Ziehe das obere Gehäuse senkrecht vom Display weg. Achte dabei darauf, dass sich keine Kabel verfangen.
-
-
-
Entferne die beiden Kreuzschlitzschrauben, mit denen die Lautsprechereinheit am oberen Gehäuse befestigt ist.
-
-
-
Drehe die Lautsprechereinheit zur Mitte des Air hin.
-
Heble den Stecker am Audiokabel mit der Spudgerspitze von der Audio-Platine hoch.
-
-
-
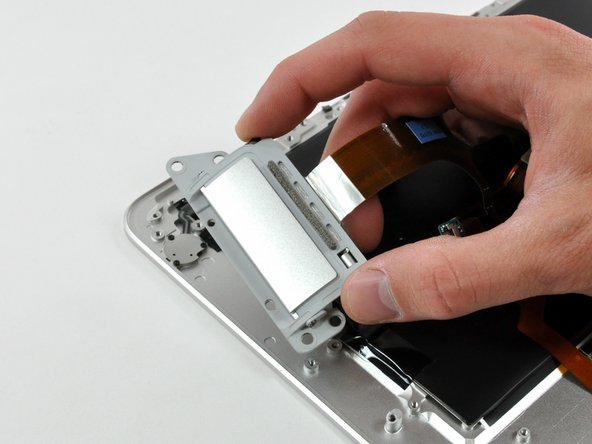
Entferne die vier mit einem Teilgewinde versehenen Kreuzschlitzschrauben, mit denen die Anschlusseinheit am oberen Gehäuse befestigt ist.
-
Hebe die Anschlusseinheit aus dem oberen Gehäuse heraus.
-
-
-
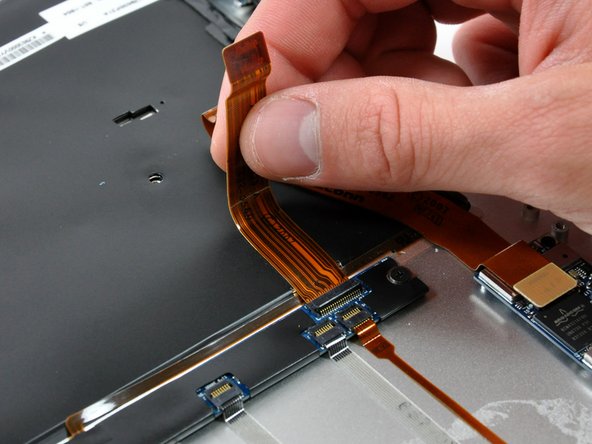
Klappe den Sicherungsbügel am Anschluss des Steuerkabels zum Trackpad mit der Spudgerspitze hoch.
-
Löse das Steuerkabel des Trackpads aus der Klebeverbindung zum oberen Gehäuse.
-
Ziehe das Steuerkabel des Trackpads aus seinem Anschluss heraus.
I noticed on the unit that I just replaced that the trackpad control cable socket location had been moved. The unit I was replacing had it more offset to the right from what is indicated in this picture and had an angled ribbon cable like the airport one. It would be a big help to include a part number for the straight one as illustrated, or make a note that some "wiggling" will be needed to make the other work. (The offset isn't huge and you can make it work with the angled cable.)
-
-
-
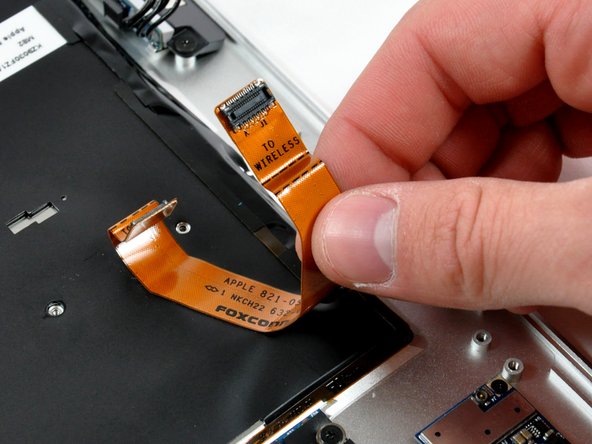
Heble den Stecker am Airport/Bluetoothkabel mit dem Spudger nach oben von der Airport Bluetooth-Karte weg.
-
Löse das Airport/Bluetoothkabel aus der Klebeverbindung zum oberen Gehäuse.
-
-
-
Entferne die einzelne Kreuzschlitzschraube, welche die Airport/Bluetooth-Karte am oberen Gehäuse befestigt.
-
Hebe die Airport/Bluetooth-Karte aus dem oberen Gehäuse heraus.
-
-
-
Entferne die beiden Kreuzschlitzschrauben, mit denen das DC-In Board am oberen Gehäuse befestigt ist.
-
Hebe das DC-In Board aus dem oberen Gehäuse heraus.
-
Das obere Gehäuse bleibt zurück.
You forgot some things ... like maybe to remove the display from the topcase? Or the wifi/bluetooth antennas? Also, some advice on thermal paste would be nice, like if you think one needs to replace it completely, or if just putting it back together is fine. (fine for me after a quick test, no apparent overheating.) Though I also cleared out lots of dust, so airflow should be better anyway.
Zitat von step21:
You forgot some things ... like maybe to remove the display from the topcase? Or the wifi/bluetooth antennas? Also, some advice on thermal paste would be nice, like if you think one needs to replace it completely, or if just putting it back together is fine. (fine for me after a quick test, no apparent overheating.) Though I also cleared out lots of dust, so airflow should be better anyway.
Thanks for being an extra set of watchful eyes. We have no idea why, but a server glitch prevented the Display pre-requisite guide (which includes the Bluetooth/Wi-Fi wires) from being displayed. We re-added the page and everything looks fine now.
We also added a link to the thermal paste guide on Step 17. This should enable other users to properly apply thermal paste once they're ready to put the heat sink back on.
Thanks again!
-


Um dein Gerät wieder zusammenbauen, folge den Schritten in umgekehrter Reihenfolge.
Um dein Gerät wieder zusammenbauen, folge den Schritten in umgekehrter Reihenfolge.
Rückgängig: Ich habe diese Anleitung nicht absolviert.
43 weitere Nutzer:innen haben diese Anleitung absolviert.
Besonderer Dank geht an diese Übersetzer:innen:
100%

Diese Übersetzer:innen helfen uns, die Welt zu reparieren! Wie kann ich mithelfen?
Hier starten ›

5 Kommentare
Although my upper case installation went perfect and my macbook Air never operated better all of the sudden my mouse pad , the part that clicks somehow started to respond slow and now takes more tan one or two clicks to register but I do not think it's your fault. If you have any suggestions on how to make it work better it would be appreciated, maybe If I tried to clean it out with isopropyl alcohol to clean it, it might help.
Kind Regards, It was fun fixing my macbook air.
Also It would have helpful to have a few extra small screws as I stripped one in the display to top case connection.
I would say 2 things. First, you will need the exact match of the model (for example A1237) plus the rest of the product specific (exact year of make). For example my model is A1237 but the upper case I bought didn't quite match especially the locations of the inner screws. I could not fit 6No screws back in when reassembling together. Without these screws the macbook air was put together and working ok but if you have a choice you want to get the exact match product. Secondly, screws. Some screws just won't come off. First thing you need a good screwdriver to unscrew a very tight and some are forced into position when assembled in factory. If you cannot take them out, take it to a computer guru who has the right hand. Seriously. I had problem with 3No screws they just won't come off. I forced it and damaged the screws. Luckily a specialist helped me to unscrew them and he told me that it's a known problem on macbook air. Other than that the replacement of the upper case was pleasantly done.
These intructions worked great. I ended up not taking off the cooling fan and then heat sink which saved a lot of time and I think reduced the risk of me screwing something up. Thanks!!!!1