Einleitung
Diese Anleitung zeigt dir, wie du an die RAM gelangen und sie aufrüsten kannst.
Was du brauchst
-
-
Entferne die zehn Schrauben, die das obere und das untere Gehäuse zusammenhalten.
-
Drei 13,5 mm (14,1 mm) Kreuzschlitzschrauben.
-
Sieben 3 mm Kreuzschlitzschrauben.
-
-
-
Hebe das Gehäuseunterteil nahe beim Lüfter mit beiden Händen an und löse es so von den beiden Clips, die es mit dem Gehäuseoberteil verbinden.
-
Entferne das Gehäuseunterteil und lege es zur Seite.
-
-
-
-
Benutze die Kante eines Spudgers, um den Akkustecker nach oben aus seinem Anschluss zu hebeln.
-
-
-
Biege das Akkukabel leicht von seinem Anschluss auf dem Logic Board weg, damit es sich nicht versehentlich wieder selbst verbindet, während du arbeitest.
-
-
-
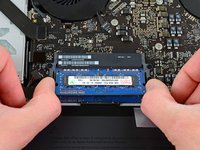
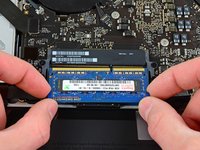
Öffne die Klammern auf beiden Seiten des RAM-Moduls, indem du sie gleichzeitig nach außen drückst.
-
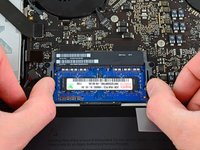
Wenn das RAM nach oben geklappt ist, ziehe es gerade aus seinem Sockel heraus.
-


Um dein Gerät wieder zusammenzusetzen, folge den Schritten in umgekehrter Reihenfolge.
Rückgängig: Ich habe diese Anleitung nicht absolviert.
180 weitere Personen haben diese Anleitung absolviert.
Besonderer Dank geht an diese Übersetzer:innen:
100%


Diese Übersetzer:innen helfen uns, die Welt zu reparieren! Wie kann ich mithelfen?
Hier starten ›

13 Kommentare zur Anleitung
Super clear guide, super easy way to upgrade the RAM.
But the factory default RAM is supposed to be 1600MHz on this (PC3 10600S is 1333MHz) right?
Super easy! Great guide!
This was a very clear and helpful guide. Thanks, Andrew!
One point that I thought would help others trying this for the first time is about the mechanism holding the RAM. As the guide points out, the RAM chips should 'pop' up when the clips holding them down are properly extended to the side. And when installing the new chips I found that though the force applied was between light and moderate, relative there wasn't much force needed to insert them into the board as there was to push them downwards until you here a 'pop.' The force needed to be applied at any stage of the whole process was minimum to midway between minimum and moderate.
Hey I consulted this iFixit guide, the official guide on the apple website and also the crucial memory selector tool.
1) Apple said you didn't have to disconnect the power. So you don't (if you're just swapping out the ram).
2) Crucial confirms that 16 gb works. I ended up getting 16 gb of PNY at BestBuy. They didn't have any Crucial on the shelves.
3) The first two times I did this, the connections weren't perfect. So I had the triple beep motherboard error and then the "nothing happens when i try to power on" error. So if either of these happens, fret not. Just calmly open everything back up and do it again.
So happy I did this. Yosemite was a memory guzzling beast. Now I have garageband and iTunes and iPhoto all blazing and not a hitch.
Cheers.
Could I suggest adding a hardware test after installation.
For my MacBook Pro you hold down the D key when restarting.