Diese Version enthält möglicherweise inkorrekte Änderungen. Wechsle zur letzten geprüften Version.
Was du brauchst
-
-
Entferne die folgenden zehn Schrauben, die den Boden des Gehäuses befestigen:
-
Zwei 2,3 mm Pentalobe P5 Schrauben
-
Acht 3 mm Pentalobe P5 Schrauben
-
-
-
Gehe mit deinen Fingern zwischen das obere und das untere Gehäuse.
-
Hebe die untere Gehäuseabdeckung vorsichtig vom Gerät ab.
-
-
-
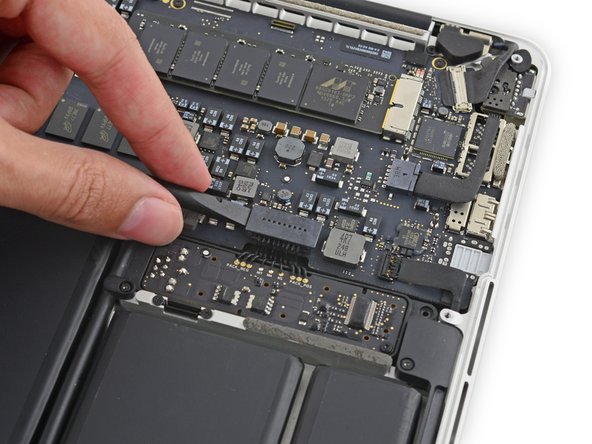
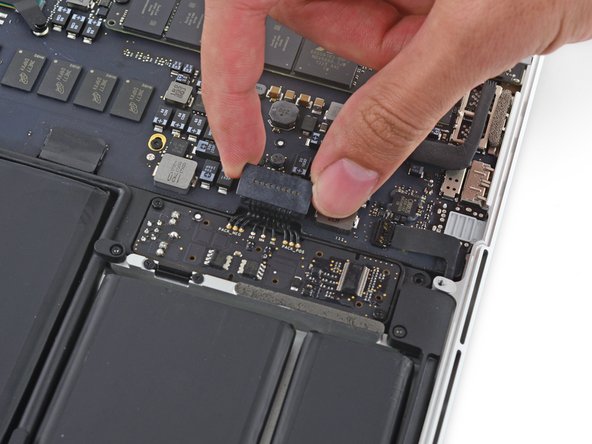
Trenne den Akkustecker mit dem flachen Ende eines Spudgers von seinem Anschluss auf dem Logic Board.
-
-
-
Entferne die beiden 2,1 mm T5 Torx Schrauben, mit denen die Abdeckung des E/O Board Kabels am Logic Board befestigt ist.
-
-
-
Nimm die Abdeckung des E/A Board Kabels mit einer Pinzette aus dem MacBook heraus.
-
-
-
Mit dem flachen Ende eines Spudgers kannst du nun den E/A Board Anschluss aus seiner Buchse auf dem Logic Board herausholen.
-
-
-
Hebe das Ende des E/A Board Kabels nach oben, das mit dem Logic Board verbunden war und biege es um, so dass es nicht mehr im Weg ist.
-
-
-
Setze die Spitze eines Spudgers vorsichtig unter dem rechten Lautsprecherkabel in der Nähe des Steckers an und hebe es aus seiner Buchse auf dem Logic Board heraus.
-
-
-
-
Entferne die folgenden Schrauben, mit denen der rechte Lautsprecher am oberen Gehäuse befestigt ist:
-
Eine 5,7 mm T5 Torx Schraube
-
Eine 6,5 mm T5 Torx Schraube
-
Eine 3,8 mm T5 Torx Schraube
-
-
-
Hebe den rechten Lautsprecher an der Seite an, wo sich das Kabel befindet und ziehe ihn aus dem Gehäuse.
-
-
-
Setze die Spitze eines Spudgers unter dem linken Lautsprecherkabel in der Nähe des Steckers an und hebe es aus seiner Buchse auf dem Logic Board heraus.
-
-
-
Entferne die folgenden Schrauben, die den linken Lautsprecher am oberen Gehäuse befestigen:
-
Eine 5,7 mm T5 Torx Schraube
-
Eine 6,5 mm T5 Torx Schraube
-
eine 3,8 mm T5 Torx Schraube
-
-
-
Hebe den linken Lautsprecher an der Ecke an und schiebe ihn um den Akku herum heraus, damit du ihn aus dem oberen Gehäuse entfernen kannst.
-
-
Dieser Schritt ist noch nicht übersetzt. Hilf mit, ihn zu übersetzen!
-
Remove the five 3.7 mm T5 Torx screws securing the battery to the upper case.
-
-
Dieser Schritt ist noch nicht übersetzt. Hilf mit, ihn zu übersetzen!
-
To protect your display, place a sheet of aluminum foil between the display and keyboard and leave it there while you work.
-
-
Dieser Schritt ist noch nicht übersetzt. Hilf mit, ihn zu übersetzen!
-
Alternatively, if you are using the hot iOpener method, skip the following three steps.
-
Wear eye protection when handling and applying the adhesive remover. (Eye protection is included in your kit.)
-
Do not wear contact lenses without eye protection.
-
Protective gloves are also included in your kit. If you are concerned about skin irritation, put your gloves on now.
-
-
Dieser Schritt ist noch nicht übersetzt. Hilf mit, ihn zu übersetzen!
-
Open your container of adhesive remover.
-
Fill the syringe included in your kit with a small amount (approximately 1-2 milliliters) of adhesive remover.
-
Refill your syringe as needed throughout the rest of this procedure.
-
-
Dieser Schritt ist noch nicht übersetzt. Hilf mit, ihn zu übersetzen!
-
Apply a small amount of adhesive remover (approximately 1 ml) evenly under the edge of the rightmost battery cell.
-
Wait 2-3 minutes for the liquid adhesive remover to penetrate underneath the battery cell before you proceed to the next step.
-
-
Dieser Schritt ist noch nicht übersetzt. Hilf mit, ihn zu übersetzen!
-
Use the hot iOpener to cover half of the two right-most battery cells.
-
After about a minute, reheat the iOpener and move it to cover the other half of the right-most battery cells.
-
-
Dieser Schritt ist noch nicht übersetzt. Hilf mit, ihn zu übersetzen!
-
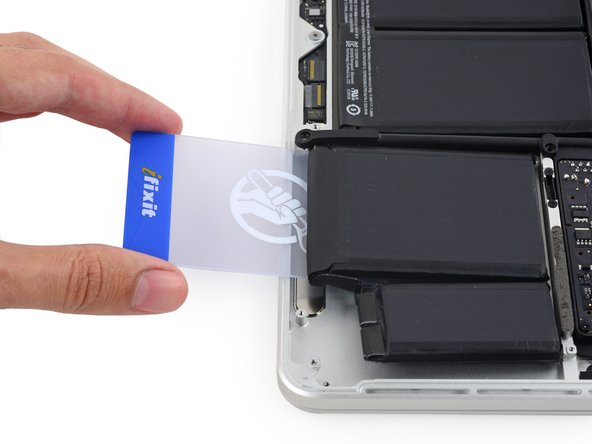
Push a plastic card between the right-most battery cell and the upper case, cutting the adhesive between the two.
-
When using the hot iOpener method, if you encounter significant resistance to prying, stop and use the iOpener to reheat the section you're working on.
-
-
Dieser Schritt ist noch nicht übersetzt. Hilf mit, ihn zu übersetzen!
-
Use the plastic card to pry the right-most battery cell up from the rear case.
-
-
Dieser Schritt ist noch nicht übersetzt. Hilf mit, ihn zu übersetzen!
-
Repeat this procedure with the adjacent battery cell:
-
Apply a small amount (about 1 ml) of liquid adhesive remover under the battery cell, and wait 2-3 minutes for it to penetrate and soften the adhesive.
-
Alternatively, re-heat this section with your iOpener if needed.
-
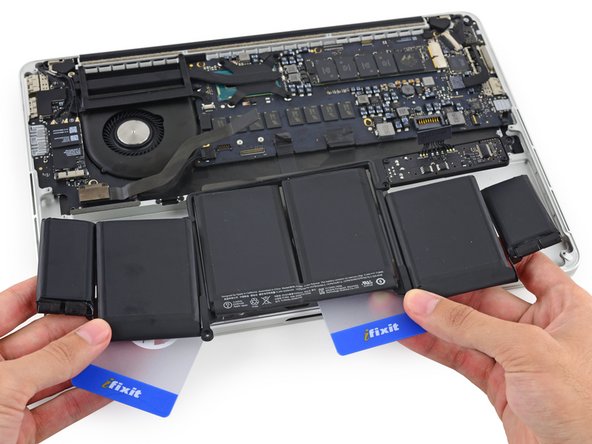
Push a plastic card about an inch between the battery cell and the upper case, and slowly pry the cell up to separate all of the adhesive.
-
-
Dieser Schritt ist noch nicht übersetzt. Hilf mit, ihn zu übersetzen!
-
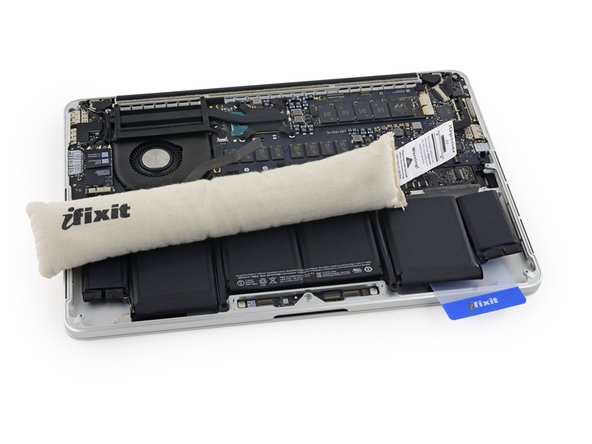
Temporarily leave your plastic card underneath the two rightmost battery cells to prevent them from re-adhering to the upper case.
-
If using an iOpener, reheat it and reapply it, this time to the left-most battery cells.
-
-
Dieser Schritt ist noch nicht übersetzt. Hilf mit, ihn zu übersetzen!
-
Repeat the above procedure to separate the two leftmost battery cells from the upper case.
-
Remember to apply a small amount (about 1 ml) of adhesive remover to each battery cell, and wait 2-3 minutes for it to penetrate and soften the adhesive.
-
Use a second plastic card to separate the two leftmost battery cells from the upper case.
-
-
Dieser Schritt ist noch nicht übersetzt. Hilf mit, ihn zu übersetzen!
-
Leave the second card in the corner between the two left cells.
-
-
Dieser Schritt ist noch nicht übersetzt. Hilf mit, ihn zu übersetzen!
-
To separate the adhesive securing the final two, middle battery cells, apply another 1 milliliter or so of liquid adhesive remover (or your iOpener) to each cell.
-
It may help to elevate one side of your MacBook Pro a few inches so that the adhesive remover flows in the correct direction, underneath the battery cells. You can use a sturdy book or foam block to prop up one side of your MacBook Pro while you work.
-
Insert the card about an inch between the left-center battery cell and the upper case, separating the adhesive between the cell and the case.
-
-
Dieser Schritt ist noch nicht übersetzt. Hilf mit, ihn zu übersetzen!
-
Pull the card back out and insert it about an inch between the right-center battery cell and the upper case, separating the adhesive between the cell and case.
-
-
Dieser Schritt ist noch nicht übersetzt. Hilf mit, ihn zu übersetzen!
-
Pry up on the two center cells to separate the last of the adhesive and lift the battery from the device.
-
-
Dieser Schritt ist noch nicht übersetzt. Hilf mit, ihn zu übersetzen!
-
Remove the battery.
-
With a little luck, you can slowly pull out each strip of adhesive with your fingers.
-
Otherwise, soak each section of adhesive with a bit of adhesive remover for 2-3 minutes, and then scrape it out with an opening pick or one of the other tools in your kit. This can take quite a bit of work, so be patient.
-
Mop up any remaining adhesive remover and give your MacBook Pro a few minutes to air dry.
-
Calibrate your battery before using it: allow it to drain overnight, then charge it to 100% and drain it again until your MacBook Pro shuts down automatically. Charge it again and use it normally.
-
Rückgängig: Ich habe diese Anleitung nicht absolviert.
Ein:e weitere:r Nutzer:in hat diese Anleitung absolviert.


