Einleitung
Diese Anleitung zeigt dir, wie man das Gehäuse und die Vorderseite deines Nest Hello entfernt.
Was du brauchst
-
-
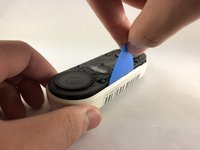
Schiebe ein Plektrum zwischen die schwarze Vorderseite und das weiße Gehäuse des Nest Hello.
-
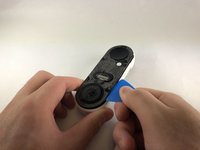
Heble die Vorderseite mit dem Plektrum vom Gehäuse weg.
-
Entferne nun die Vorderseite komplett vom Gerät, zögere nicht, hier fest zu ziehen.
-
-
-
-
Entferne die Aufkleber und benutze einen Kreuzschlitzschraubendreher #000, um die vier Schrauben zu entfernen.
-
-
-
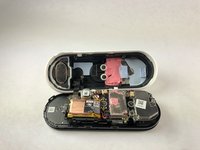
Schiebe ein Plektrum zwischen das weiße Gehäuse und die schwarze interne Platine, um diese heraus zu hebeln.
I ended up doing the headlight lens restoration method - I scraped away any plastic that was flaking off and then I used progressively finer sandpaper (start with 400-600 grit and go up from there). I finished it with rubbing compound and polish. Looks decent.
Also - be careful not to cut or displace the rubber gasket that runs around the outside of the main body that has the circuitry - you'll risk losing the waterproofing
What is the replacement battery type please?
BUSFUIVA Replacement Battery for Nest 1ICP7/17/26, Hello, NC5100US, C1241290, Vido Doorbell Wired. 3.7V 280MAH https://a.co/d/38BD8qY
The top end has some kind of mild adhesive (the blue stuff). The bottom end came out more easily for me, and then I ended up bending my board slightly by trying to pry out the top end. May be better to start on the top end if you can get something under the edge of the board to get leverage.
The black ribbon cable was instantly sheared in half the moment I got the two halves apart, which took more force than I was hoping to need. Turns out the ribbon cable is attached to a sharp metal piece and it will easily tear through it. No longer worth it to replace the battery for me, sadly.
What a stupid design by Nest. If they know that battery will fail they should at least make it user accessible when removed from mount. Replaced mine. It’s a pain getting to the battery and it’s easy to crack the faceplate when prying it off. Also the plastic tools included with kit will fail before you’re into the device.
If you can manage to get to the battery without destroying the Nest Doorbell it’s worth it to get a few more years of use.
-
Um dein Gerät wieder zusammenzubauen, folge der Anleitung in umgekehrter Reihenfolge.
Um dein Gerät wieder zusammenzubauen, folge der Anleitung in umgekehrter Reihenfolge.
Besonderer Dank geht an diese Übersetzer:innen:
100%
Diese Übersetzer:innen helfen uns, die Welt zu reparieren! Wie kann ich mithelfen?
Hier starten ›
2 Kommentare
Are Replacement parts available anywhere? Can’t seem to find anything… thanks!


I had to use a metal spudger tool to start and then used guitar picks.
Joel Lundi - Antwort
Be afraid to pull hard. The faceplate will break in two.
B Bremer - Antwort
I did the JerryRigEverything method and slipped a razor under the faceplate to separate it carefully from the body. Worked perfectly and nothing was damaged
There I Fixed It - Antwort
Be careful with the wiring and the heater element. I must have shorted something together when it put it back together and now it will no longer power up. It is probably best to cut the wires to the heater and deal with the consequences in the cold temperatures.
Joe I. Fabritz - Antwort
The secret I think is slicing through the adhesive. I shoved multiple picks in and worked my way around. You want to cut the adhesive. Prying is likely to break the faceplate. The big hint is the next picture in the step, seeing where the adhesive is.
Arnold de Leon - Antwort