Zum Hauptinhalt wechseln

PlayStation 5 LED-Platine austauschen

Was du brauchst

  1. PlayStation 5 LED-Platine austauschen, Entferne die Schraube des Standfußes: Schritt 1, Bild 1 von 1
    • Wenn deine PlayStation 5 hochkant steht, drehe sie um, damit der Standfuß nach oben zeigt.

    • Wenn deine PlayStation 5 quer steht, mache mit Schritt 6 weiter.

    • Arbeite auf einer flachen Oberfläche, damit deine Konsole nicht so leicht umkippen kann.

    • Entferne die 26,5 mm Schraube mit einem Schlitzschraubendreher oder einer Münze.

  2. PlayStation 5 LED-Platine austauschen, Entferne den Standfuß: Schritt 2, Bild 1 von 2 PlayStation 5 LED-Platine austauschen, Entferne den Standfuß: Schritt 2, Bild 2 von 2
    • Hebe den Standfuß gerade nach oben.

  3. PlayStation 5 LED-Platine austauschen, Die Schraube des Standfuß verstauen: Schritt 3, Bild 1 von 2 PlayStation 5 LED-Platine austauschen, Die Schraube des Standfuß verstauen: Schritt 3, Bild 2 von 2
    • Stecke die Schraube in die Kerbe auf der Unterseite des Standfußes.

  4. PlayStation 5 LED-Platine austauschen, Schraubenloch abdecken: Schritt 4, Bild 1 von 3 PlayStation 5 LED-Platine austauschen, Schraubenloch abdecken: Schritt 4, Bild 2 von 3 PlayStation 5 LED-Platine austauschen, Schraubenloch abdecken: Schritt 4, Bild 3 von 3
    • Löse die Abdeckung für das Schraubenloch mit einer Pinzette.

    • Drücke die Abdeckung auf das Schraubenloch.

  5. PlayStation 5 LED-Platine austauschen, Schließe die Abdeckung: Schritt 5, Bild 1 von 3 PlayStation 5 LED-Platine austauschen, Schließe die Abdeckung: Schritt 5, Bild 2 von 3 PlayStation 5 LED-Platine austauschen, Schließe die Abdeckung: Schritt 5, Bild 3 von 3
    • Drehe den Standfuß gegen den Uhrzeigersinn, um die Abdeckung zu schließen.

  6. PlayStation 5 LED-Platine austauschen, Entferne den Standfuß: Schritt 6, Bild 1 von 2 PlayStation 5 LED-Platine austauschen, Entferne den Standfuß: Schritt 6, Bild 2 von 2
    • Wenn die PlayStation 5 noch flach liegt, dann stelle sie auf ihre Front, so dass die Ladebuchse nach oben zeigt.

    • Hebe den Standfuß gerade nach oben, um ihn zu entfernen.

    Do you guys sell the stand

    Corey Lewis - Antwort

    Steps 1 through 6 are just about removing the stand, correct? Storing the screw and all that is just about being neat and tidy?

    tofu - Antwort

  7. PlayStation 5 LED-Platine austauschen, Rechte Frontplatte entfernen: Schritt 7, Bild 1 von 3 PlayStation 5 LED-Platine austauschen, Rechte Frontplatte entfernen: Schritt 7, Bild 2 von 3 PlayStation 5 LED-Platine austauschen, Rechte Frontplatte entfernen: Schritt 7, Bild 3 von 3
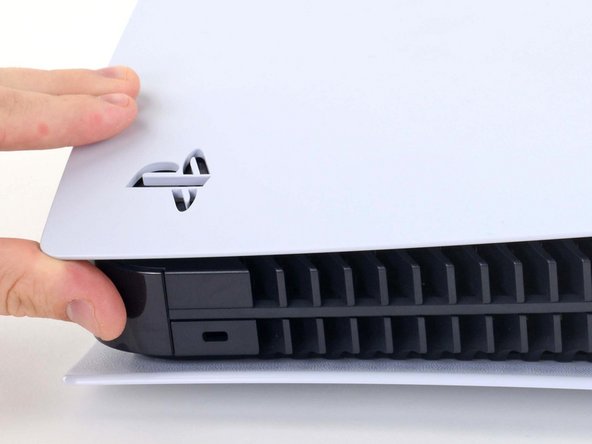
    • Kippe das Gerät so, dass dass die USB- und Ethernetanschlüsse von dir aus gesehen links sind.

    • Heble die Frontplatte an einer Ecke hoch, bis sie sich vom Gehäuse löst.

  8. PlayStation 5 LED-Platine austauschen: Schritt 8, Bild 1 von 2 PlayStation 5 LED-Platine austauschen: Schritt 8, Bild 2 von 2
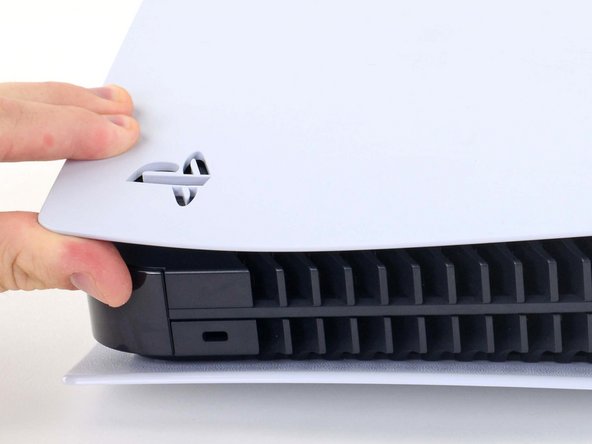
    • Hebe die rechte Frontplatte an der Ecke an und schiebe sie gleichzeitig zur Unterseite des Gerätes hin.

    • Entferne die rechte Frontplatte.

    I recommend doing both covers at this time, to avoid hassle later. Skip to step 38, then come back here

    UnitedShoes - Antwort

  9. PlayStation 5 LED-Platine austauschen, Gitter hochhebeln: Schritt 9, Bild 1 von 3 PlayStation 5 LED-Platine austauschen, Gitter hochhebeln: Schritt 9, Bild 2 von 3 PlayStation 5 LED-Platine austauschen, Gitter hochhebeln: Schritt 9, Bild 3 von 3
    • Setzt das flache Ende eines Spudgers unter das Gitter in die Kerbe über dem Lüfter.

    • Hebe den Spudger an, um das Gitter vom Gehäuse zu hebeln.

  10. PlayStation 5 LED-Platine austauschen, Gitter entfernen: Schritt 10, Bild 1 von 2 PlayStation 5 LED-Platine austauschen, Gitter entfernen: Schritt 10, Bild 2 von 2
    • Hebe das Gitter vom Gehäuse und entferne es.

    During reassembling:

    There is a little flat pin in each end, they need to go into the console

    Janick Carstens - Antwort

  11. PlayStation 5 LED-Platine austauschen, Schrauben der Lüfterhaube: Schritt 11, Bild 1 von 1
    In diesem Schritt verwendetes Werkzeug:
    Magnetic Project Mat
    $19.95
    Kaufen
    • Entferne die vier Torx TR8 Sicherheitsschrauben, mit denen die Lüfterhaube befestigt ist.

    • Zwei 23,3 mm Schrauben

    • Eine 11,4 mm Schraube

    • Eine 31 mm Schraube

    • Achte darauf, dass du den Überblick über die Schrauben behältst und jede an ihren alten Platz kommt. Sonst richtest du großen Schaden an.

    My ps5 seems to have tiny black caps over each screw. My spudger can’t get them off I see no other way to move forward besides breaking the shroud

    Anthony Pouliot - Antwort

    wrong side, take the cover off the other side

    Alan Sears -

    The 31 mm-long screw just wont budge! do I turn that one counter-clockwise or clockwise? someone please help!

    Chris Love - Antwort

    counter clockwise to remove

    Alan Sears -

    I damaged the 23.3mm on the bottom right next to fan connector. Is there any replacements? Can't seem to find any 23.3mm t8 screw anywhere online

    forsage.rh - Antwort

    I used a t8 for all of them and had no problem removing, except for that bottom right screw

    forsage.rh -

    Is there any replacement screws you can buy for the fan? I slightly damage 23.3mm screw.

    Kevin Sarmiento - Antwort

    My PS5 has TX8 (security Torx bit) screws on my fan shroud and all the case screws. A normal Torx driver won’t work you need the one with the hole in the middle of the bit driver.

    Daniel Sutczak - Antwort

    Why does my ps5 have 3 different screws? 2 are the same then 2 other ones? Why?

    GoodContentKing - Antwort

    Does anyone know the thread pitch of these screws? I just bought a used PS5 and the screws are missing. The fan has been glued in. Can't make this up.....

    Steven Brien - Antwort

    Ci sono viti di ricambio?

    Dove posso trovarle?

    Ho guardato dappertutto e non se ne trovano

    Alessio Zecca - Antwort

    Sind mit den Massen die dicke oder die Länge gemeint

    Zombiehunter -_- - Antwort

  12. PlayStation 5 LED-Platine austauschen, Lüfterhaube entfernen: Schritt 12, Bild 1 von 2 PlayStation 5 LED-Platine austauschen, Lüfterhaube entfernen: Schritt 12, Bild 2 von 2
    • Hebe die Lüfterhaube gerade nach oben und entferne sie.

    wo bekomme ich die original Torx M8 für die Ps5?

    Elli Pirelly - Antwort

  13. PlayStation 5 LED-Platine austauschen, Kabelabdeckung entfernen: Schritt 13, Bild 1 von 3 PlayStation 5 LED-Platine austauschen, Kabelabdeckung entfernen: Schritt 13, Bild 2 von 3 PlayStation 5 LED-Platine austauschen, Kabelabdeckung entfernen: Schritt 13, Bild 3 von 3
    • Setze das flache Ende eines Spudgers unter die schwarze Kabelabdeckung in die Lücke über den Lüfterkabeln.

    • Heble nur an der Abdeckung, nicht an den Kabeln.

    • Löse die Abdeckung mit dem Spudger so weit, bis du die mit den Fingern greifen kannst.

    Some PS5's have a smaller sticky cover instead , remove it in this step

    UnitedShoes - Antwort

  14. PlayStation 5 LED-Platine austauschen: Schritt 14, Bild 1 von 3 PlayStation 5 LED-Platine austauschen: Schritt 14, Bild 2 von 3 PlayStation 5 LED-Platine austauschen: Schritt 14, Bild 3 von 3
    • Ziehe die Abdeckung mit den Fingern ab.

  15. PlayStation 5 LED-Platine austauschen, Lüfterkabel abtrennen: Schritt 15, Bild 1 von 2 PlayStation 5 LED-Platine austauschen, Lüfterkabel abtrennen: Schritt 15, Bild 2 von 2
    • Greife mit deinen Fingern die Kanten des Kabelanschlusses und ziehe ihn gerade aus seinem Anschluss.

    • Ziehe immer nur am Anschluss, nie an den Kabeln selbst.

  16. PlayStation 5 LED-Platine austauschen, Lüfter entfernen: Schritt 16, Bild 1 von 3 PlayStation 5 LED-Platine austauschen, Lüfter entfernen: Schritt 16, Bild 2 von 3 PlayStation 5 LED-Platine austauschen, Lüfter entfernen: Schritt 16, Bild 3 von 3
    • Hebe den Lüfter nach oben aus seiner Einbuchtung und entferne ihn.

  17. PlayStation 5 LED-Platine austauschen, SSD-Abdeckung entfernen: Schritt 17, Bild 1 von 1
    • Verwende einen Kreuzschlitzschraubendreher, um die 17 mm lange Schraube der SSD-Abdeckung zu entfernen.

  18. PlayStation 5 LED-Platine austauschen: Schritt 18, Bild 1 von 3 PlayStation 5 LED-Platine austauschen: Schritt 18, Bild 2 von 3 PlayStation 5 LED-Platine austauschen: Schritt 18, Bild 3 von 3
    • Schiebe die SSD-Abdeckung mit dem Finger in Richtung der Oberseite des Geräts, um sie aus dem Gehäuse zu lösen.

    • Entferne die SSD-Abdeckung

    It is unnecessary to remove the SSD screw and cover for power supply replacement.

    Daniel Sutczak - Antwort

    The only thing you can do without removing the ssd cover and screw is remove the fan.

    David Fear -

  19. PlayStation 5 LED-Platine austauschen, Kabel des optischen Laufwerks lösen: Schritt 19, Bild 1 von 2 PlayStation 5 LED-Platine austauschen, Kabel des optischen Laufwerks lösen: Schritt 19, Bild 2 von 2
    • Fasse den Stecker am Kabel des optischen Laufwerks mit den Fingern am Rand an und ziehe ihn nach oben, um ihn von der Hauptplatine zu trennen.

    • Ziehe immer am Stecker und nicht am Kabel!

    For some PS5's, the optical drive connector is still covered in this step. Proceed up to step 22, then you will be able to access these connecters. The connectors will be running across the heatsink visible from step 24.

    UnitedShoes - Antwort

  20. PlayStation 5 LED-Platine austauschen: Schritt 20, Bild 1 von 2 PlayStation 5 LED-Platine austauschen: Schritt 20, Bild 2 von 2
    • Fasse den Stecker am Kabel des optischen Laufwerks mit den Fingern am Rand an und ziehe ihn nach oben, um ihn vom optischen Laufwerk zu trennen.

  21. PlayStation 5 LED-Platine austauschen, Aufkleber entfernen: Schritt 21, Bild 1 von 3 PlayStation 5 LED-Platine austauschen, Aufkleber entfernen: Schritt 21, Bild 2 von 3 PlayStation 5 LED-Platine austauschen, Aufkleber entfernen: Schritt 21, Bild 3 von 3
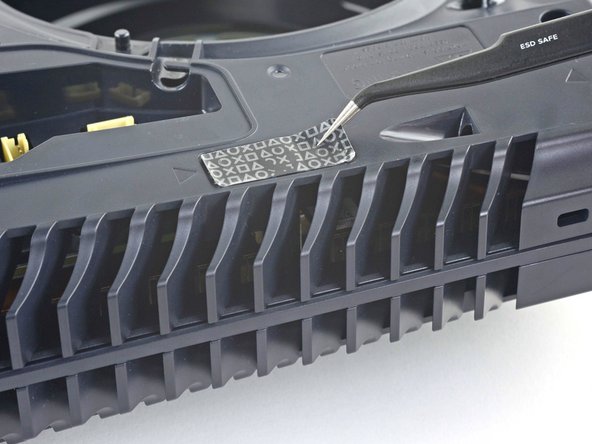
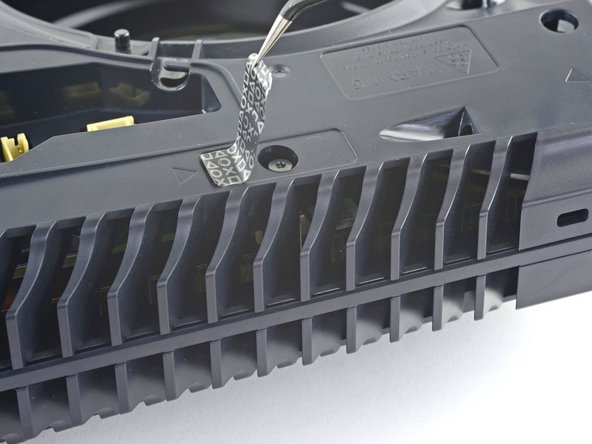
    • Entferne mit einer Pinzette den Aufkleber, der die verbleibende Gehäuseschraube verdeckt.

    • Wenn deine PlayStation 5 noch nicht geöffnet wurde, ist dieser Aufkleber komplett schwarz. Das Muster erscheint, nachdem du ihn entfernt hast.

    • Technisch gesehen handelt es sich dabei um manipulationssichere Aufkleber - aber keine Sorge: Solange du nichts beschädigst, kann Sony deine Garantie nicht aufheben. Viel Spaß!

  22. PlayStation 5 LED-Platine austauschen, Gehäuseschrauben entfernen: Schritt 22, Bild 1 von 1
    • Entferne die elf Torx T8 Schrauben, mit denen das Gehäuse befestigt ist.

    • Sechs 18,6 mm-lange Schrauben

    • Zwei 23,3 mm-lange Schrauben

    • Zwei 43,2 mm-lange Schrauben

    • Eine 7,3 mm-lange Schrauben

  23. PlayStation 5 LED-Platine austauschen, Gehäuse entfernen: Schritt 23, Bild 1 von 2 PlayStation 5 LED-Platine austauschen, Gehäuse entfernen: Schritt 23, Bild 2 von 2
    • Hebe das Gehäuse gerade hoch und entferne es.

  24. PlayStation 5 LED-Platine austauschen, Flachbandkabel des optischen Laufwerks entfernen: Schritt 24, Bild 1 von 3 PlayStation 5 LED-Platine austauschen, Flachbandkabel des optischen Laufwerks entfernen: Schritt 24, Bild 2 von 3 PlayStation 5 LED-Platine austauschen, Flachbandkabel des optischen Laufwerks entfernen: Schritt 24, Bild 3 von 3
    • Drücke mit dem flachen Ende eines Spudgers auf die Metallverriegelungslasche des Anschlusses des optischen Laufwerks.

    • Ziehe während du die Metalllasche herunterdrückst, die blaue Zuglasche mit einer Pinzette direkt vom Anschluss ab, um das Kabel vom optischen Laufwerk zu trennen.

    • Ziehe nur an der blauen Zuglasche und nicht am Kabel.

  25. PlayStation 5 LED-Platine austauschen, Optisches Laufwerk entfernen: Schritt 25, Bild 1 von 2 PlayStation 5 LED-Platine austauschen, Optisches Laufwerk entfernen: Schritt 25, Bild 2 von 2
    • Hebe das optische Laufwerk aus dem Gerät und entferne es.

  26. PlayStation 5 LED-Platine austauschen, Flachbandkabel des optischen Laufwerks entfernen: Schritt 26, Bild 1 von 3 PlayStation 5 LED-Platine austauschen, Flachbandkabel des optischen Laufwerks entfernen: Schritt 26, Bild 2 von 3 PlayStation 5 LED-Platine austauschen, Flachbandkabel des optischen Laufwerks entfernen: Schritt 26, Bild 3 von 3
    • Drücke mit dem flachen Ende eines Spudgers auf die Metallverriegelungslasche des Anschlusses des optischen Laufwerks.

    • Ziehe während du die Metalllasche herunterdrückst, die blaue Zuglasche mit einer Pinzette direkt vom Anschluss ab, um das Kabel von der Hauptplatine zu trennen.

  27. PlayStation 5 LED-Platine austauschen, Flachbandkabel der Einschalt- und Auswurfstaste lösen: Schritt 27, Bild 1 von 2 PlayStation 5 LED-Platine austauschen, Flachbandkabel der Einschalt- und Auswurfstaste lösen: Schritt 27, Bild 2 von 2
    • Ziehe mit einer Pinzette die blaue Zuglasche gerade vom Stecker weg und löse das Flachbandkabel der Einschalt-und Auswurfstaste ab.

    where to get the ribbon cable from

    sameh - Antwort

  28. PlayStation 5 LED-Platine austauschen, Flachbandkabel zur LED entfernen: Schritt 28, Bild 1 von 2 PlayStation 5 LED-Platine austauschen, Flachbandkabel zur LED entfernen: Schritt 28, Bild 2 von 2
    • Ziehe mit einer Pinzette die blaue Zuglasche direkt vom Stecker weg, um das Kabel zur LED zu trennen.

  29. PlayStation 5 LED-Platine austauschen, Antennenkabel abtrennen: Schritt 29, Bild 1 von 3 PlayStation 5 LED-Platine austauschen, Antennenkabel abtrennen: Schritt 29, Bild 2 von 3 PlayStation 5 LED-Platine austauschen, Antennenkabel abtrennen: Schritt 29, Bild 3 von 3
    • Fasse den Metallstecker am weißen Wi-Fi-Antennenkabel so nah wie möglich mit einer Pinzette am Anschluss an.

    • Hebe den Stecker des Kabels gerade nach oben, um ihn von der Hauptplatine zu trennen.

    • Wiederhole das Ganze auch noch am schwarzen Antennenkabel.

    Black and white antennas are reversed, black should go on RB and white on RW

    iPod Fix It - Antwort

    It looks like some models of PS5 lack these antenna wires. My PS5 only has Power Supply antennas, which are in the next step.

    UnitedShoes - Antwort

    Can confirm, on a PS5 I got for repair, there are only antenna connectors that are in the next step. The antenna connectors of this step are physically absent from the PCB. There are only 2 coaxial connectors in total, not 4. From the image it seems the PCB routing is slightly different (my board with missing connectors seems to use PCB traces as antennae given trace shapes)

    Ilya - Antwort

  30. PlayStation 5 LED-Platine austauschen: Schritt 30, Bild 1 von 3 PlayStation 5 LED-Platine austauschen: Schritt 30, Bild 2 von 3 PlayStation 5 LED-Platine austauschen: Schritt 30, Bild 3 von 3
    • Fasse den Metallstecker mit einer Pinzette am schwarzen Antennenkabel beim Netzteil so nah wie möglich am Anschluss an.

    • Hebe den Stecker des Kabels gerade nach oben, um ihn von der Hauptplatine zu trennen.

    • Wiederhole das Ganze auch noch am weißen Antennenkabel beim Netzteil.

  31. PlayStation 5 LED-Platine austauschen, Weiße Aufkleber entfernen: Schritt 31, Bild 1 von 3 PlayStation 5 LED-Platine austauschen, Weiße Aufkleber entfernen: Schritt 31, Bild 2 von 3 PlayStation 5 LED-Platine austauschen, Weiße Aufkleber entfernen: Schritt 31, Bild 3 von 3
    • Ziehe den weißen Aufkleber, mit dem die Antennenkabel am oberen Abschirmblech befestigt sind, mit einer Pinzette zurück.

    • Hole die Antennenkabel unter dem Aufkleber heraus.

    • Drücke den Aufkleber wieder an, so dass du ihn später wieder verwenden kannst.

  32. PlayStation 5 LED-Platine austauschen: Schritt 32, Bild 1 von 3 PlayStation 5 LED-Platine austauschen: Schritt 32, Bild 2 von 3 PlayStation 5 LED-Platine austauschen: Schritt 32, Bild 3 von 3
    • Wiederhole das Verfahren für die vier restlichen Aufkleber.

  33. PlayStation 5 LED-Platine austauschen: Schritt 33, Bild 1 von 3 PlayStation 5 LED-Platine austauschen: Schritt 33, Bild 2 von 3 PlayStation 5 LED-Platine austauschen: Schritt 33, Bild 3 von 3
    • Ziehe den weißen Aufkleber, mit dem das Flachbandkabel zur LED am Kühlkörper befestigt ist, mit einer Pinzette zurück.

    • Hole das Flachbandkabel zur LED unter dem Aufkleber heraus.

    • Drücke den Aufkleber wieder an, so dass du ihn später wieder verwenden kannst.

  34. PlayStation 5 LED-Platine austauschen, Schrauben am oberen Abschirmblech herausdrehen: Schritt 34, Bild 1 von 1
    • Drehe die einundvierzig 7,3 mm langen Torx T8 Schrauben heraus, mit denen das obere Abschirmblech befestigt ist.

    Your image already has the long black screw removed from the left hand side half way down.

    You should add a step for this screw for people re-assembling.

    infiniti25 - Antwort

    I second this! I had an extra long screw when I was done, it was likely this. This is one of the screws that reach down to the PSU

    UnitedShoes -

    I believe that this was an unintentional oversight in the guide, as I cannot find any guide that mentions removing this screw. I have made an edit to this guide to clarify that final screw must also be removed, hoping it is approved and published!

    Cyberdragon E207 -

    I can’t see how removing 41 of these 7.3mm screws to replace the power supply. None of them hold the power supply to the board. Waste of time.

    Daniel Sutczak - Antwort

    The reason why is because you need to remove the top shield plate to get to the usb ribbon cable.

    Bryson Morgan -

    Some PS5's have a removable cover for the USB board (step 36). If this is your situation, then I think removing this entire plate is unnecessary for removing the PSU (80% sure, I haven't exactly tried.)

    UnitedShoes -

  35. PlayStation 5 LED-Platine austauschen, Oberes Abschirmblech entfernen: Schritt 35, Bild 1 von 3 PlayStation 5 LED-Platine austauschen, Oberes Abschirmblech entfernen: Schritt 35, Bild 2 von 3 PlayStation 5 LED-Platine austauschen, Oberes Abschirmblech entfernen: Schritt 35, Bild 3 von 3
    • Hebe das obere Abschirmblech von der Hauptplatine ab und entferne es.

    Unnecessary step to replace power supply.

    Daniel Sutczak - Antwort

    Debatable, removing the top shield makes it much more comfortable to remove the USB ribbon cable.

    Bryson Morgan -

    I would say it's required since there's no way to get to the metal release otherwise

    UnitedShoes -

    The grey rubber came off in some spots, what do I use to replace it? It attaches to cylinder things (opposite side of power supply) which then attaches to a copper bus.

    Fortyr - Antwort

    That's thermal paste, it's recommended to keep it all on there. If you lost some paste, check on Google for the proper thermal paste for the PS5

    UnitedShoes -

  36. PlayStation 5 LED-Platine austauschen, USB-Platine abtrennen: Schritt 36, Bild 1 von 3 PlayStation 5 LED-Platine austauschen, USB-Platine abtrennen: Schritt 36, Bild 2 von 3 PlayStation 5 LED-Platine austauschen, USB-Platine abtrennen: Schritt 36, Bild 3 von 3
    • Drücke die metallene Sicherungslasche am Kabelstecker zur USB-Platine mit den Fingern nach unten.

    • Halte die Lasche gedrückt und setze das flache Ende des Spudgers gegen das isolierende Stück Schaumstoff auf dem Flachbandkabel. Ziehe es gerade vom Stecker weg und trenne das Kabel ab.

    What happens if this cable disconnects from the front?

    Carolyn Page - Antwort

  37. PlayStation 5 LED-Platine austauschen, Linke Abdeckung entfernen: Schritt 37, Bild 1 von 3 PlayStation 5 LED-Platine austauschen, Linke Abdeckung entfernen: Schritt 37, Bild 2 von 3 PlayStation 5 LED-Platine austauschen, Linke Abdeckung entfernen: Schritt 37, Bild 3 von 3
    • Hebe die Abdeckung mit dem PlayStation-Logo an der Ecke an und löse sie vom Gehäuse ab.

    Wrong picture: the other face of Playstation has already been removed at this point, while in the picture it looks as if we have just started disassembly. This note applies to all following steps.

    Ilya - Antwort

  38. PlayStation 5 LED-Platine austauschen: Schritt 38, Bild 1 von 2 PlayStation 5 LED-Platine austauschen: Schritt 38, Bild 2 von 2
    • Während du die Abdeckung an der linken Ecke anhebst, schiebe sie gleichzeitig zur Unterkante des Geräts hin.

    • Entferne die linke Abdeckung.

  39. PlayStation 5 LED-Platine austauschen, Schrauben herausdrehen: Schritt 39, Bild 1 von 1
    • Entferne die beiden 29,4 mm langen Torx T8 Schrauben, mit denen das Gehäuse an der Hauptplatine und am Kühlkörper befestigt ist.

    These screws are T9 security, or, if they are designed to be T8 security, they also accommodate T9 bits and you should definitely use T9. Source: Myself after stripping a highly torqued bolt 🤦‍♂️

    just chris... - Antwort

  40. PlayStation 5 LED-Platine austauschen, Gehäuse entfernen: Schritt 40, Bild 1 von 3 PlayStation 5 LED-Platine austauschen, Gehäuse entfernen: Schritt 40, Bild 2 von 3 PlayStation 5 LED-Platine austauschen, Gehäuse entfernen: Schritt 40, Bild 3 von 3
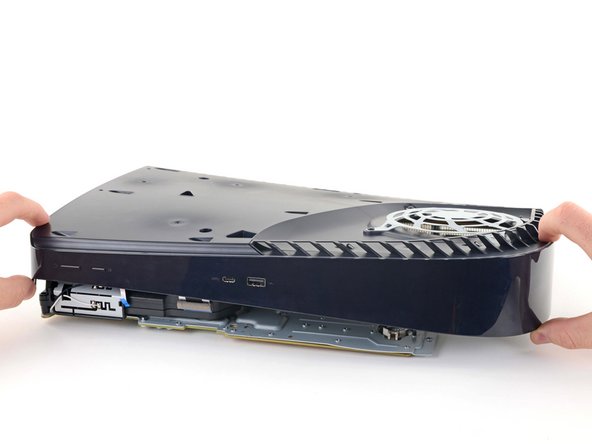
    • Hebe die Vorderkante des Gehäuses von der Hauptplatine und dem Kühlkörper ab.

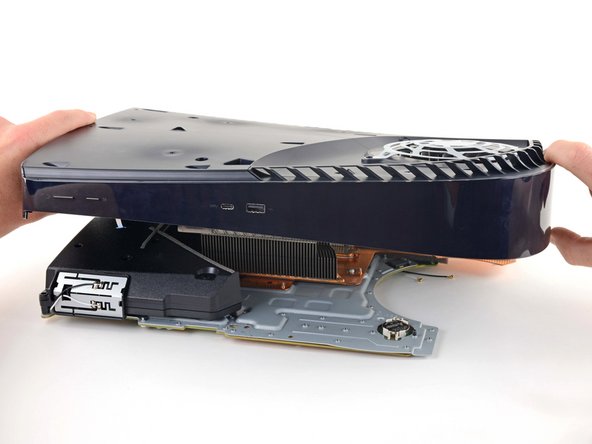
    • Lasse die Vorderkante angehoben und drücke das Gehäuse von der Hauptplatine und dem Kühlkörper nach hinten, so dass die Ladebuchse aus ihrer Öffnung im Gehäuse herauskommt.

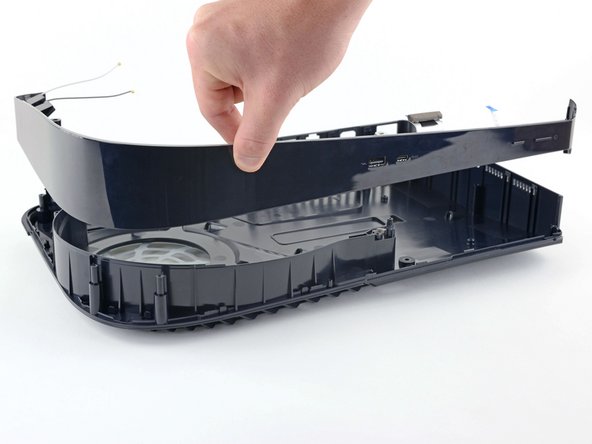
    • Entferne das Gehäuse.

  41. PlayStation 5 LED-Platine austauschen, Mittelpanele entfernen: Schritt 41, Bild 1 von 2 PlayStation 5 LED-Platine austauschen, Mittelpanele entfernen: Schritt 41, Bild 2 von 2
    • Hebe die Mittelpanele an und entferne sie vom Gehäuse.

  42. PlayStation 5 LED-Platine austauschen, Flachbandkabel zur LED-Platine abtrennen: Schritt 42, Bild 1 von 2 PlayStation 5 LED-Platine austauschen, Flachbandkabel zur LED-Platine abtrennen: Schritt 42, Bild 2 von 2
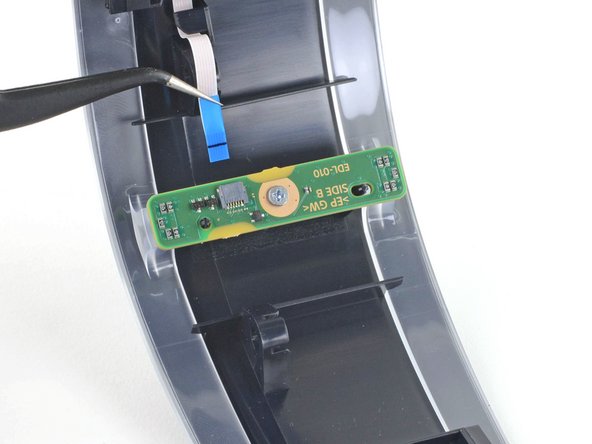
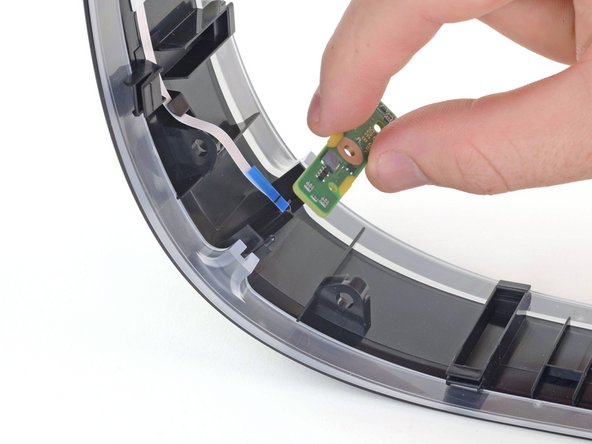
    • Ziehe das Flachbandkabel zur LED-Platine mit einer Pinzette an der blauen Lasche gerade aus dem Anschluss heraus und trenne es ab.

  43. PlayStation 5 LED-Platine austauschen, Schraube an der LED-Platine herausdrehen: Schritt 43, Bild 1 von 1
    • Entferne die 6,5 mm lange Kreuzschlitzschraube, mit der die LED-Platine am Mittelpanel befestigt ist.

  44. PlayStation 5 LED-Platine austauschen: Schritt 44, Bild 1 von 2 PlayStation 5 LED-Platine austauschen: Schritt 44, Bild 2 von 2
    • Entferne die LED-Platine.

Abschluss

Um dein Gerät wieder zusammenzubauen, folge den Schritten dieser Anleitung in umgekehrter Reihenfolge.

Entsorge deinen Elektromüll fachgerecht.

Lief die Reparatur nicht wie geplant? Probiere zunächst einige grundsätzliche Lösungen oder frage in unserem PlayStation 5 Forum nach Hilfe bei der Fehlersuche.

4 weitere Nutzer:innen haben diese Anleitung absolviert.

Besonderer Dank geht an diese Übersetzer:innen:

en de

100%

Diese Übersetzer:innen helfen uns, die Welt zu reparieren! Wie kann ich mithelfen?
Hier starten ›

Robert Boyd

Mitglied seit: 02/01/21

26.500 Reputation

94 Anleitungen geschrieben

2 Kommentare

where can I buy a replacement light board?

rot253 - Antwort

If you are in the UK, they are sold here:

https://consoletherapy.com/store/genuine...

James H - Antwort

Kommentar hinzufügen

Seitenaufrufe:

Letzte 24 Stunden: 7

Letzte 7 Tage: 50

Letzte 30 Tage: 282

Insgesamt: 6,855