Einleitung
Wenn die Schultertasten an deinem Retroid Pocket 3 Handheld klemmen oder nicht reagieren, verwende diese Anleitung, um auf die Schultertasten der Konsole zuzugreifen und die defekten Tasten zu entfernen und die neuen Tasten einzusetzen. Dieser Vorgang dauert etwa 10–15 Minuten und die für das Projekt benötigten Werkzeuge sind unten aufgelistet.
Was du brauchst
-
-
-
Ziehe alle am Retroid Pocket 3+ angeschlossenen Ladekabel ab.
-
Stelle sicher, dass dein Gerät zu 5 % oder weniger geladen ist, da ein geladener Akku bei einer Beschädigung gefährlich sein kann.
 Frag FixBot
-
-
-
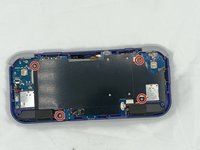
Entferne die vier 6 mm Schrauben von der Rückplatte des Geräts mit einem T5 Torx-Schraubendreher.
-
Verwende ein Öffnungswerkzeug oder einen Spudger, um die Rückplatte vorsichtig vom Gerät aufzuhebeln.
-
-
-
-
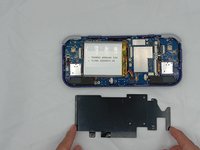
Entferne die vier 4,5 mm Kreuzschlitzschrauben mit einem Kreuzschlitz-Schraubendreher.
-
Nimm die Metallplatte ab.
-
-
-
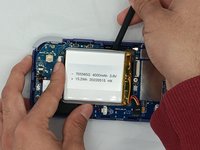
Verwende ein Öffnungswerkzeug aus Kunststoff oder einen Spudger, um den Stecker des Akkus zu lösen.
-
Hebe den Akku vorsichtig aus dem Gehäuse.
-
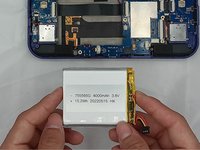
Hebe den Akku an und entferne ihn.
-
-
-
-
-
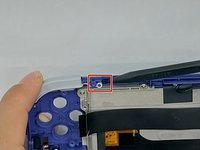
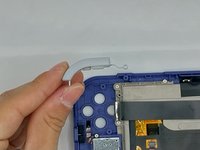
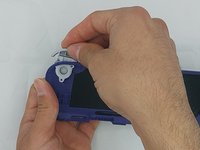
Setze die Spitze des Spudgers unter den oberen runden Clip an der Oberseite an.
-
Beginne vorsichtig damit, den Clip anzuheben, um ihn vom Kunststoffstift am Gehäuse zu schieben, und kippe dabei den Auslöser, während du ihn zum Entfernen anhebst.
-
-
-
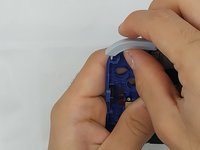
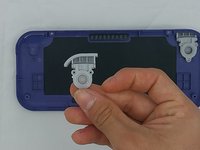
Entferne die sechs 4,4 mm Kreuzschlitzschrauben an den Auslösetasten mit einem Kreuzschlitz-Schraubendreher.
-
Ziehe die Auslösetaste vorsichtig durch, bis sie sich gelöst hat.
-
-


Um dein Gerät wieder zusammenzubauen, folge den Schritten dieser Anleitung in umgekehrter Reihenfolge.
Besonderer Dank geht an diese Übersetzer:innen:
100%

Translation Bot hilft uns, die Welt in Ordnung zu bringen! Wie kann ich mithelfen?
Hier starten ›

Team

University of North Texas, Team 4-7, Harold Spring 2024 Mitglied von University of North Texas, Team 4-7, Harold Spring 2024
UNT-HAROLD-S24S4G7
4 Mitglieder
55 Anleitungen geschrieben