Zum Hauptinhalt wechseln

Diese Version enthält möglicherweise inkorrekte Änderungen. Wechsle zur letzten geprüften Version.

Grundständige Anleitung
Dies ist eine grundständige Anleitung, die nur als Teil einer anderen Anleitung verwendet werden sollte.

Was du brauchst

  1. Dieser Schritt ist noch nicht übersetzt. Hilf mit, ihn zu übersetzen!

    : Schritt 1, Bild 1 von 1
    • Before you begin disassembly, make sure that the Rug Doctor is not plugged in and that all reservoirs are empty of liquids.

    • Unclip the clear hose from the back of the Rug Doctor.

  2. Dieser Schritt ist noch nicht übersetzt. Hilf mit, ihn zu übersetzen!

    : Schritt 2, Bild 1 von 2 : Schritt 2, Bild 2 von 2
    • Use a 7/16" (11 mm OK) wrench to hold the handle axle while you use a 7/16" socket to remove the cap nut securing the axle end.

  3. Dieser Schritt ist noch nicht übersetzt. Hilf mit, ihn zu übersetzen!

    : Schritt 3, Bild 1 von 2 : Schritt 3, Bild 2 von 2
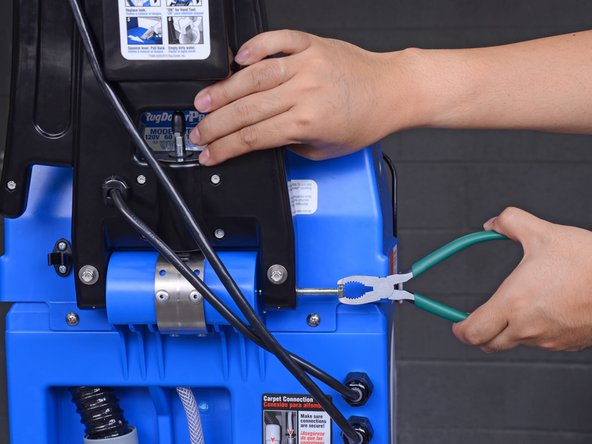
    • Support the handle with one hand. It will be loose after this step.

    • Use fingers or pliers to pull out the handle axle.

    • If the axle feels hard to pull out, squeeze the handle release lever to release pressure on the axle.

  4. Dieser Schritt ist noch nicht übersetzt. Hilf mit, ihn zu übersetzen!

    : Schritt 4, Bild 1 von 1
    • Detach the handle from the Rug Doctor and set it down.

    • If you need more cable slack, you can set the Rug Doctor on its side.

Ziellinie

Arthur Shi

Mitglied seit: 01/03/18

253.561 Reputation

526 Anleitungen geschrieben

Team

iFixit Mitglied von iFixit

Staff

135 Mitglieder

17.205 Anleitungen geschrieben

0 Kommentare

Kommentar hinzufügen

Seitenaufrufe:

Letzte 24 Stunden: 0

Letzte 7 Tage: 1

Letzte 30 Tage: 2

Insgesamt: 30