Einleitung
Kein Keyboard kein Sound. So einfach ist das. Aber keine Angst, es zu ersetzen ist genau so einfach.
Diese Anleitung zeigt dir, wie wie du das Keyboard deines OP-1 ersetzt.
Was du brauchst
-
-
Die vier länglichen Tasten der Klaviatur kannst du von links her lösen.
-
Die acht kleineren Tasten löst du von unten.
-
-
-
Der Scherenmechanismus der acht kleinen Tasten blockiert die darunter liegenden Schrauben.
-
Wieder mit einem Opening Tool oder einem Opening Pick kannst du diese einfach herausheben.
-
-
-
-
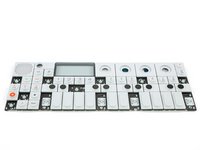
Löse die zwölf Schrauben mit einem Phillips #00 Schraubendreher.
-
Dann ziehe einfach die vier Drehknöpfe und den Lautstärkeregler ab.
-
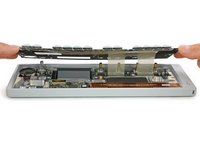
Jetzt kannst du das Keyboard leicht anheben und versetzt nach hinten ablegen.
Your missing the ribbon decoupling step, unless you skipped it because it’s such a tight squeeze to get back in.
The concept of removing the square panels that the knobs sit on was skipped.
-
-
-
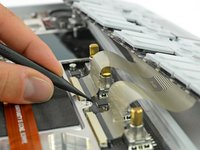
Entriegele die Flachbandkabel indem du die beiden schwarzen Kunststoffnasen auf jeder Seite der Anschlüsse wegdrückst.
-
Nun kannst du die Kabel herausnehmen und das Keyboard vollständig entfernen.
I found bring the OP-1 higher up off my work surface made installing the ribbons much easier, oh and keep the keyboard assembly parallel to the OP-1 to ensure the ribbons seat evenly.
There ribbons are incredibly frustrating -- I cannot, for the life of me, lock them in place. Even after bending them, the direction of the bend itself creates tension that pulls them out of the zero insertion force connector. The black nibs do not seem to provide enough locking force. Frustratingly enough, this happens slowly over time, so usually 24 hours after I have fully reassembled the keyboard, it starts malfunctioning again. I would really appreciate some help here.
-


Arbeite die Schritte in umgekehrter Reihenfolge ab, um dein Gerät wieder zusammenzubauen.
Arbeite die Schritte in umgekehrter Reihenfolge ab, um dein Gerät wieder zusammenzubauen.
Rückgängig: Ich habe diese Anleitung nicht absolviert.
19 weitere Personen haben diese Anleitung absolviert.
Besonderer Dank geht an diese Übersetzer:innen:
100%


Diese Übersetzer:innen helfen uns, die Welt zu reparieren! Wie kann ich mithelfen?
Hier starten ›

Team

Tobias Isakeit - Repairability Engineer Mitglied von Tobias Isakeit - Repairability Engineer
Business
1 Mitglied
1.131 Anleitungen geschrieben
19 Kommentare
Nice guide Tobias!
Worked like a charm. My OP-1 feels brand new.
Thanks iFixit X TeenageEngineering for providing these replacement parts!
Keep it up <3
Awesome guide! Thank you!!!
After reassembling everything I have one key ( the upper A) which retriggers the sound randomly if I press the key.
I hope that the reason is not that I put the flex cable back too loose … and i have to open it again. Anyone had this before?
This happened to me constantly, only by taking the key off I noticed the tiniest amount of moisture, a mere misting, nesting in the board. it had been re-triggering randomly… Not ideal whilst constantly gigging. Seems to be triggering normally now after drying it in front of a heater. The only thing I think could of caused this is a dry ice machine I played beside a few weeks ago.
Perfect. Thanks :)
Did this along with with replacing the connector board and it all seems as good as new. Recommended getting the Opening Tool, Spudger and for the connector board job the Jimmy. Well done TE for providing this to option for repairs.
keyboard replaced I have a new OP1 ;)
thx TE, hope you will bring connector board please !!!
Is this going to be available any time soon?
Solid guide. Solid fix. Nice to have my synth back in order :)
I have a a broken scissor mechanism on 1 single key of my OP-1, but it seems like my only option to replace that tiny broken part is to buy a whole new keyboard. Wondering if someone on this thread might confirm that (or offer and alternative). Thanks!
Take a look at these comments, maybe this will help.
Is this ever coming back? I spilled coffee on my OP-1 last year and some of the keys no longer work. I would really like to be able to fix this
:-(
Hi Michael, we’re constantly looking to get parts back into stock. Sometimes we are limited by our suppliers. But you can use the "notify me" function so you’ll know when it is available again.
After installing the new keyboard a sliver of the screen edge under the outer screen is visible. Do you think the replacement is manufactured incorrectly? Or is this an error with aligning the keyboard when reinserting it?
What's the secret to those flex cables. That was a painful 10 minutes.