Einleitung
Was du brauchst
Einführungsvideo
-
-
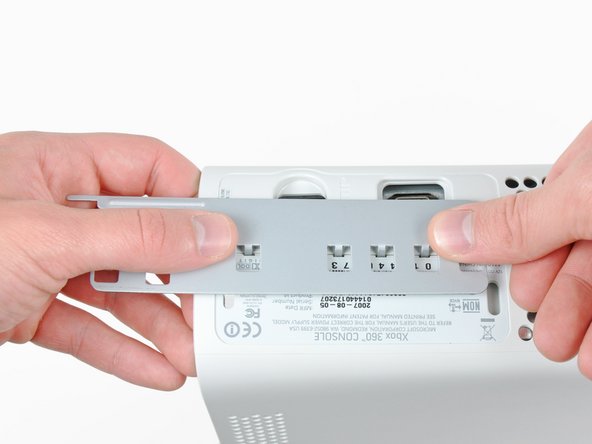
Greife die Festplatteneinheit mit einer Hand und drücke mit der anderen Hand den kleinen Knopf, während du die Festplatteneinheit nach oben hebst.
-
Nimm die Festplatteneinheit von der Konsole.
-
-
-
Führe das flache Ende eines Spudgers oder die Kante eines Xbox 360 opening tools in den kleinen Schlitz an der Seite des Front Pannels in der Unterseite.
-
Hebel die vordere Kante des Lüfters weg von der Frontplatte.
You can avoid this step by pulling the front cover off. Just make sure you don't break the springs for the USB bay area.
Hello, thank you ifix for this guide, I followed this guide, I got stuck at some point but I resolved it. Also I want to share this resource: Step by Step guide to fix Xbox 360 errors it helped me go through all the things associated with Xbox 360 and the troubleshooting of errors. Hope this can also help you all.
-
-
-
Um die Klammern zu lösen, arbeite dich von der Vorder- zur Hinterseite der Lüftereinheit entlang.
-
Während du die Bodenabdeckung leicht anhebst, nutze die Spitze eines Spudgers um die Klammern zu lösen.
-
-
-
Führe die flache Seite eines Spudgers zwischen der Frontabdeckung und der Außenhülle, nahe des An/Aus-Schalters, ein.
-
Führe den Spudger entlang der Kante der Frontabdeckung um die Klammern zu lösen, die sie an der Konsole halten.
The faceplate just pulls off, using a tool is completely unneccessary. https://beta.support.xbox.com/help/xbox-...
-
-
-
Die obere Lüftereinheit wird mit Klammern in der Konsole gehalten. Die ersten zwei sind hier rot markiert.
-
-
-
Führe das flache Ende eines Spudgers in die kleine, bereits erwähnte, Öffnung ein um die Klammern zu lösen.
I found this step difficult. I wasn't able to see where the clips were from the pictures. If you look at step 14 you can see what the clips look like after the vent is taken off. Once you realize where they are it is a lot easier.
-
-
-
Um die Klammern zu lösen, beginne in der Mitte der oberen Lüftereinheit.
-
Während du leicht die Kante der Lüftereinheit anhebst, nutze die Spitze eines Spudgers um die Klammern in der oberen Mitte der Seitenabdeckung hineinzudrücken um sie zu lösen.
-
-
-
Nutze die Spitze eines Spudgers um die Klammern an der hinteren Seite der oberen Lüftereinheit zu lösen.
-
-
-
Nutze die Spitze deines Spudgers um die Klammer an der hinteren Seite der oberen Lüftereinheit zu lösen.
-
Entferne die obere Lüftereinheit.
-
-
-
Stelle die Konsole senkrecht mit der Oberkante nach unten hin.
-
Ziehe vorsichtig den Garantie-Sticker von der Konsole ab.
LOL “Romove the warenty seal”
-
-
-
Nutze das flache Ende eines Spudgers um die folgenden Verriegelungen zu lösen:
-
Über dem Front-USB Port
-
Unter dem Front-USB Port
-
Über den Speicherkarten-Schlitzen.
-
-
-
Führe das flache Ende eines Spudgers in der Verriegelung über der Eject-Taste ein und hebel nach oben um die letzte Verriegelung zu lösen.
-
-
-
-
Hebe vorsichtig die vordere Kante der Seitenabdeckung an, um sicherzustellen, dass die Verriegelungen an der Vorderseite komplett gelöst sind.
-
-
-
Drücke das Xbox 360 Opening Tool in die Schlitze für die Klammern, die Ober- und Unterseite verbinden in der Nähe der I/O Ports.
-
Während du das Opening Tool in die Xbox drückst, drücke die obere und untere Hülle auseinander um die Klammern zu lösen.
I didn't have an XBox tool, so I followed instructions in this video for this step (https://www.youtube.com/watch?v=qaxIB6cX...) to pry it open with your fingers and a screwdriver.
The small (metal) women's hair clip is best for un-latching the tabs. The screw drivers just make the holes bigger.
You can also use the pointed end of a plastic spudger to push each clip free while you separate the case with your free hand.
-
-
-
Während du die obere und untere Hülle auseinander drückst, nutze die Spitze eines Spudgers oder den Stift eines Xbox 360 Opening Tools um die lange Klammer (rot markiert) in das Gehäuse zu drücken.
-
Die Klammer löst sich und hinterlässt die Klammern in der Nähe des Stromanschlusses als einzige Klammern zurück, die die Gehäuseteile verbinden.
-
-
-
Drück das Xbox 360 Opening Tool unten in die zwei verbleibenden Schlitze um die Klammern in der Nähe der Stromverbindung zu trennen.
-
Drücke die beiden Gehäuseteile auseinander um sie komplett voneinander zu trennen.
-
-
-
Greife den hinteren Teil der Rückseite und hebe ihn an um ihn von der Konsole zu trennen.
-
-
-
Verwende die Spitze eines Spudgers um die Klemme, die den Auswurfknopf festhält, aus dem Metallgehäuse zu lösen.
-
Führe die Flache Seite des Spudgers zwischen die Auswurftaste und das optische Laufwerk ein.
-
Hebel die Auswurftaste aus ihren letzten Verankerungen und nimm sie heraus.
-
-
-
Drehe die 6 silbernen 64 mm T10 Torx Schrauben heraus, die die obere Abdeckung am Metallgehäuse halten.
-
-
-
Zieh die silbrige Klebefolie ab, die das optische Laufwerk am Gehäuse festhält.
Looking at mine, I doubt it. It looks like standard foil tape
-
-
-
Hebe das optische Laufwerk leicht nach oben um an das SATA Kabel und das Stromkabel des Laufwerks heranzukommen. Die Kabel befinden sich auf der Rückseite des optischen Laufwerks.
-
-
-
Greife das Stromkabel kurz hinter seinem Stecker und zieh es gerade aus dem optischen Laufwerk heraus.
-
Greife das SATA-Kabel am Stecker und ziehe es gerade aus dem optischen Laufwerk heraus.
I found the power cable to be very tough to get out, at least it is the first time doing this.
I found it much easier to remove the SATA cable after lifting the assembly mostly out of the case.
-
-
-
Hebe das optische Laufwerk aus dem Metallgehäuse heraus.
Be careful not to lose or break the two teeny metal clips securing the optical drive assembly snugly to the metal casing on either side of the drive's front face. I used a spudger to press in the topmost tines on these clips because they were catching on the drive and bending up. The clips should stay on the metal housing, not come off with the drive.
-
-
-
Führe das flache Ende eines Spudgers in die kleine rechteckige Öffnung an der Oberseite des Lüfterkanals.
-
Löse vorsichtig die Klammer des Lüfterkanals und nimm den Lüfterkanal aus der Xbox.
Fair warning for people using this guide for maintenance, the inside will likely have a coating of fine dust or dirt
-
-
-
Hebe die Rahmenleiste über den Doppelventilatoren an und ziehe die Doppelventilatoren in Richtung des Motherboards.
Cleaning out the fan now, will help problems in the future.
Do Step 35 first (remove the fan connector from the motherboard), otherwise as you pull the fans forward out of the metal bracket you risk stressing the connector's attachment to the motherboard (because the fans will press against the connector as you pull them forward).
There are small black feet on the bottom of the fan assembly, You can push up from the bottom of the case if needed.
these are powerful fans. im having over heating issues with a brushless motor. anything less than a 120mm pc fan does nothing. but i must keep the top off to fit the 120 and adequate heat removal. so i wanna use tbis turbo fan and mount i ti the lid.
how do i remove the blades and get to the bearings and guts??
theres no rear access hole hiding under the specs sticker.
please help! thank
-
-
-
Ziehe das Kabel der Doppelventilatoren vom Mainboard ab.
-
Entferne die Doppelventilatoren aus dem Gehäuse.
-
-
-
Verwende die flache Seite eines Spudgers um die Klammern, an der oberen und linken Seite des RF Modulschilds zu lösen.
-
Entferne das RF Modulschild von der Konsole.
-
-
-
Drehe die drei 5,6mm T8 Torx-Schrauben heraus, die das RF Modul am Metallgehäuse befestigen.
for whatever reason the T8 screws holding the RF receiver on my unit were torqued on pretty hard. almost impossible to get off. IS taking the RF off really necessary?
They all seem like that the further down we go. Unless you're here to just repaste the board, you have to take it off
-
-
-
Greife das RF Modul und zieh es vorsichtig hoch um es aus seinem Sockel im Motherboard zu nehmen.
-
Nimm das RF Modul aus der Konsole.
-
-
-
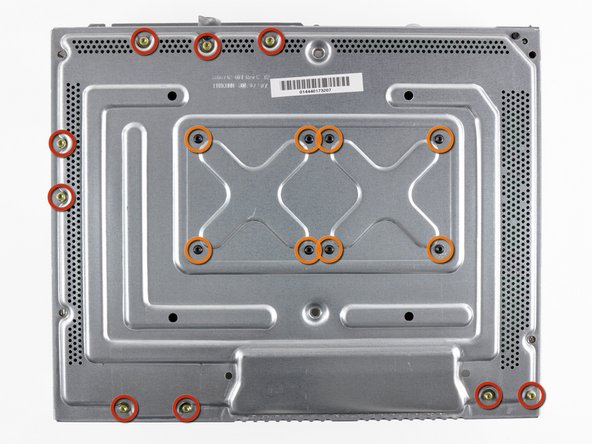
Entferne folgende Schrauben, die das Motherboard am Metallgehäuse befestigen:
-
Neun goldene 11mm T10 Torx-Schrauben.
-
Acht schwarze 5,6mm T8 Torx-Schrauben.
kinda hard for a KID to do this huh also I am a 9 year old you get it
well, it almost as if this is labeled as Difficult in the beginning!
The T8’s were T9’s on mine. This guide could be wrong, or my toolkit was mislabeled. If you can’t get the T8’s out, try a T9 before stripping the screws!
They were T8’s for me
Ryan Lee -
-
-
-
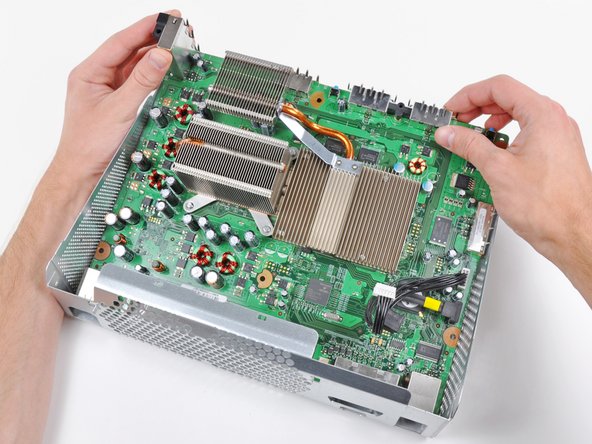
Hebe das Motherboard an der vorderen Kante an.
-
Entferne das Motherboard aus dem Metallgehäuse.
-
-
-
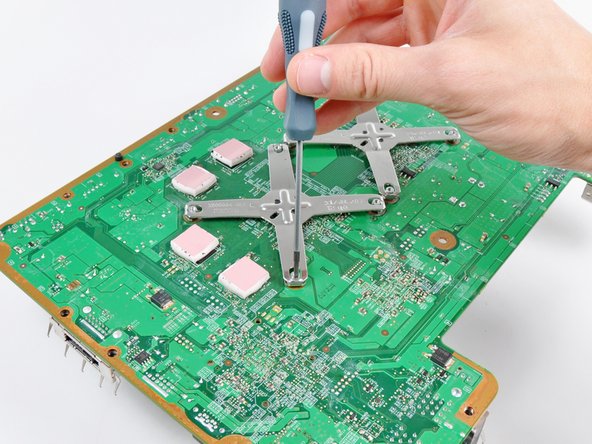
Führe die Spitze eines kleinen Flachkopfschraubenziehers an den Enden der X-förmigen Klammer zwischen der Klemme und der Befestigung ein.
-
Hebel die X-förmingen Klammern aus den Befestigungen, bis die Kante mit der Rille über die übrigen Befestigungen gehoben ist.
The instructions on how to remove the x clamps are insufficient. I had a great deal of trouble with them. The small flathead screwdriver included with the kit is too small and weak to do the job. I ended up Googling other how-to's. I used a larger screwdriver and FINALLY popped them off, however as careful as I tried to be in the process I accidentally damaged a few traces around the screw hole. Repair was a failure, still have 3 red lights. Waste of time and money.
Why the heck would you suggest using a screwdriver to release the x-clamps from the motherboard, knowing that the screwdriver could slip and damage some of the traces on the motherboard!? Didn't see the comment about placing a piece of cardboard on the motherboard to prevent scratching until I had already screwed up my Xbox. How hard would it be for iFixit to develop a tool to easily remove the x-clamps like they did to open the Xbox? I wanted to do this to prevent any possibility of overheating, and went from a working Xbox to a dead one because of this bad step. Definitely took my view of iFixit down a notch, will be much more hesitant to recommend their tools and guides after this. Would like a refund but I know that's not going to happen. Super ticked!
Same thing just happened to me, the tiny screw driver they say to use has next to 0 leverage to get it off. Now my repair kit is useless cause I physically removed some of the bits because my screwdriver slipped.
Forren -
I found that inserting a sprudger between the X clamp and retaining post and turning while lifting worked well without damaging the board
The tool provided in the kit is completely incapable of performing this step (prying the X off the post).
I originally had a lot of issues prying them up; I was really worried about accidentally scratching the board. The instructions don’t seem fully adequate. Instead, first pry all four corners as high up as possible, pointing the screwdriver towards the center of the X clamp. If you pry them practically horizontally, then it makes the whole process a lot easier. Then work individually, pushing each corner slowly outwards and upwards, putting the screwdriver in from above (not the side as step 42 shows, too dangerous) into the small space between the screw and the X. Be careful at this point, just in case. Also, DON’T use the small flat head screwdriver provided; it’s too tiny to get proper leverage. I used 1/8 in. See this tutorial: https://www.youtube.com/watch?v=pHzEV3c_...
Maybe the tiny flathead in the kit I got is newer than the old ones…
DO NOT stick the screwdriver vertical as shown in step 41!
Instead use it like step 42. Insert it only that way, between each front of the X clip arm and the post, and turn it so the screwdriver turn pushes the bottom of the X clip off the post.
No risk of damaging the board this way.
Instructions were very unclear, but comments helped. Both used cardboard and the tutorial found here https://www.youtube.com/watch?v=pHzEV3c_... as mentioned by Sophia Vera. Took my time, and mostly used a longer screwdriver like in step 42. Once the first 3 clips come off, the fourth one essentially falls off, so be ready to catch your heat block when you pop the third one.
-
-
-
Führe den Flachkopfschraubenzieher parallel zum Motherboard zwischen die X-förmige Klammer und die Befestigungen.
-
Dreh den Schraubenzieher um die X-förmigen Klammern von der Befestigung zu trennen.
-
-
Is the x-clamp supposed to be reinstalled? It's not pictured in any part of the instructions after this point, so I did not reinstall it, and putting the xbox back together now is different than taking it apart.
The X-clamps are not reused. Since you install machine screws in place of the X-clamp mounting posts, you do not reinstall the eight screws highlighted in orange on step 41.
-
-
Führe die Spitze eines Flachkopfschraubenziehers zwischen den Ecken der X-förmigen Klammer und den Befestigungen des Kühlkörpers ein.
-
Hebel die X-förmige Klammer weg von der Befestigung, bis sie über die Rille in der Befestigung gehoben ist.
-
Entferne den CPU Kühlkörper vom Motherboard.
-
-
-
Jetzt, wo die Kühlkörper von beiden Prozessoren abgelöst sind, verwende einen Spudger aus Plastik um die Reste der alten Wärmeleitpaste von den Porzessoren und Kühlkörpern abzulösen.
Do yourself a favor and buy some ArctiClean... I used Isopropyl Alcohol and Q-Tips and ended up spending 45 mins scrubbing the surfaces. I imagine with the Arcticlean it would've taken mere minutes.
WD-40 is another option, Be sure to apply minimal amounts carefully using q-tips to gently rub away the thermal paste. Use isopropyl to clean up afterwards.
-
-
-
Nachdem die Kontakte gesäubert wurden, sollten sie aussehen wie auf den Bildern.
-
-
-
Dreh das Motherboard um.
-
Löse die die Silikon-Wärmeleitpads von den RAM Chips an der Unterseite des Boards.
-
-
-
Nutze den 1/4'' Steckschlüsselaufsatz des beiliegenden Schraubenziehers ohne ein Bit um die vier Befestigungen der X-förmigen Klammern vom CPU und GPU rauszuschrauben.
-
-
-
Trage eine dünne Schicht Wärmeleitpaste an den rot markierten Stellen auf.
-
Nachdem du die Wärmeleitpaste auf den Prozessoren aufgetragen hast, setze beide Kühlkörper nacheinander wieder auf. In unserem Fall haben wir mit dem CPU Kühlkörper begonnen.
-
-
-
Führe eine Maschinenschraube durch jedes der vier Löcher um den CPU Kühlkörper mit den Schraubköpfen an der Rückseite des Boards.
-
Während du die Schraubköpfe hälst, stecke erst eine Nylon-Unterlegscheibe und dann eine Metall-Unterlegscheibe auf die Schraube.
-
Verwende das große Flachkopfschraubenzieher-Bit um die Schrauben am CPU Kühlkörper festzuschrauben. Schraube erst leicht zwei diagonal liegende Schrauben hinein, wie im Bild gezeigt. Danach schraube die anderen beiden Schrauben hinein und ziehe alle fest.
-
Wiederhole den selben Ablauf für den GPU Kühlkörper.
We only had a hardcopy printout of this guide when we tried this fix, but we were still confused by the relative order of the placement of the washers. If we had read the nylon washers makes contact with the motherboard and the metal washers make contact with the heatsink, we would likely get more clarity with the washer placement.
Maybe consider including a couple of extra washers in the kit. The vast majority of my repair time has been spent looking for the nylon washer that dispersed onto the kitchen tile floor.
There is exactly one valid orientation for the CPU heatsink - the heat pipe must be on the side with the capacitors, not the side where the GPU is, otherwise it’d block the GPU heatsink from fitting back. I had to take the CPU heatsink off and re-do it after doing it the wrong way the first time.
is one single nylon washer important? because I bumped into the table and it fell out and got lost :/
This part was a little tricky fitting the screws under the tray through the heat sinks
-
-
-
Verwende die Kante deines kleinen Flachkopfschraubenziehers oder einen anderen dünnen, scharfen Gegenstand um vorsichtig die Ecke einer blauen oderweißen Plastikfolie, die den Kleber an der Unterseite der beiden Kühlkörper schützt.
-
Löse die Schutzfolien von der Klebeseite beider Kühlkörper ab.
-
-
-
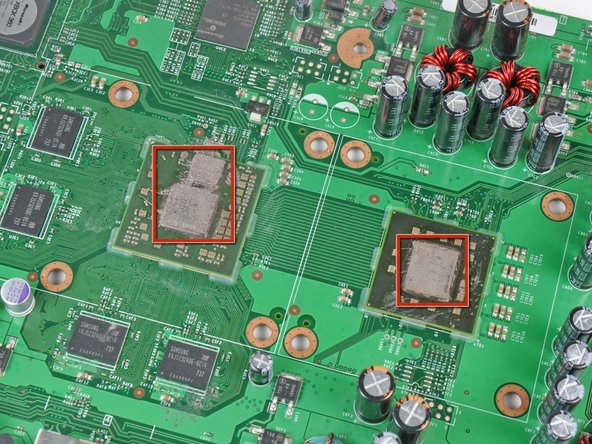
Säubere vorsichtig die zwei (im erste Bild rot markierten) Chips
-
Klebe die zwei Kühlkörper oben auf die zwei (im ersten BIld rot markierten) Chips. Hier ist es wieder sehr wichtig, sie mit den Lamellen in Richtung des Luftstroms (wie in Bild 2 gezeigt) zu positionieren.
I did the fix and now it does nothing I can't figure out why
-
-
-
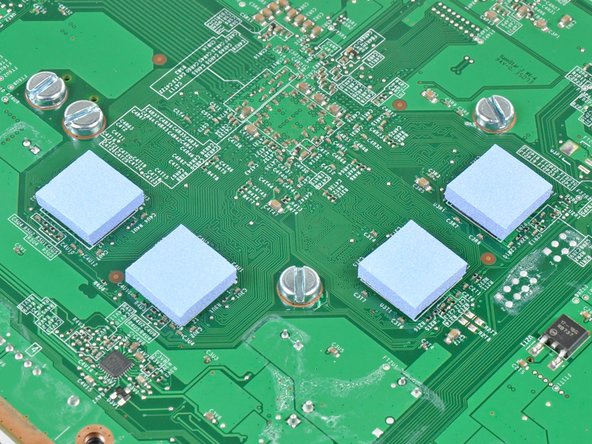
Klebe die Wärmepads auf die RAM Chips an der Unterseite des Boards.
-
Setze das Mainboard zurück in das Gehäuse und baue deine Xbox 360 wieder zusammen.
-


Arbeite die Schritte in umgekehrter Reihenfolge ab, um dein Gerät wieder zusammenzubauen.
Arbeite die Schritte in umgekehrter Reihenfolge ab, um dein Gerät wieder zusammenzubauen.
Rückgängig: Ich habe diese Anleitung nicht absolviert.
626 weitere Nutzer:innen haben diese Anleitung absolviert.
Besonderer Dank geht an diese Übersetzer:innen:
100%
Diese Übersetzer:innen helfen uns, die Welt zu reparieren! Wie kann ich mithelfen?
Hier starten ›

69 Kommentare
I didn't have a heat gun so I disabled the fan and left the 360 on for 1/2 hour to heat up the weak solder points and then let it cool down for 1/2 hour before re-assembling the 360. This gave me all green lights.
Unfortunately this repair only lasted a few months on my xbox, going to try it again and hope for better results.
When you take it apart, I recommend following our reflow guide before installing the RROD fix kit. I recently did this to an X360 that the RROD kit fixed only momentarily and afterwards it worked good as new.
I did the relowing of the motherboard this weekend, hopefully it lasts longer than the previous repair.
zima539 -
I followed this guide and even performed the reflowing procedure. It worked perfectly. I noticed that when I took my Xbox 360 apart there were no existing thermal pads on the RAM chips on the underside of the mobo. Perhaps this caused the problem...? Either way this guide was thorough and easy to follow. Be sure to read ahead a step or two because some things are described generally in one step, then in better detail in the step after.
first of all -> THANK YOU iFIXIT!
my xbox died on me 3 days before the MW3 release. 3 red lights! what a timing.
i followed the guide and did everything slow and careful as instructed. (didnt do the reflow.)
the thermal paste thing was a bit tricky wasnt really sure how much i
have to put on the CPU and GPU to provide the right cooling but after
assembling all back together and hitting the "on" button the green lights came on!
haven't tried to play a longer session but i definetly will do this weekend with MW3.
my 360 didn't have the three lights, but it still didn't work. First I thought there was something with the AV cables because the power button was green like normal yet there was no audio or video response coming from the TV. I tried swapping cables and that didn't work so I figured it was the xbox. I tried this fix and it worked great! So if anyone is wondering if this can fix a broken xbox only if that xbox has a RROD, perhaps give this fix a try because it worked for me.
I have a question, can i do it only by changing the 4 thermal pads, and not moving on those x things? like, not changing anything on the cpu or gpu, please someone let me know asap
What's the best place to purchase all the parts in repair kit, but individually. I don't need everything provided, but just the heat sinks etc.
Eric,
you can get the kit and tools to repair your xbox thru www.Ifixit.com for a little over $30. for everything you get its well werth it.
Hope this helps!
Laurap6286
iFIXIT store probally
first off the instructions were great i followed everything didn't have a heat gun so i tried what the first commenter tried with just lettting it run without the fan let it cool still nothing I used rubber washers instead of nylon washers could that be whats preventing my xbox from working? any comments or advice would be greatly appreciated
I didn't have 3 red rings before the repair, but I knew it was overheating as it couldn't run a game for long, but was fine with some arcade games and DVDs. After the repair, and removing lots and lots of dust that has accumulated over 6 years, it NOW has the 3 red rings. Did I not put enough paste on? Any ideas would be helpful.
The RROD is caused by the mother boards bending form poor heat transfer out of the system....the circuits become weak and break. the heating gun is used to effectively resolder the system and hopefully unbend the motherbaord enough to ge the system working again....their solutions to keeping it from happening again is thermal paste and new conduction tech that is more modern...once you get it working try getting more fans...or some sort of cooling solution in the system.
Guide worked great. Cleaned off all the old thermal paste with isopropyl then used a heat gun to reflow the solder. To all those wondering if you have to remove the x-clamps; the answer is yes. The reason the consoles RRoD is because of the x-clamps putting too much stress on the motherboard. Just make sure you clean everything really well and be careful. Also, I used MX-2 instead of the crap they send with the kit.
i did all the thing it said in the guide to do worked great my xbox is working again but now i cant sink my wireless controllers to my xbox iv read online that it might be the RF that needs replacing i just want to see if anyone can tell if there is anything i can try before i buy the part
Just used your Red Ring of Death Kit with success. Did the thermal rework too. It has been working for over an hour now so looks ok. Cooking the chips on "High" for four minutes was a bit scary but it survived. I have a thermal rework gun which I check with a thermocouple temperature probe which plugs in to my test meter. If I may make one small criticism it would help to have actual temperatures where you have stated "Low" and "High" Just ball park figures would be enough. This is the first use I've made of the rework gun so still building up skill with the technique. Obviously the effective temperature will vary according to the nozzle distance from the job. Otherwise very good kit and excellent instructions. Also worked with your Android app running on my tablet next to the job. Fantastic. Have fitted very many heat sinks as I have built computers since they ran on steam so no problem here. I'm a retired Electronics Engineer and will be 80 in December this year. Hands as steady as a surgeon but need glasses to work now. Many thanks. Keep up your good work.
This technique works. Use a heat gun. Don't try any of the dopey "hack" fixes, like wrapping your Xbox in a towel, running it without the fans, or putting it in the oven. This is iFixit - they show you the right way to do things. Their guides work for a reason - they know what they're doing.
You CAN buy thermal compound, cleaning solution, and even the screws & washers elsewhere, but these dudes deserve your cash.
i had the code E74 problem for my xbox 360 elite. the Ring Of Death kit fixed the problem. now my elite works like a charm. it had 1 ring on bottom right corner of the console. thank you for the support
I originally tried to fix my Red Ring of Death issue by just applying new thermal paste and not using iFixit's RRoD kit. Unfortunately, the repair did not work. So stopped being cheap and decided to buy the iFixit RRoD kit. Reflowing my XBOX's motherboard and applying the iFixit RRoD kit worked like a charm. GTA 5...here I come!
Thank you for the guide and the repair kit. It unfortunately didn't solve my issue, but everything went smoothly and if I were to get another old Xbox - for repair or for a friend - I'd look here first to getting it up to par and to increase its life.
And to those who go "The video wasn't all that descriptive about x"... READ! Seeing can help, but the text guide was perfect at describing every aspect of my Xbox's dis-assembly.
this didnt work at all im afraid, it would have been great if it did. but nothing has changed.
So successfully installed RROD kit and did a very cautious reflow... had green lights and went to bed. Woke up to continue reassembling unit and it was right back to 3 light RROD... I have just done a slightly less cautious reflow and am hopeing it will ressurect the console... if it doesn't well there goes the cost of the kit, 30 bucks in shipping and an unhappy family.
Just received my kit and installed it in my RROD Xbox 360. Followed all the steps as well as the reflow and thermal paste guides. After reassembling the whole thing carefully... the kit unfortunately didn't work.
You can use a different type of thermal paste, but we recommend Arctic Silver.
Hi all,
I did the advices in the guide but unfortunately, it doesn't work. Now i have two red lights before i had three. Anybody can help me ?
Thank you.
I don't care what anybody says, this guide actually worked for me. I made an account just to say that. Although, I will tell you, after immediately following the guide I got RROD again. What I did was towel trick (Google it ;) my console for a good 45 minutes. I then, let it cool for like another 45 minutes. Next thing you know.... :D
The RROD kit did not work for me. :( So I guess I wasted $30 I could have put toward buying a different one.
I went through the guide a few nights ago. I have an older Xbox, One of those old white guys that everyone knows and loves. It lasted me a lot longer than I had expected, outliving a few of the newer versions that my friends had bought long after I had gotten mine. However, a few months ago it came down with a case of RROD. I thought "Great, no more warranty, I guess i can pay 100 bucks to get it repaired or just buy a whole new system for even more!" but thankfully, I bought the kit and now it's working like new. Super easy to take apart, no problems except for two. The first being that it's a pain to bolt in the heatsinks with the washers and everything. I used a trick where I used a few toothpicks through the mobo holes and washers to hold everything in place until I could get the bolt in and threaded. Aside from initially reinstalling the CPU heatsink in the wrong way (i blame lack of sleep) i was able to take it down again and redo it no problem at all. A fairly easy, cheap, and effective repair.
Kit was missing a nylon washer, and peeling the backing off of the thermal pads tore the pads to pieces. I followed the instructions exactly and made due with what I had, and did an entire system dusting. Now the Xbox won't run, whereas it had the red ring and would run prior to the repair. I have a history with computer construction and repair, so I was very careful and exact. I'll troubleshoot and re-do the thermal paste, yet at this time I'm calling this product a waste of time and money.
I didn't have a heat gun so I used a blow dryer to heat up the board. Might not have been hot enough I assume since I still have the 3 red lights. I left it connected and turned on but nothing happens with the 3 red lights flashing. Can't even get it to heat up without the fans either. I will be buying a heat gun today to try it again and hope it works. If not, is there anything else I can try?
You can put the board in your oven I've done it a long time ago on one xbox 360 and I still have it, sense then it hasn't had the rrod
Imagine my horror when I went to play my brand new copy of Dragon Age: Inquisition, and received a nasty little screen that said "E74". Came here, bought this kit & a $20 heat gun from the hardware store (to reflow the motherboard), and now I and Iron Bull are roaring through the Hinterlands! I am not a particularly "handy" person, so if I can do it, so can you. iFixit, you guys are awesome!
I finally had the chance to attempt to repair the xbox for my son, it took a few but at the end with the guide and the parts I bought NO MORE RROD :-)
Thank you for the guide
Tom G.
I did this for error code 0020 and now I get 0003. I bought the kit installed it after reflowing the xbox. Please help, eager baby cousin waiting to get back to his minecraft.
I just completed the above steps. I reflowed the board prior to putting in the kit. No more Red lights! We will see how long it lasts but for now, I'm one very satisfied customer!
Installed the RROD fix kit and it didn't work. I didn't do the reflow because I don't have a heat gun. It was a great guide and fun project.
A blow dryer (Hair dryer) works great as a heat gun... I have had many successes on second tries because the first try didn't work...
I din't work for me.. i have purchased the repair kit and installed all but i have still the red ring!
Sorry for my bad English.
It didnt work for me.. i have purchased the repair kit but i still have the red ring of dead.. please help
Purchased the kit and installed, however the unit booted up, saw the Xbox logo, then it locked up and back to the red ring :(
On the bottom side of the Mainboard just under the X clips some super Tiny small blocks fell off when I tried to reflow with the heat gun. Now my xbox wont work at all. What are those TINY blocks called that is just beneath the center of the X clips.
Well you just made your xbox a toaster set... those pieces that fell off were electrical components. Time to go buy a new xbox! You might want to let the professionals do the repairs for you next time. Sorry for your bad luck!
Thank you! My xbox360 is almost more than 10 years old, and have three red rings after 10~15minutes. I tried this guide without kit and skipped some steps, but it works!
My six screw driver did not match small size screw…. so I skipped step 36 ~ 52 , 54, 55. I just sticked two heat sinks on two chips (only step 53) but it works. Thank you very much!!!
Worked for us, Thanks a lot! We have launch core console, that we bought for 40€ on the flea market, but had a 3 rrod. We 've done the reflow, and used coins instead of cooling pads. We had then 4 rrod after it, but fortunately we only forgot the AV cable (this box has no HDMI). Now it runs like new. :-)
Never use this “Fix”… Please please do not use bolts. It breaks the system even more and acts as a temporary fix. Use the original X Clamps that were originally on the system. Your best bet would be re flowing the chips are replacing the thermal paste. ALWAYS USE THE X CLAMPS, NEVER USE BOLTS!
Awesome! it works, and it's not the first time I deal with micro electronics, I try to be more careful every time ( I'm getting better I think?) This is a cool website and I will further look into its fixings for other things I have that need updating to figuring out questions I have.
I finally was able to fix my xbox from 20 years of rrod circle, avoiding wanting to send it in, ha, I'm curious to see if other functions are now out of date with what they have going on in their database systems to tech now in bits communication. Yes, it was like going into the past with my old profile, will have to set it up a new now.
I just installed the kit and everything seems to be working. However, the fans are really loud now. I may be miss remembering but I have never heard them this loud before. I’m wondering if somehow the heat sensors go off of the heat sync temp and since they are transferring heat better now they are hotter and the fans are told to spin faster? It seems to be running fine so I just want to be sure that I can keep using the system without having to worry about it.
Please don’t do this to your 360… all you will do is damage it beyond repair bu trying to fix “broken solder joints” that aren’t even there… the issue lies in the flip chip itself, not the solder under the substrate.
Yeah right microsoft design the xbox 360 do die back in 2006-2008
I bought the RROD repair kit from IFIXIT. I think the motherboard solder reflow step was critical for fixing my unit. I used an Ancor heat gun on low setting (572 F) for 1 minute on the bottom side followed by 3 minutes on top side. I monitored the temp of the board by touch and when it started getting pretty warm, decided to stop the reflow. it’s all a guess as to what time and temp will work. I then applied the thermal paste and heat shields, reassembled the unit, powered it on and it ran perfectly. The RROD repair kit and instructions were great.
I performed this repair about 8 months ago as a preventive measure. Console has not had any issues since the repair, but I’ve been reading that replacing the x-clamps with the screws and washers (the so-called “bolt mod”) actually will (1) cause the motherboard to flex and (2) lead to unrepairable damage. iFixit contributors, is it true? If so, does the method in this guide somehow protect against flexing? Should I disassemble my console and reinstall the x-clamps?
Well, I have everything torn down and cleaned up and am ready to put the thermal paste on and put things back together. BUT I noticed there were two small silver “clip like” pieces that came off from somewhere and I don’t know where!! HELP!! They are about 1 - 1.5 “ long and 1/8 inch wide or narrower. There are 6 small rectangular holes with little flaps that look like they should slide onto or connect to something. One end has a small clip and the other end has a arrow like slide. Anyone have any ideas where these go? Thanks for any advice!!
I think the ones you mean are the clips of the chassis that go on the left and right side of the dvd drive opening . You have to put the bottom of the clip in the chassis and then slide it up over the edge on the top of the chassis
Where do I even start? PLEASE FOR THE LOVE OF GOD DON’T DO THIS TO YOUR CONSOLE. Instead of me rambling about how this should be removed, watch this video which explains why this is a BAD IDEA: https://www.youtube.com/watch?v=C8gggL3f...
Try hot iron on the chip instead of reflow.And pls check capacitor's they go.bad.fast.usualy I recap first.
This guide worked! That was definitely worth it. Thank you ifixit!
Before attempting this I had a red-ring-of-death, and now the system isn't even lighting up. I press the power button and nothing happens, no fans, no lights. Not sure where I went wrong, or if there is any way to recover.
WARNING: Just replacing the drive will not make it work correctly. Microsoft has married the drives to the motherboard. Hence, in order to get full operation out of the drive you'll have to perform more steps not listed here. Search in the FAQ on this specific topic for more details. Otherwise, before buying a new drive, try cleaning the inside of the old one and/or replace the belt involved in opening and closing the drive door.
- Good Luck
Eric - Antwort
Thanks..helped!
joseph zulu - Antwort
bress the button and lift with the same hand! i thought mine was stuck because of this pic!!!
Maths with Luigi - Antwort