Zum Hauptinhalt wechseln

iPad Mini CDMA Battery Connector Replacement

Grundständige Anleitung
Dies ist eine grundständige Anleitung, die nur als Teil einer anderen Anleitung verwendet werden sollte.

Was du brauchst

  1. iPad Mini CDMA Battery Connector Replacement, Battery Connector: Schritt 1, Bild 1 von 1
    • Remove the three 1.3 mm Phillips #00 screws securing the connector shield to the logic board.

    • Be sure to not substitute these three screws with any other screws, specifically the screws securing the LCD shield plate to the rear case of the iPad. Any slightly longer screws may strip the screw holes and result in irreparable damage to the logic board.

  2. iPad Mini CDMA Battery Connector Replacement: Schritt 2, Bild 1 von 1
    • Use a pair of tweezers to grasp and remove the connector shield from the iPad.

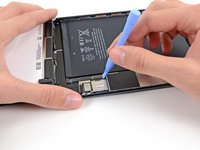
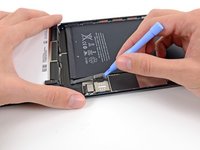
  3. iPad Mini CDMA Battery Connector Replacement: Schritt 3, Bild 1 von 2 iPad Mini CDMA Battery Connector Replacement: Schritt 3, Bild 2 von 2
    • Use a plastic opening tool to gently pry the battery connector up from its socket on the logic board.

    • Be very careful to only pry up on the battery connector and not on the socket itself. If you pry up on the logic board socket, you may break the connector entirely.

Abschluss

To reassemble your device, follow these instructions in reverse order.

Team

iFixit Mitglied von iFixit

Staff

136 Mitglieder

16.573 Anleitungen geschrieben

0 Kommentare

Kommentar hinzufügen

Seitenaufrufe:

Letzte 24 Stunden: 0

Letzte 7 Tage: 0

Letzte 30 Tage: 2

Insgesamt: 500