Einleitung
Folge den Schritten dieser Anleitung, um die Displayeinheit, inklusive LCD und Touchscreen Glas, deines iPad mini 4 Wi-Fi zu ersetzen.
Hierbei muss der Bildschirm ausgebaut werden und dann der Home Button auf die neue Displayeinheit übertragen werden. Um die Touch ID Funktionalität beizubehalten, musst du den originalen Home Button auf den neuen Bildschirm übertragen.
Je nach Ersatzteil musst du unter Umständen auch den Standby-Sensor für die Nutzung von SmartCover übertragen, dafür ist das Entlöten eines Kabels notwendig.
Was du brauchst
-
-
Erhitze den iOpener für dreißig Sekunden.
-
Im Verlauf der Reparatur kühlt sich der iOpener wieder ab. Erhitze ihn dann noch einmal für dreißig Sekunden.
-
-
-
Halte den iOpener an einem der flachen Enden und vermeide die heiße Mitte, während du ihn aus der Mikrowelle nimmst.
-
-
-
Fülle einen Topf oder eine tiefe Pfanne mit ausreichend Wasser, um den iOpener komplett damit bedecken zu können.
-
Erhitze das Wasser (ohne den iOpener) bis es kocht. Schalte die Wärmezufuhr (Platte) aus.
-
Lege den iOpener für etwa 2-3 Minuten in das heiße Wasser. Stelle sicher, dass der iOpener komplett mit Wasser bedeckt ist.
-
Nimm den iOpener mit einer Küchenzange aus dem Wasser heraus.
-
Trockne den iOpener gründlich mit einem Küchen- oder Handtuch ab.
-
Der iOpener kann jetzt verwendet werden. Solltest du den iOpener erneut erwärmen müssen, erhitze das Wasser nochmal bis zum Siedepunkt, schalte die Wärmezufuhr aus, und lege den iOpener wieder für 2-3 Minuten vollständig in das Wasser.
-
-
-
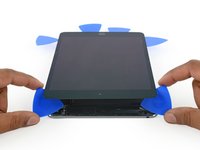
Platziere den erhitzten iOpener auf der linken langen Kante und lasse ihn etwa 2 Minuten in dieser Position.
-
-
-
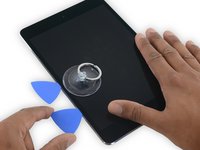
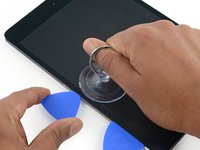
Platziere mittig einen Saugheber auf der angewärmten Seite.
-
Achte darauf, dass der Saugheber komplett auf dem Glas aufliegt.
-
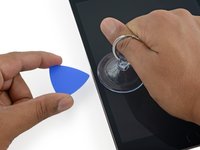
Halte das iPad mit einer Hand nach unten und ziehe den Saugheber mit gleichmäßiger Kraft nach oben, um einen Spalt zu erzeugen.
-
-
-
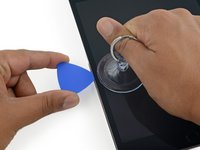
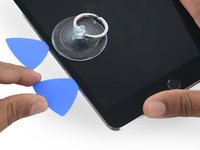
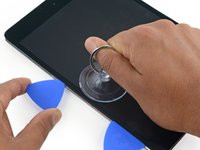
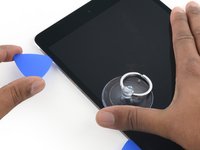
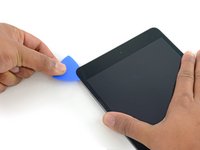
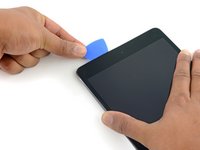
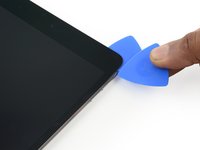
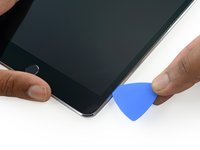
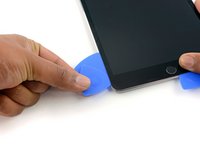
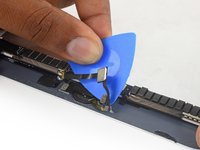
Während du das Display mit dem Saugheber anhebst, führe ein Plektrum in die Lücke zwischen dem Glas und dem iPad Gehäuse ein.
“Don't insert the opening pick any deeper than the black bezel on the side of the display. Inserting the pick too far may damage the LCD.”
Unfortunately, you only know you have inserted it too far when you have, and you start seeing little bubble veins form between the glass screen and the LCD.
The adhesive can be very stiff/hard, and if pushing through it can result in the pick plunging into the LCD when the adhesive finally gives way.
Take your time, use alot of heat, and if you need to try and push the pick in, try and do so in a slicing motion along the edge, use the wide edge, or hold the pick so that your finger will hit the edge of the screen before the pick tip will pass the bezel.
Adhesive strips are only 1mm wide on sides. Up to 5mm wide top and bottom. I used the Isclack. Screen seemed ok bending without breaking. Worth looking for a photo of the replacement adhesive strips so you know what you have to separate. Be extra careful at the lower right corner where the cables are.
This is a failure of a guide as it doesn’t tell you to insert at a downward angle so you don’t potrude into the LCD… Now I have to spend more money to replace the screen as I pushed adhesive between the LCD and the screen even though I went no farther than a millimeter short of the screen...
can you open the right side if the left is too cracked to use a suction cup on?
This guide needs amending urgently.
You MUST NOT put the pick or whatever you are using more than 2mm under the sides of the screen, or you will cut through the adhesive tape securing the backlight assembly to the LCD glass.
This will push adhesive into the viewable area of the LCD and cause the backlight assembly to no longer be secured against the LCD fully.
I now need a new screen.
This line below from the guide is absolutely INCORRECT and will ruin your expensive display:
”Don't insert the opening pick any deeper than the black bezel on the side of the display.”
The black bezel is 5mm to 6mm wide; you MUST NOT insert anything to that depth or you will destroy your display. 2mm maximum!
thanks. will take this into account for my repair
Adab Abu -
I too damaged my display because of this absolute nonsense (The German version, which I used, still had this INCORRECT portion in it). I can't believe how long it took iFixit to update this, even though people have been reporting this for years on end. Sadly iFixit still haven't updated a variety of other things that are still at the very least high risk instructions. I just messaged them the other day, but they don't seem to care about or understand the remaining issues that this guide has. At least they updated one of the most severe things, but they just plainly told me 'I'm wrong' about the rest. I liked iFixit it so far, and I've worked on a variety of (difficult) repairs - but this experience was a very huge let down.
A few thoughts after opening a number of Mini 4’s.
1) if the display is warm enough you can squeeze the digitizer and LCD back together after a minor incursion with the opening pick and it will reseal.
2) I’ve started going in at the top just to the right of the camera (I use an iFlex to get in then switch to a pick). Then I run down either side with my fingers choked up on the pick so there only a mm or 2 sticking out. Usually after running down one side, I can get the display open enough to get the pick in behind the LCD when I do the other side
-
-
-
Erhitze den iOpener erneut, platziere ihn an der gleichen Stelle und lasse ihn ein paar Minuten dort liegen.
If your iPad is cold, consider leaving the iOpener on for longer than 5 minutes. The aluminum housing is a very large thermally dissipating mass and will quickly cool off the glass and make you have to start over and wait the 10 minutes to reheat. There’s a very slim window in which you’re able to insert the pick into the glass adhesive before it solidifies once again. I’ve been fighting with it for like 20 minutes following these instructions and it’s not working. You really need to leave it for longer than just 5 minutes to get the back housing hot too.
Heat is essential. I used a 3d printer’s heated set at 65 degrees. Chris Storer’s stip above saved me as you really need to let it sit for quite a while to soften the adhesive. Since I was doing a battery change, I heated both sides as the aluminum back is a huge heatsink that really sucks up the heat. Don’t try forcing it; if the suction cup isn’t pulling a gap in the screen, leave it on the heater for additional time.
Love the 3d printer idea, I hadn’t thought of that! I have used a heat gun as well but you have to be very careful to not use too much heat. Also watch for inserting the pick too far, it is really easy to delaminate glass from the display!
russ -
-
-
-
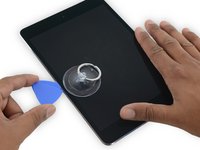
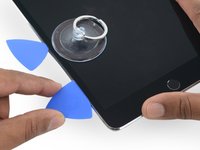
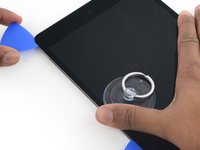
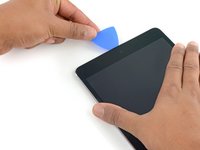
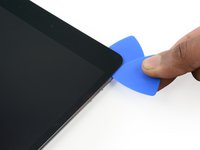
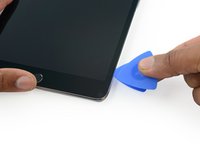
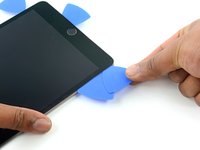
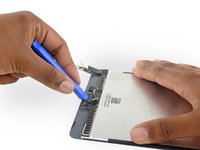
Führe ein zweites Plektrum neben dem ersten ein und ziehe es vorsichtig nach unten, um die Klebeverbindung des Displays zu lösen.
-
-
-
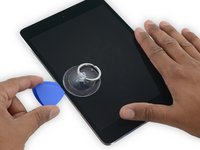
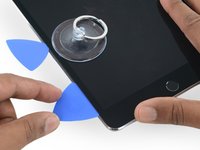
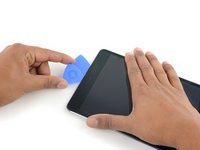
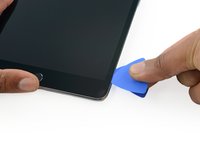
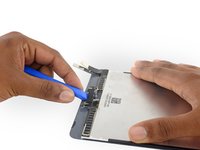
Schiebe das Plektrum weiter an der Seite des Displays herunter, um den Kleber zu lösen.
-
Falls das Plektrum im Kleber stecken bleiben sollte, dann "rolle" es die Seite des iPads entlang, um weiterhin den Kleber zu lösen.
-
-
-
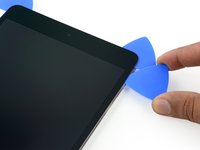
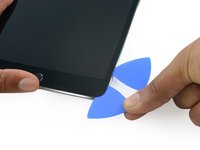
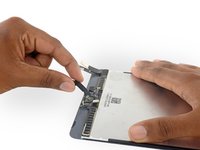
Nimm das erste Plektrum, das du eingesetzt hast, und schiebe es nach oben zur oberen Ecke des iPads.
-
-
-
Erhitze erneut den iOpener und lege ihn auf die obere Kante des iPads über die Frontkamera.
-
Wenn du einen flexiblen iOpener hast, kannst du ihn so umbiegen, dass sowohl die obere linke Ecke als auch die obere Kante gleichzeitig erhitzt werden.
-
-
-
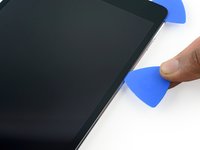
Schiebe das Plektrum um die obere linke Ecke des iPads, um den Kleber zu trennen.
-
-
-
Schiebe das Plektrum entlang der Oberkante des iPads und halte kurz vor der Kamera an.
-
Wenn du die Frontkamera erreichst, ziehe das Plektrum etwas heraus und schiebe es weiter an der Oberkante entlang.
-
-
-
-
Lasse ein Plektrum kurz nach der Frontkamera im iPad stecken.
-
Nimm ein zweites Plektrum und setze es links neben der Kamera ein, wo gerade eben das erste Plektrum war. Schiebe es zur Ecke zurück, um jeglichen Kleber vollständig zu lösen.
-
Lasse das zweite Plektrum an Ort und Stelle, um zu vermeiden, dass sich der Kleber in der Ecke beim Abkühlen wieder verbindet.
-
-
-
Setze das vorherige Plektrum tiefer in den iPad ein und schiebe es von der Kamera weg zur Ecke.
-
-
-
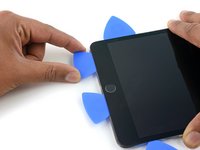
Lasse die drei Plektren in den Ecken des iPads stecken, um zu vermeiden, dass sich der Kleber des Frontpanels wieder verbindet.
-
Erhitze den iOpener erneut und lege ihn auf die übrige lange Seite des iPads entlang der Lautstärke- und Verriegelungstasten.
-
-
-
Setze ein neues Plektrum ein und schiebe es entlang der rechten Kante des iPads herunter und trenne so den Kleber auf.
-
-
-
Schiebe das Plektrum weiterhin die rechte Kante entlang herunter, falls nötig, erhitze die Kante erneut mit dem iOpener.
-
-
-
Lasse die Plektren an Ort und Stelle und erhitze den iOpener erneut.
-
Lege den erhitzten iOpener auf die Seite mit dem Home Button und lasse ihn dort ein paar Minuten, um den Kleber unter dem Glas aufzuweichen.
-
-
-
Setze ein neues Plektrum an der unteren rechten Ecke des Displays ein, und zwar unter dem letzten Plektrum, das du benutzt hast, um die rechte Kante herunter zu schneiden.
-
Schiebe das neue Plektrum um die untere rechte Ecke des Gerätes.
-
-
-
Schiebe das Plektrum von der unteren rechten Ecke an der Unterkante des Gerätes entlang. Halte etwa 1,2 cm kurz vor dem Home Button an.
-
-
-
Setze ein letztes Plektrum an der unteren linken Ecke des iPads ein, direkt unter dem bereits vorhandenen Plektrum.
-
-
-
Schiebe das Plektrum weiterhin an der unteren linken Kante des Displays entlang in Richtung Mitte des iPads, bis es ungefähr 1,2 cm vom Home Button entfernt ist.
-
-
-
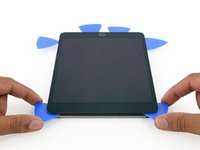
Verdrehe die beiden Plektren an der Oberkante des iPads, um den letzten Kleber abzulösen, der das Display befestigt.
-
Hebe das Display von der Oberkante her ab, um das Gerät zu öffnen.
"Twist the two picks at the top edge of the iPadTwist the two picks at the top edge of the iPad "
When I did this twisting motion, and I thought I was being gentle, one of the picks cracked nearly in half. That adhesive is very strong! I probably did not cut into it far enough before applying the twisting to open the screen.
-
-
-
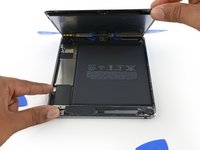
Entferne die vier 1,2 mm Kreuzschlitzschrauben über der Halterung des Akku-/Displaysteckers.
-
-
-
Entferne die Halterung des Akku-/Displaykabels.
Is it the end of the world if the bracket is not reinstalled, will the device function normally or will it eventually have issues with the connectors coming loose following shock?
-
-
-
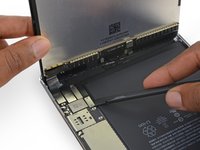
Benutze das flache Ende eines Spudgers, um den Akkustecker von seinem Anschluss auf dem Logic Board zu trennen.
When i was starting to disconnect the lcd to the board i hit the black film and it lit and now even the new display wont display anything how to fix it? The black film near the lcd connector.
-
-
-
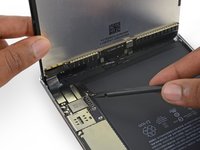
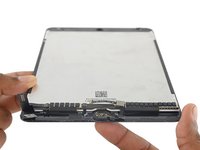
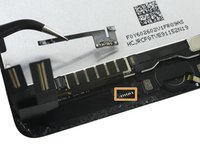
Benutze die Spitze eines Spudgers, um den Stecker des Displaydatenkabels aus seinem Anschluss auf dem Logic Board zu lösen.
-
Benutze die Spitze eines Spudgers, um den Stecker des Touchscreen-Kabels aus seinem Anschluss auf dem Logic Board zu lösen.
-
-
-
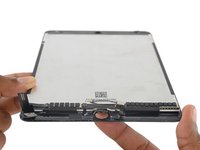
Entferne die Displayeinheit.
Ich habe eine Bücherstütze benutzt um das Display in senkrechter Position zu halten, während ich die vier Schräubchen gelöst habe.. So zieht man nicht so an den Flexkabeln….!
Because the 3-piece adhesive strips shown in the Display Adhesive Application Guide link were different from iPad Mini 4 Adhesive Strips (item code IF316-013-1), it wasn't easy to figure out the exact location of the bottom adhesive. It would be helpful to include a separate application guide or an additional picture showing the exact location of each strip) on the guide.
-
-
-
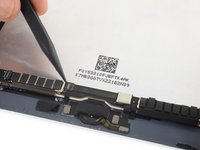
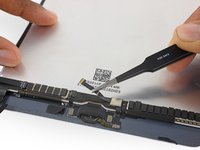
Benutze die Spitze eines Spudgers, um den Halteriegel am Home Button ZIF Anschluss nach oben zu klappen.
-
-
-
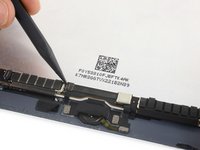
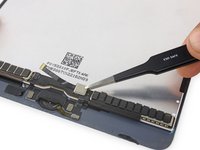
Benutze eine Pinzette, um das Home Button Flachbandkabel aus dem ZIF Anschluss zu lösen.
-
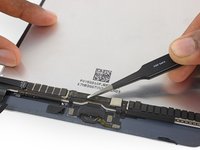
Löse das Kabel bis zur EMI Abschirmung ab.
-
-
-
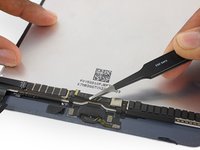
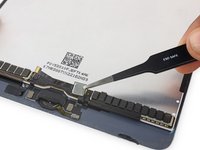
Benutze eine Pinzette, um das Hardware-Kontrollmodul des Home Buttons von der Displayeinheit wegzuheben.
-
-
-
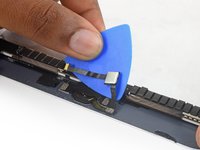
Benutze ein Opening Pick (Plektrum), um weiterhin das Home Button Flachbandkabel von der Displayeinheit zu lösen.
-
-
-
Benutze ein Öffnungswerkzeug aus Plastik, um die Halterung des Home Buttons von der Displayeinheit wegzuhebeln.
The tip about the high-bond tape is great, but high-bond tape is something that should be mentioned at the beginning in the list of supplies we need. Because I have the whole thing taken apart, and now I’m told I need something that I don’t have on hand. So what am I supposed to do, just let everything sit around open, until I get to the store to see if they have some high-bond tape?
-
-
-
Erhitze einen iOpener und lege ihn über die Unterkante des Frontpanels, um den Kleber aufzuweichen, mit dem der Home Button befestigt ist.
-
-
-
Drücke den Home Button langsam nach oben und aus der Displayeinheit heraus, um die Dichtung vom Frontpanel zu lösen.
-
-
-
Entferne die Home Button Einheit.
-
-
-
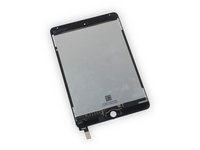
Untersuche dein Ersatzteil und dein originales Display sorgfältig, um sicher zu gehen, dass sie passen.
-
Unter Umständen fehlt bei deinem Ersatzteil der Standby-Sensor, der für die Nutzung von SmartCover notwendig ist. Wenn du diese Funktion beibehalten möchtest, musst du die Komponente übertragen.
-
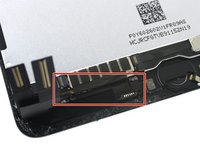
Entlöte die sechs Lötpads unten links am Display, um das Kabel der Sensoreinheit zu entfernen.
This is an important step that’s missed by a lot of people resulting in negative reviews on replacement screens. Screen suppliers never mention this step or people would not buy from them. Save yourself a headache and time and buy a screen-digitizer with the sleep/wake sensor already soldered.
Is there any reason to replace this if you won’t use it? If I don’t move over the old sensor, will it still work? I’ve never soldered something this small and expensive before.
hab es ohne gemacht, da es auch keine lötstellen gibt - seither gibt es gar keine Standyby funktion mehr!
LÖSUNG: in den Systemeinstellungen “anzeige und Helligkeit” Sperren/entsperren deaktivieren.
junk -
Was meinst du damit “weil es keine Lötstellen gibt”? Sind auf deinem neuen Display keine Lötstellen gewesen wo du den Sensor hättest dran löten können?
Funktioniert dein Lösungsweg für dich noch: “anzeige und Helligkeit” Sperren/entsperren deaktivieren“ ?
Ich stehe vor der gleichen Herausforderung und will ungern löten und würde mich über eine Antwort freuen :/
I replace my iPad mini 4 screen-digitizer and did not have to replace this sensor because it did not have one, but the new screen-digitizer came with the sleep/wake sensor in place. Small electronics needs careful and tedious work. Thanks iFixit for the instructions to fix my iPad. I have to mention that I am a technician from the old school.
-


Um dein Gerät wieder zusammenzubauen, folge dieser Anleitung in umgekehrter Reihenfolge.
Um dein Gerät wieder zusammenzubauen, folge dieser Anleitung in umgekehrter Reihenfolge.
Rückgängig: Ich habe diese Anleitung nicht absolviert.
29 weitere Personen haben diese Anleitung absolviert.
Besonderer Dank geht an diese Übersetzer:innen:
100%

Annika Faelker hilft uns, die Welt in Ordnung zu bringen! Wie kann ich mithelfen?
Hier starten ›

4 Kommentare
Not only is that part in step 39 crucial to Smart-Cover function, but the regular sleep/wake function will not work if this isn’t transferred. Wish the replacements were shipped with this part attached, because soldering those tiny points is near impossible to do! Buyer/repairer beware.
Its better to have reassemble instruction, like where i am going to put the new adhesive?
The iFixIt replacement part did not come with adhesive, so I had to reuse the old adhesive that got pulled and torn during removal of the bad screen.
Also, the iFixIt replacement part does not come with the sleep/wake sensor (Step 39). Following my repair, the iPad is no longer capable of going to sleep (neither by the button on top nor through AssistiveTouch), so we have to resort to waiting for the lock screen timer to turn the screen off whenever we’re done using it. I feel the soldering that is required to maintain this functionality (I would imagine it would need a millimeter-diameter drop of solder on six contacts that are then pressed together with the transplanted part to form the bond without solder spilling onto a neighboring contact) is not within the capability of most casual repairers.
If I were to do this repair again, I would find a part that has fresh adhesive and the sleep/wake sensor already attached.
My kit did come with the adhesive, but it's a little tricky to figure out (and there is an embedded link to the adhesive). Needs some more pictures/pointers about re-installing the home button, ended up with a gap in the adhesive near the home button. Also, tips on how to remove shattered glass? Otherwise, thanks for the tutorial, looks new.