Einleitung
クリックホイールは、指からの指令を受け取り、ロジックボードに伝達します。
Was du brauchst
-
-
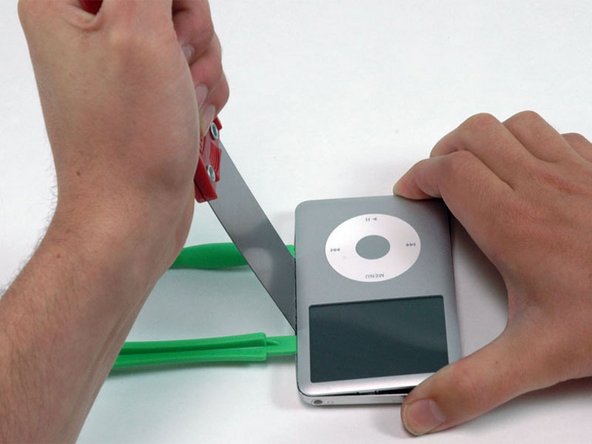
プラスチック製オープニングツールをiPodの表面と裏面の間の継ぎ目に差し込みます。
right here, you should insert a picture of the little clips on the rails inside the back of the ipod, so that we can visualise what we're trying to undo, & get a better idea of which way to bend, which way NOT to bend the tools.
Good point! There is such a picture showing the location of at least four (4) clips on each side of the case here:
https://d3nevzfk7ii3be.cloudfront.net/ig...
in the Step 4 of the “iPod Classic Teardown”: iPod Classic Teardown
As mentioned below by Kevin M there are 3 more (1 on top and 2 on the bottom sides).
LDS -
Actually it’s a wayyyyyyy easier using the iFlash opening tool and following the pdf of this guy (youtube link)
Actually it’s wayyyyyy easier using this tool as mentioned by this awesome guy on his video.
That video is excellent. He has a PDF you print which is the same size as the iPod so you know exactly where the 11 clips are (1 on top, 2 on bottom, and 4 more along each side).
Appreciated the earlier comment about using guitar picks. It is very easy to open the iPod with guitar picks. It still requires patience sometimes, but no noticeable damage to the iPod. Went to the local music store, they stocked Fender picks. Fender "Thin" work best for me for starters, but sometimes Fender "Medium" are needed. (Go to your local music store-- very cheap!) I have opened (and repaired successfully!) four different iPods just using guitar picks.
-
-
-
iPodの表面と裏面の間の継ぎ目に、もう一つのプラスチック製開口ツールを差し込みます。そして、2つのツール間に少なくとも4cm弱程度のスペースを空け、ツールをそのままの状態にします。
-
-
-
パテナイフを2つの開口部ツールの継ぎ目に、慎重に斜めの角度で3mm程度挿入します。
-
パテナイフでリアパネルの外縁を外せたら、パテナイフを垂直にして、慎重に(かつ、時間をかけてしっかりと)パテナイフを開口部に差し込んでいるツールと本体の隙間に真っ直ぐ差し込みます。
I tried this on the first iPod I was trying to fix. This method really messes up the sides of the iPod. Go back and read earlier comments about using guitar picks or other tools!
I tried this on the first iPod I was trying to fix. This method really messes up the sides of the iPod. Go back and read earlier comments about using guitar picks or other tools!
-
-
-
パテナイフの後ろのリアパネルを指で押しながら、変形しないようにします。画像のようにパテナイフをゆっくりと曲げて、iPod側面のメタル製タブの大部分を外します。
I tried this on the first iPod I was trying to fix. This method really messes up the sides of the iPod. Go back and read earlier comments about using guitar picks or other tools!
-
-
-
ディスプレイ中央付近で、プラスチック製開口ツールで作った隙間に、メタル製スパッジャーをゆっくりと差し込みます。
-
メタル製スパッジャーを使って、iPod上部にある1つのクリップを外します。
-
-
-
上部コーナーから開口ツールを取り出し、iPodの表面と裏面の間の継ぎ目に差し込みます。その際、2つのツール間に少なくとも約3.8cmのスペースを空けます(反対側と同じように)。
-
-
-
斜めの角度にして、パテナイフを2つの開口ツールの継ぎ目に3mm程度ほど差し込みます。
-
パテナイフでリアパネルの外縁が外れたら、パテナイフが垂直になるように角度をつけ、慎重に(しかし確実に)、プラスチック製開口ツールの隙間を通して、iPodの中にまっすぐ差し込みます。
-
パテナイフの後ろのリアパネルを指で押して、曲がらないように固定します。パテナイフを少しだけ曲げて、iPodのこちら側のメタルタブの全体を外します。
-
-
-
-
片手でフロントパネルアセンブリを掴み、もう片方の手でリアパネルを掴みます。
-
2つのコンポーネントを同時に接続しているリボンケーブルにダメージを与えないよう細心の注意を払いながら、フロントパネルの上部とリアパネルの上部を互いに(ヒンジとしてのiPodの底部を考えてください)引き離して、リアパネル上の残りのクリップを慎重に外します。
-
-
-
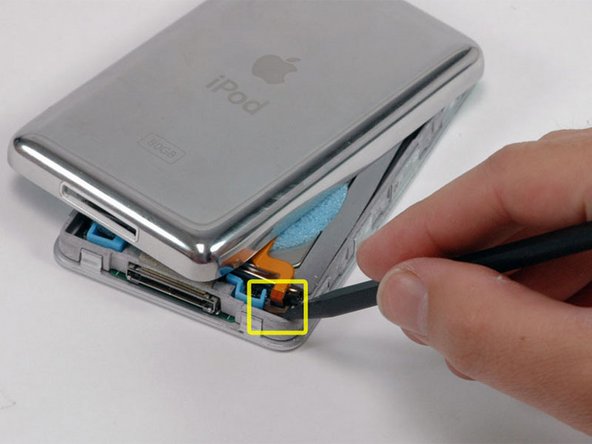
スパッジャーを使って、オレンジ色のバッテリーリボンを固定しているコネクタを上部にスライドします。ケーブルを解放するには、ロッキングバーを約2mm持ち上げるだけで十分です。
-
コネクタからオンレジ色のバッテリーリボンをスライドして、取り出します。
If the small battery black/white connector pumps out of the ipod when you are trying to unplug the cable...REMEMBER the "U" black shape is meant to be just in the same direction as the blue plastic "U" beside it. If you plug it back in the wrong way it will display "Charging please wait..." forever!.
:)
How did you get the black battery piece to stay in after it popped out?
I knocked this little bit out too! Any tips to get it back in? Soldering?
This step is what ultimately destroyed my iPod. A caution to be very careful would be good.
I got the whole black white thing disconnected from the pins. After a lot of struggle I was able to get it back in, but I couldn’t get the black locking part to go up on its own. after many tries and some tries to get it in when the black thing is closed, i tore out the pins that were connected to the panel. can’t get it back on so it isn’t connected to the battery…
Now i have a perfect iPod with a new harddrive but I can’t use it.
Please add a red caution sentence because I’m pretty sure that if i had known what I had to do I would’ve been more careful and I would now have a functioning iPod.
Nonetheless, great guide! without this I wouldn’t even have tried and the harddisk came from another broken down iPod classic so it’s not that I lost money.
I got the whole battery clamp connector (black and white) all out too… So angry about it! I thought that the white part should be disconnected too, like former iPod models. Be careful, you only have to release the BLACK locking bar! One more photo with a zoom on the battery connector could have been useful… Great guide anyway :-)!
battery connector fix
Hello! Trying to identify the problem on my Ipod. I think I'm not qualified to open it and do the fixing. Do you know a shop or someone in Paris that would try it? Apple says they are not qualified anymore.
Thanks in advance!
OK, you have to be really careful with this step! If you pry too hard, the little plastic clamp that holds the cable will come up too far and break, and then you are ****ed. It only needs to be raised millimeter or two, but at first, it doesn't move at aIl, so it is easy to pry upwards too hard. I have found that using angled tweezers while VERY GENTLY prying upwards on both sides works best. But still, BE VERY CAREFUL AND GENTLE! It's also easy not to even know that it is up all the way! So every now and then try gently lifting the ribbon cable to see if it is already released.
-
-
-
ハードドライブを片手で持ち上げて、下にあるヘッドフォンジャックのリボンにアクセスできるようにします。
-
ヘッドホンジャックのリボンを固定しているプラスチックのタブをスパジャーでこじ開けます。タブを90度上に回転させ、リボンケーブルを外します。
-
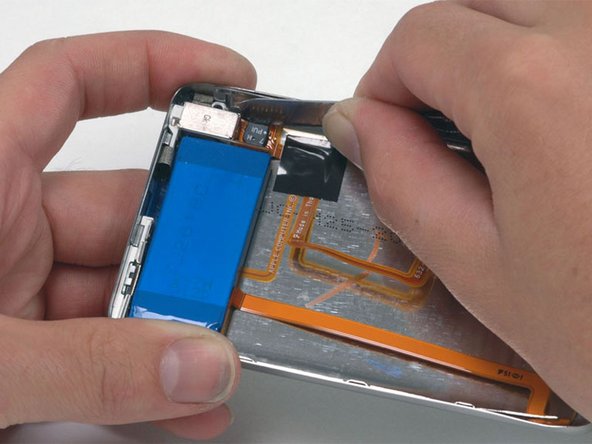
オレンジ色のヘッドフォンジャックリボンをスライドさせて、コネクタから外します。
-
これでリアパネルがiPodから外れました。
-
-
-
さて、iPod Classicの内部コンポーネントを解放することによって生じたダメージを修理しましょう!下部ケースのメタル製クリップの少なくとも一つは上向きに曲がっている可能性が高いです。これらのクリップは、リアパネルに再度取り付けるために、全て下向きにしなければなりません。
-
-
-
フレームワークからハードドライブを回転させて外し、コネクタが上向きになるように置きます。
-
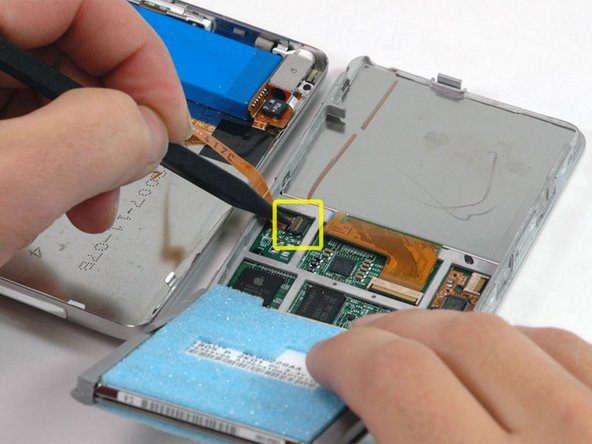
スパッジャーを使って、オレンジ色のハードドライブリボンを固定しているプラスチック製タブを跳ね上げます。リボンケーブルを解放しながら、タブを90度上向きに回転させます。
To be clear, the plastic tab to be flipped up is the SMALL BLACK piece shown vertically in the photo above. The spudger is pointing directly to it. The tab flips TOWARDS the ribbon. While the picture is correct, this wasn’t obvious to me.
Thanks for the feedback! I will adjust the wording to clarify this.
-
-
-
オレンジ色のハードドライブリボンケーブルをスライドして、コネクタから直接取り出します。
-
iPodのハードドライブを交換する際に、ゴム製のマウントブラケットとフォームパッドが付属していない場合は、これらのパーツを古いドライブから交換用のドライブに移植してください。
-
-
-
フロントパネルをメタル製フレームワークに固定しているプラスネジを3本外します。
See here, it’s a PH00.
-
-
-
iPod端付近に注意深く手を進め、グレーのメタル製フレームワークからフロントパネルを離します。
I would suggest prying with a tool on one of the lips that holds the front place on, but do NOT pry on one near the LCD screen or you may damage the screen. Also, don't forget there is an extra small latch on the top of the LCD that has to be loosened too.
I pressed gently on the click wheel on the play botton side first to help unlock the glue. Keep away from the screen side best you can.
After reading all your warnings and how risky it is to damage my IPOD I don’t dare to replace the display which got out of light and I no longer see the text. I planned to send for a new but it seems like the possibility to succeed without damaging the IPOD is less than succeeding. It is really a pity since I love it snd have so much good music saved to it. I usually fix my damaged apparatus but this seems more orf ess impossible after reading the text. I am really sad/devastated!! :
-
-
-
スパッジャーを使って、オレンジ色のディスプレイリボンを固定しているプラスチック製タブを跳ね上げます。リボンケーブルを解放しながら、ディスプレイ側にタブを90度上向きに回転させます。
-
-
-
クリックホイール上のアイコンが見えるように、ロジックボードの下からクリックホイールを動かします。
-
スパッジャーを使って、オレンジ色のディスプレイリボンを固定しているプラスチック製タブを跳ね上げます。リボンケーブルを解放しながら、タブを90度上向きに回転させます。
-
-
-
スパッジャーを使用して、クリックホイールケーブルをロジックボードから持ち上げます。 ケーブルを過度に曲げないように注意してください。ケーブルを曲げると、電子機器が損傷する場合があります。
-


ケースを閉じる前に、必ずデバイスをテストして、正しく動作するか確認してください。
デバイスを再度組み立てるには、この説明書の逆の順番で組み立ててください。
ケースを閉じる前に、必ずデバイスをテストして、正しく動作するか確認してください。
デバイスを再度組み立てるには、この説明書の逆の順番で組み立ててください。
Rückgängig: Ich habe diese Anleitung nicht absolviert.
53 weitere Nutzer:innen haben diese Anleitung absolviert.
Besonderer Dank geht an diese Übersetzer:innen:
100%


Diese Übersetzer:innen helfen uns, die Welt zu reparieren! Wie kann ich mithelfen?
Hier starten ›

6 Kommentare
Thanks ifixit.com
Waiting on parts. Will update when finished.
I replaced the clickwheel and now it isnt responding when i click or try to use the clickwheel.
Did you ever figure out why? Mine is doing the same thing. Thanks!
If you're meticulous, the job can perfectly be done, without any of the recommended tools. I hadn't the time to order them, so I opened my iPod with the large blade of my Victorinox swiss army knife. By just following the instruction I succeeded in releasing all of the metal tabs all around the iPod, and didn't damage any of them. You can clearly hear them "declipsing". I think the blade of the Victorinox is thiner than the putty knife, the only thing you have to take care of, is not to cut the black or silver painting of the front of the case, but if you are used to cut with a knife, you should succeed. Just be aware that it is however a difficult job !
jcfsystems - Antwort
Thank you for these instructions - my dead iPod classic (that died whilst attached to an ipod dock during a heavy thunderstorm which took out the dock too) is now working again. Opening the case took me 40 minutes and 7 plastic case openers not to mention very sore hands but the rest of the process worked fine. thanks again
Stuart Hutchesson - Antwort
Opened it up with MANY super thin nylon guitar picks in less than a minute starting from the two tabs on the bottom - I used the putty knife in my shop for wood filler and patching walls :)
cmguitar - Antwort
Appreciated the earlier comment about using guitar picks. It is waaaaaay easier to open the iPod with guitar picks. It still requires patience sometimes, but no noticeable damage to the iPod. Went to the local music store, they stocked Fender picks. Fender "Thin" work best for me for starters, but sometimes Fender "Medium" are needed. (Go to your local music store-- very cheap!) I have opened (and repaired successfully!) four different iPods just using guitar picks.
Novice iPod Repair Guy - Antwort