Zum Hauptinhalt wechseln
Gemeinsam reparieren - Jetzt registrieren

HP Envy Battery Replacement

Was du brauchst

  1. HP Envy Battery Replacement, Battery: Schritt 1, Bild 1 von 1
    • Plug in your computer to charge and take a look at the light coming from near the charging port.

    • If the light is a steady orange or white, your computer should be charging normally and this guide is no longer necessary.

    • If the light is a blinking white, your computer is not charging properly and you should proceed to the next step.

    Frag FixBot

    Kommentar hinzufügen

  2. HP Envy Battery Replacement: Schritt 2, Bild 1 von 1
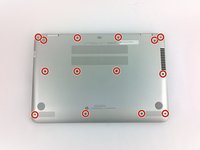
    • Flip the laptop over on its back and remove the two depressed stickers in the middle to reveal the two central 6.0 mm Phillips-head screws.

    Frag FixBot

    Kommentar hinzufügen

  3. HP Envy Battery Replacement: Schritt 3, Bild 1 von 1
    • Use a spudger to pry up the two rear feet near the hinge.

    • You don't need to pry up the two feet near the front of the laptop as there are no screws underneath them.

    Frag FixBot

    Kommentar hinzufügen

  4. HP Envy Battery Replacement: Schritt 4, Bild 1 von 3 HP Envy Battery Replacement: Schritt 4, Bild 2 von 3 HP Envy Battery Replacement: Schritt 4, Bild 3 von 3
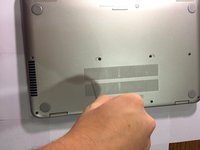
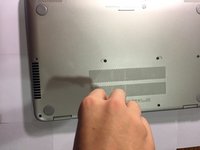
    • Use a Phillips screwdriver to remove the 14 screws securing the back cover.

    Frag FixBot

    Kommentar hinzufügen

  5. HP Envy Battery Replacement: Schritt 5, Bild 1 von 3 HP Envy Battery Replacement: Schritt 5, Bild 2 von 3 HP Envy Battery Replacement: Schritt 5, Bild 3 von 3
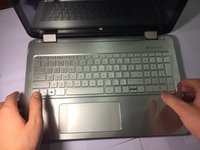
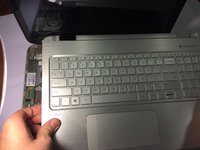
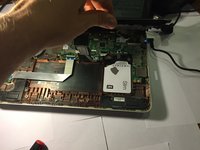
    • Once all of the screws have come out, flip the laptop over and open the lid so that the keyboard is face up.

    • Pop the keyboard from the sides and carefully lift it off of the parts underneath.

    • DO NOT pull the keyboard away from the rest of the laptop too quickly. There are various cords and wires connecting the keyboard section to the rest of the computer that should remain plugged in.

    Frag FixBot

    Kommentar hinzufügen

  6. HP Envy Battery Replacement: Schritt 6, Bild 1 von 1
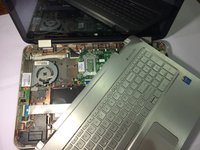
    • Carefully lay the keyboard section against the open screen of your laptop without unplugging anything.

    • Check the inside of your laptop to make sure there are no glaringly obvious problems (insects, missing parts, scorched parts).

    Frag FixBot

    Kommentar hinzufügen

  7. HP Envy Battery Replacement: Schritt 7, Bild 1 von 3 HP Envy Battery Replacement: Schritt 7, Bild 2 von 3 HP Envy Battery Replacement: Schritt 7, Bild 3 von 3
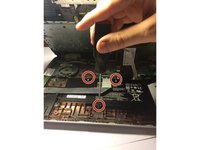
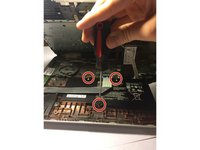
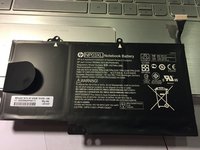
    • Locate the battery and the three 4.0 mm Phillips-head screws that hold it in place.

    • Unscrew these three screws and use the tab attached to the battery to remove it safely from the laptop.

    • Unplug the cord attaching the battery to the motherboard. This is the only cord that should be unplugged throughout the entire fix.

    Frag FixBot

    Kommentar hinzufügen

  8. HP Envy Battery Replacement: Schritt 8, Bild 1 von 2 HP Envy Battery Replacement: Schritt 8, Bild 2 von 2
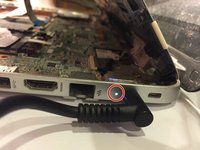
    • Once the battery is safely removed, plug the charging cord into the charging port on the side and plug the other end into the wall.

    • DO NOT turn the computer on or touch any of the internal components during this step.

    • If the light is on after plugging it in, you have just confirmed that something is wrong with the battery, which means you're on the right track!

    • If the light on the side blinks upon plugging it in, the battery is not the problem. If that is the case, put your laptop back together and consult an expert.

    • Unplug the charging cable.

    Frag FixBot

    Kommentar hinzufügen

  9. HP Envy Battery Replacement: Schritt 9, Bild 1 von 3 HP Envy Battery Replacement: Schritt 9, Bild 2 von 3 HP Envy Battery Replacement: Schritt 9, Bild 3 von 3
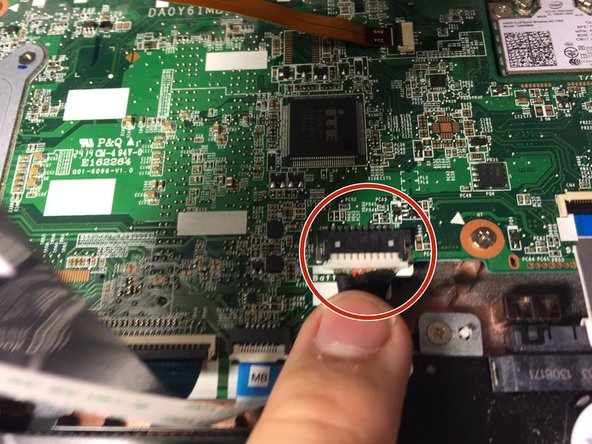
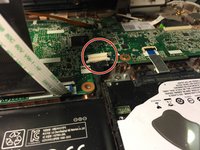
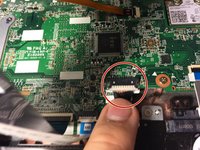
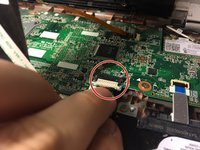
    • Place the battery back where it was previously and find where it was plugged in.

    • Due to general wear and tear, often this will become slightly unplugged, causing the laptop to fail to charge properly.

    • Plug the cable on the battery back into the port on the motherboard and make sure it is secured.

    Frag FixBot

    Kommentar hinzufügen

  10. HP Envy Battery Replacement: Schritt 10, Bild 1 von 1
    • Run the earlier test from Step 7 that you performed on the laptop with the battery inside.

    • DO NOT turn the computer on or touch any of the internal components during this step.

    • If the light comes on and doesn't blink, you have fixed the problem! Congratulations!

    • If the light still blinks, you may have to purchase a new battery for your laptop.

    Frag FixBot

    Kommentar hinzufügen

Abschluss

To reassemble your device, follow these instructions in reverse order.

Rückgängig: Ich habe diese Anleitung nicht absolviert.

20 weitere Personen haben diese Anleitung absolviert.

Team

Cal Poly, Team 17-2, Green Fall 2015 Mitglied von Cal Poly, Team 17-2, Green Fall 2015

CPSU-GREEN-F15S17G2

4 Mitglieder

31 Anleitungen geschrieben

9 Kommentare zur Anleitung

In addition to the screws shown there are two screws under the pads close to the hinges. Pry the pads off and remove the screws under them. Then follow the instructions.

Tom D

Tom - Antwort Teilen

can you tell me the name of the battery ?

عبدالسلام محمد - Antwort Teilen

Worked like a gem. Now my battery is even charging. There must be a loose connection between the battery and mother board. Double thumbs up to you!

ganesh_sarma478 - Antwort Teilen

Agree with Tom - I put the comment under the step where the screws are.

Sean C - Antwort Teilen

This worked like a charm for me. Thank you for posting!! followed directions exactly, so easy to follow. The only trouble I had was getting the keyboard detached. It was really stuck on there, but I eventually got it. Battery is charging as we speak.

julieb6148 - Antwort Teilen

Kommentar hinzufügen

Seitenaufrufe:

Letzte 24 Stunden: 4

Letzte 7 Tage: 39

Letzte 30 Tage: 157

Insgesamt: 51,658