Diese Übersetzung enthält möglicherweise noch nicht die neuesten Änderungen der Original-Anleitung. Hilf mit, die Übersetzung zu aktualisieren oder sieh dir die Original-Anleitung an.
Einleitung
Heizt sich das Innere deines MacBook Pro mit Retina Display zu sehr auf? Das könnte auf ein Problem mit dem Kühlkörper hinweisen. Benutze diese Anleitung, um den Kühlkörper aus deinem MacBook Pro 15" Retina Display Ende 2013 zu entfernen.
Vergiss nicht die alte Wärmeleitpaste zu entfernen und neue aufzutragen, wenn du den Kühlkörper entfernst. Folge dieser Anleitung um zu erfahren, wie das funktioniert.
Was du brauchst
-
-
Entferne die folgenden P5-Pentalobe-Schrauben, mit denen das Gehäuseunterteil am MacBook Pro befestigt ist:
-
Acht 3,0 mm Schrauben
-
Zwei 2,3 mm Schrauben
-
-
-
Hebe das Gehäuseunterteil von der Kante aus, die der Kupplungsabdeckung am nächsten liegt, vom MacBook Pro ab.
-
Lege das Gehäuseunterteil beiseite.
-
-
-
-
Heble den Akkuanschluss mit dem flachen Ende eines Spudgers vorsichtig aus seiner Buchse auf dem Logic Board heraus.
-
Biege die Akkukabel nach hinten und aus dem Weg, so dass der Akkuanschluss nicht versehentlich mit dem Logic Board in Kontakt kommt.
-
-
-
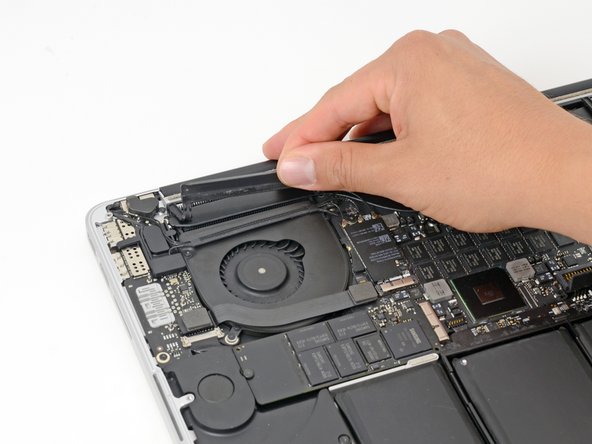
Führe das flache Ende eines Spudgers unter die Gummi-Kühlkörperabdeckung des rechten Lüfters.
-
Schiebe den Spudger längs unter der Abdeckung her und löse den Kleber.
-
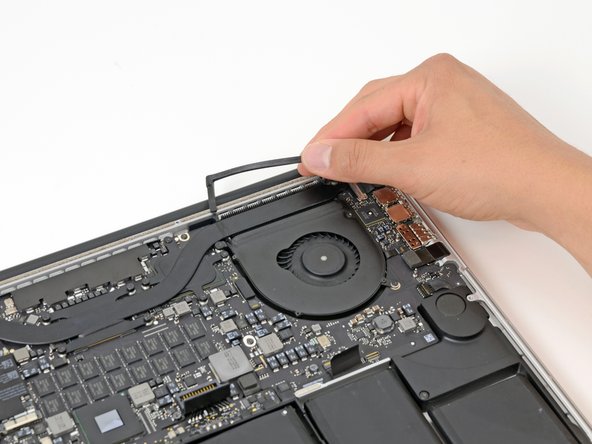
Hebe die Abdeckung an und drehe diese vom Kühlkörper weg.
-
-
-
Verfahre auf die gleiche Weise wie oben beschrieben mit der Kühlkörperabdeckung auf dem linken Lüfter.
-
-
-
Entferne die folgenden sechs Schrauben, die den Kühlkörper am Logic Board befestigen:
-
Eine 5,5 mm T5 Torx Linsenkopfschraube
-
Vier 3,5 mm T5 Torx Schrauben
-
Eine 3,8 mm silberne T5 Torx Schraube
-
-
-
Fasse den Kühlkörper von einer Seite, hebe ihn vom MacBook Pro hoch und entferne ihn.
-


Um das Gerät wieder zusammenzubauen, befolge diese Anweisungen in umgekehrter Reihenfolge.
Um das Gerät wieder zusammenzubauen, befolge diese Anweisungen in umgekehrter Reihenfolge.
Rückgängig: Ich habe diese Anleitung nicht absolviert.
31 weitere Nutzer:innen haben diese Anleitung absolviert.
Besonderer Dank geht an diese Übersetzer:innen:
87%


Diese Übersetzer:innen helfen uns, die Welt zu reparieren! Wie kann ich mithelfen?
Hier starten ›

12 Kommentare
Performed today on 3 yrs old Retina 15" with integrated Iris Pro 5200. Temperatures dropped considerably, both during idle and load periods, but BE AWARE, if you pass control to the fans via i.e.: smsFanControl, during testing laptop reaches abnoxious temperatures (98C) - what it seems is that when smcFanControl is taking over, also throttling is turned off, therefore, when temperature rised you need to rise fan rpm (during Geekbench 3 I set it at the end to the 3800rpm from 2500rpm it was and this dropped immediately from 98C to 70C). When SmcFanControl is set to Default, MAC UEFI controls fans and - what is funny - when load exceeded reasonable thresholds, (one core reached 92C) it throttled (probably) because without much rpm raise - this dropped temps to 75C (Default setting did at critical point two things: a) from 2160 rpm to 2890rpm and b) throttle ... what ended in immediate drop to 75C). Keep that in mind.
In this aspect I consider this as a smarter management.
One of the screw thread used to tighten the spring-clamp holding the cpu in place has detached from the motherboard. Is it possible to repair this, and if not, is it fine to hold the cpu with only one spring clamp ? Thanks a lot !
Hopefully you are still around the forums these days.
You usually can fix something like that if it was soldered to the board, with simple solder and something to hold it in place. However if it was riveted to the board you may have another problem, of which I do not know how to solve. You happen to have a picture?
The image in Step 7, and the offered replacement part are wrong! In all images except step 7 you are showing the correct hardware, whitha heat pipe including cpu and discrete graphics plates. But in step 7, and in the replacement part offering you show a heat pipe containing only one plate! Please correct this? Where do I get a replacement heat pipe for my macbook containing adiscrete graphics chip? Thank you very much!
I want to know this as well. That said, I don’t really see the need to replace the heat sink. What’s the problem is that the thermal paste has dried up and no longer conducts as it used to. So simply removing the old heat sink, scraping off the paste and re-applying new paste should do the job just fine. I don’t see in what way the heatsink itself should go ‘bad’.