Zum Hauptinhalt wechseln

Motorola Moto Z2 Force Displayeinheit und Fingerabdrucksensor tauschen

Hinweis: Du bearbeitest gerade eine grundständige Anleitung, die Teil der Anleitung ist, die du eben angeschaut hast. Alle Änderungen, die du vornimmst, betreffen alle 6 Anleitungen, die diese grundständige Anleitung beinhalten.

Englisch
Deutsch
Schritt 2
Motorola Moto Z2 Force Display and Fingerprint Sensor Replacement, Release the Screen Assembly: Schritt 0, Bild 1 von 3 Motorola Moto Z2 Force Display and Fingerprint Sensor Replacement, Release the Screen Assembly: Schritt 0, Bild 2 von 3 Motorola Moto Z2 Force Display and Fingerprint Sensor Replacement, Release the Screen Assembly: Schritt 0, Bild 3 von 3
Release the Screen Assembly
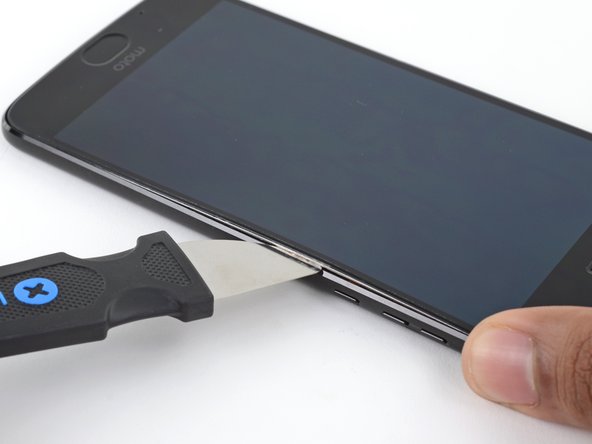
  • Insert a Jimmy or other metal tool between the right side of the plastic display and the metal frame, near the phone's side buttons.

  • This may require a considerable amount of force. Push the tool as far down into the gap as you can, taking care to not scratch the chassis of your device in the process.

  • Tilt the Jimmy downward while continuing to push it deeper into the gap to pry up the right side of the screen assembly.

  • Since the display on top of the screen assembly is flexible and only attached with a slight amount of adhesive, you may end up prying up only the display instead of lifting the entire assembly. If this occurs, remove the tool and try again, this time using more downward force to get underneath the entire assembly.

  • Ensure your tool is behind the entire screen assembly and not just the display. If done correctly, you should notice the thin silver metal midframe come up with the plastic display (as pictured).

Setze einen Jimmy oder ein anderes Metallwerkzeug zwischen der rechten Seite des Plastikdisplays und dem Rahmen nahe an den Seitentasten des Smartphones ein.

Das kann recht viel Kraft erfordern. Drücke das Werkzeug so tief wie möglich in den Spalt hinein, achte aber darauf, dass der Rahmen des Gerätes dabei nicht zerkratzt wird.

Kippe den Jimmy nach unten und drücke ihn gleichzeitig tiefer in den Spalt hinein, so dass die rechte Seite der Displayeinheit hochgehebelt wird.

Da die oberste Schicht des Displays flexibel und nur leicht verklebt ist, kannst du versehentlich diese Schicht vom Rest des Displays lösen, anstatt die ganze Einheit anzuheben. In diesem Fall musst du das Werkzeug entfernen und erneut mit größere Kraft nach unten hineindrücken.

Achte darauf, dass sich das Werkzeug wirklich ganz hinter der Displayeinheit befindet und nicht nur unter dem Display. Wenn du es richtig gemacht hast, dann kannst sehen, wie der dünne silberfarbene metallene Mittelrahmen zusammen mit dem Plastikdisplay, wie im Bild gezeigt, nach oben kommt.

Deine Beiträge sind lizenziert unter der Open-Source Creative Commons Lizenz.