Diese Version enthält möglicherweise inkorrekte Änderungen. Wechsle zur letzten geprüften Version.
Einleitung
Die obere Abdeckung deiner Xbox 360 E muss entfernt werden, damit du in deine Xbox zu gelangen und so andere Teile wie das CD-Laufwerk oder das Motherboard ersetzen kannst.
Was du brauchst
-
Dieser Schritt ist noch nicht übersetzt. Hilf mit, ihn zu übersetzen!
-
Push the Spudger into the crevice between the grated top panel of the Xbox and the bottom body with the rubber feet.
-
Pull back on the spudger like a lever, keeping it pressed firmly into the crevice.
-
-
Dieser Schritt ist noch nicht übersetzt. Hilf mit, ihn zu übersetzen!
-
Slide the spudger along the separation you have created between the grated panel and the bottom body of the Xbox.
-
Periodically pull back on the spudger like a lever, keeping it pressed firmly into the crevice.
-
-
Dieser Schritt ist noch nicht übersetzt. Hilf mit, ihn zu übersetzen!
-
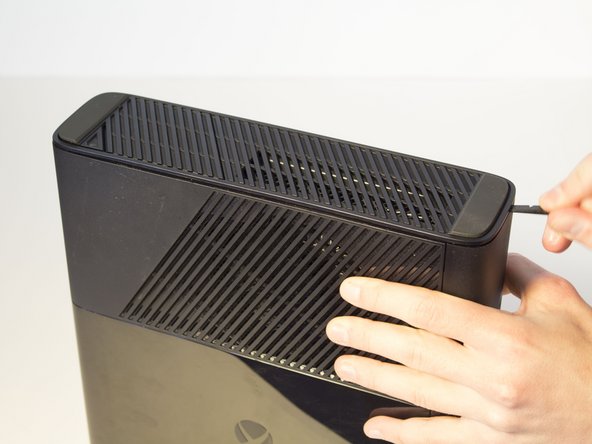
Continue sliding the spudger along the perimeter of the left grated face of the Xbox.
-
Pull the top panel off.
-
-
Dieser Schritt ist noch nicht übersetzt. Hilf mit, ihn zu übersetzen!
-
Remove the 11 mm screw left of the green wifi-card using the T9 Torx screw bit.
-
-
Dieser Schritt ist noch nicht übersetzt. Hilf mit, ihn zu übersetzen!
-
Push the spudger into the crevice between the right grated face and the top body of the Xbox. It's easier to begin away from the vent.
-
Pull up on the spudger like a lever, keeping it pressed firmly into the crevice.
-
-
Dieser Schritt ist noch nicht übersetzt. Hilf mit, ihn zu übersetzen!
-
Slide the spudger along the crevice to separate the grated face and the top body.
-
-
-
Dieser Schritt ist noch nicht übersetzt. Hilf mit, ihn zu übersetzen!
-
Wiggle the spudger in the crevice as you slide the spudger to loosen the bottom plate.
-
Slide the spudger along the crevice, going completely about the perimeter of the bottom panel.
-
Pull the bottom panel off.
-
-
Dieser Schritt ist noch nicht übersetzt. Hilf mit, ihn zu übersetzen!
-
In front of the CD drive you will find the Xbox logo. Press on the area left of the Xbox logo, and the disk tray panel will pop off.
-
-
Dieser Schritt ist noch nicht übersetzt. Hilf mit, ihn zu übersetzen!
-
Beginning on the left side without the grate, run the spudger along the crevice until you've reached the grated part, while holding the part that's being separated as you go.
-
-
Dieser Schritt ist noch nicht übersetzt. Hilf mit, ihn zu übersetzen!
-
Keep holding the partially separated panel open. It's easiest to do this by wedging a spudger into the opening but can also be held open by your hands.
-
Rotate the Xbox to the left to locate the clip connecting the front panel to the body. Insert the spudger inside the gap to release the clip. This may require wiggling the spudger. The clip will pop off, making the front panel looser.
-
-
Dieser Schritt ist noch nicht übersetzt. Hilf mit, ihn zu übersetzen!
-
Flip the Xbox so the opposite side is towards you. Make sure to keep the separation open.
-
Locate the other clip and insert the spudger to remove it.
-
-
Dieser Schritt ist noch nicht übersetzt. Hilf mit, ihn zu übersetzen!
-
Continue to run the spudger along the crease to release any further clips that may still be attatched.
-
Now that the front panel has been released from its clips you can pull off the front panel.
-
-
Dieser Schritt ist noch nicht übersetzt. Hilf mit, ihn zu übersetzen!
-
Find the brown section where the ribbon cable enters the green board. Flip the brown part up and pull out the plastic tab at the end of the ribbon.
-
-
-
Richte die Xbox so aus, dass die untere Abdeckung nach oben zeigt. Stelle sicher, dass du die Gummifüße siehst, damit du weißt, dass du die richtige Seite des Geräts vor dir hast.
-
Hebe die untere Abdeckung in einem Winkel von 45 Grad leicht vom Gerät weg.
-
-
Dieser Schritt ist noch nicht übersetzt. Hilf mit, ihn zu übersetzen!
-
Rotate the Xbox so you are now looking at the back of the device.
-
Remove the sticker from the back of the Xbox.
-
-
Dieser Schritt ist noch nicht übersetzt. Hilf mit, ihn zu übersetzen!
-
Turn the Xbox to the left to locate the clip holding the body together.
-
With a spudger, press up on the clip like a latch. Move to the far end to undo the other clip the same way.
-
-
-
Drücke den Spudger in den Spalt. Schiebe den Spudger an der senkrechten Spalte entlang, um die letzte Klammer zu lösen. Die untere Abdeckung sollte dann herausrutschen.
-
-
-
Entferne die fünf langen schwarzen 55 mm Schrauben mit der Bezeichnung C2-5 und C7 mit einem T9 Torx Schraubendreher.
-
Drehe das Gerät vorsichtig um und ziehe die Abdeckung ab, indem du sie von dem Metallteil abhebst, das an der Kunststoffaußenseite angebracht ist.
-


Befolge diese Anweisungen in umgekehrter Reihenfolge, um dein Gerät wieder zusammenzubauen.
Befolge diese Anweisungen in umgekehrter Reihenfolge, um dein Gerät wieder zusammenzubauen.
Rückgängig: Ich habe diese Anleitung nicht absolviert.
19 weitere Nutzer:innen haben diese Anleitung absolviert.
Besonderer Dank geht an diese Übersetzer:innen:
100%


Diese Übersetzer:innen helfen uns, die Welt zu reparieren! Wie kann ich mithelfen?
Hier starten ›
Team

Cal Poly, Team 2-11, Amido Winter 2014 Mitglied von Cal Poly, Team 2-11, Amido Winter 2014
CPSU-AMIDO-W14S2G11
4 Mitglieder
43 Anleitungen geschrieben
2 Kommentare
Thank you for sharing your instructions. I'd just like to ask if dismantelling the Xbox and cleaning out dust and dirt would help with the overheating message problem that I have? I know that there are videos etc on how to redo the solder connection that often leads to this fault, but my soldering skills are a bit "rusty" ! Do you have any other suggestions for this fault?
De - dusting certainly wouldn't hurt.